Edited (6/2/25) to add: I figured out how to do error checking! I’ve included details below and updated the shared Shortcut.
Edited (3/2/25) to add: I had the file encoding command incorrect below! It’s now correct.
Everybody’s got a line, and Meta crossed mine a while back. It’s time to extricate my data and my attention from their greedy, fascist-enabling claws. I spent the last couple days using an Apple Shortcut to migrate all of my Instagram posts over to WordPress posts on this blog, and I’m in the process of shutting down the Insta account entirely. If you’d like to do the same, I’ll show you how.
Why a Shortcut? Well, I did some research first to see if there was a plugin or service that could migrate the posts for me. Unfortunately, I didn’t find much. This plugin on Github looked like the perfect thing, but it hasn’t been updated in six years since Instagram got it shut down. I also found Intagrate – and would have been willing to pay for it – but spotted this alert at the top of the page: “Due to Instagram API changes, only Instagram Creator and Business accounts can be connected to the plugin.” Most likely that means I wouldn’t have any luck trying to use the API myself, either by fixing the old plugin or writing my own.
And then I thought about the Apple Shortcuts I wrote recently for making posts straight from my phone. I already know how to upload media to WordPress and then use it to create posts. Why not use that to do the export? I just needed my Instagram data in some format that the Shortcut could parse.
Step 1 – Request my Instagram archive
To get to my Instagram data, I had to go to the Meta Accounts Center and click on “Your information and permissions.” Then I clicked on the “Download your information” option. Then I clicked on the “Download or transfer information” option in the box that pops up. I selected my Instagram profile and “Some of your information.” Then I selected the option to just download my “Content.” (There’s a ton of other information in there like Fundraisers and Followers and Messages and whatnot, but I only cared about my content.) Then I selected the option to “Download to device.” The final step was to select my download options:
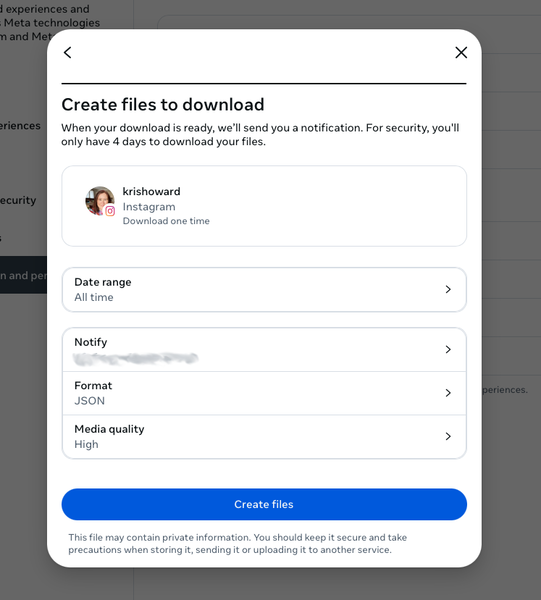
I requested “All time” for the date range, “JSON” for the format, and “High” for the media quality. Once I submitted the request, it took a little while for the file to be prepared. They sent me an email once it was ready and I downloaded it.
The archive itself is pretty straightforward. The details of all my posts were in your_instagram_activity/content/posts_1.json. All of the actual images were in media/posts and then organised in folders by month/year.
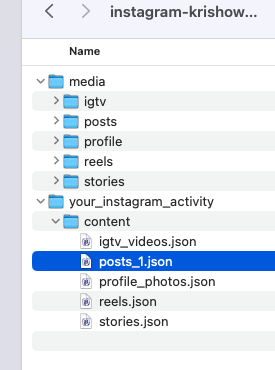
Step 2 – Prepare the JSON
Once thing I noticed when I looked at the JSON in a text editor was that the encoding was clearly messed up. I could see posts where I had used emojis instead looked like this:
"title": "I was excited yesterday to find at a Mittagong antique shop a set of 6 placemats depicting artworks from the famous Australian artist Tom Roberts. Mr. Snook was similarly excited to find a red metal EAT napkin holder for $2 at the Vinnies. \u00f0\u009f\u0098\u0082\u00e2\u009d\u00a4\u00ef\u00b8\u008f",
I’m not an expert at fixing encoding issues, so I asked Rodd to help. We tried changing the encoding in BBEdit, but nothing seemed to fix it. He went away and did some digging and figured out I needed to use iconv and jq. Here’s the Terminal command that worked:
cat posts_1.json | jq '.|sort_by(.media[0].creation_timestamp)|reverse' | iconv -t iso-8859-1 -f utf-8 > posts_1_fix.json
And now when I opened posts_1_fix.json I could see the emoji properly:
"title": "I was excited yesterday to find at a Mittagong antique shop a set of 6 placemats depicting artworks from the famous Australian artist Tom Roberts. Mr. Snook was similarly excited to find a red metal EAT napkin holder for $2 at the Vinnies. 😂❤️",
The other thing that command does is to reorder the items in the JSON. For some reason, the file was not organised by timestamp. (I thought at first some items were missing and thus did several more downloads before I realised that all the content was there, just jumbled about.) Most people probably don’t care about the order, but in my case, it’s because for several years I had a plugin that automatically pulled in my Instagram posts each day to my blog. That meant I needed to delete several years worth of posts in the middle of the JSON to avoid having duplication. I simply used Epoch Converter to get the timestamp of the first and last posts that I imported in this way, and then deleted the items that fell within that timeframe.
Another thing – my Shortcut only handles images. It’ll skip over any videos, which come through as mp4 files. I don’t usually post these, so my approach was to handle them separately. I simply went through the file searching for them to see if they were worth moving over to YouTube and embedding on the blog, and then deleted those items. You can choose how you want to handle them.
Lastly, I discovered that Shortcuts would only parse the JSON if it had a .txt extension. So I copied the first 1000 lines or so of it (I’ll explain why in a minute) into a separate file and called it “posts_scratch.txt”, keeping it in the same folder as “posts_1.json” and “posts_1_fix.json”.
Step 3 – Set up the Shortcut
You can download the Shortcut I created here. I’ll walk you through it bit by bit.
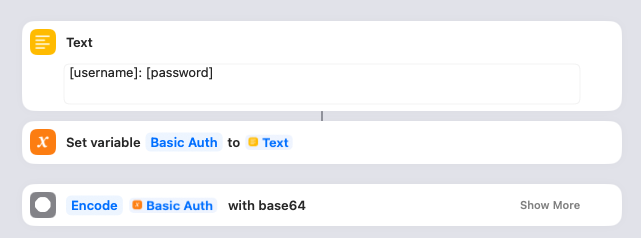
This is where you give the Shortcut the details it needs to access your WordPress blog. You’ll need to create an Application Password and then put the username and password into the Text box as shown. The Shortcut saves that in a variable and then encodes it.
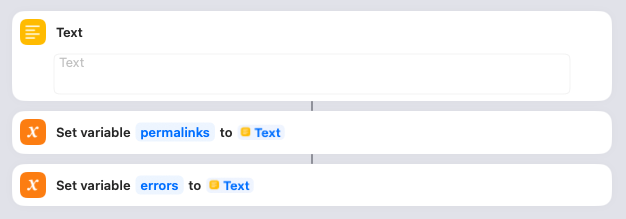
In order to show a list of all the posts that have been created at the end of the import (as well as any errors that have occurred), I create blank variables to collect them. Nothing to do here.

This is things really get going. You need to click on that “content” link and ensure it points to the content folder in your downloaded Instagram archive. When you run the Shortcut, it’ll look in that folder for the “posts_scratch.txt” file and parse it, with each Instagram post becoming an item in the Dictionary. The Shortcut then loops through each of these.
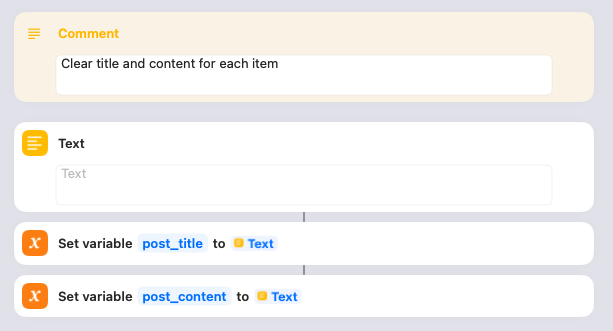
For each Instagram post, I set a blank variable for the post_title and post_content. Nothing to do here.
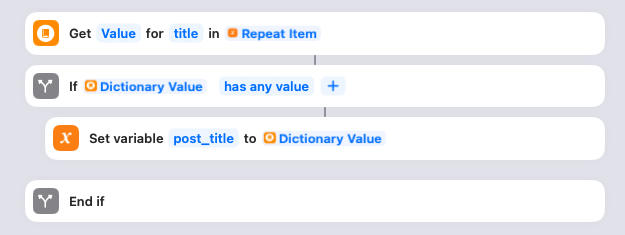
Next the script looks to see if there is a title specified for the Instagram post in the JSON. Note: the JSON file handles this differently depending on whether it’s a single image or multi image post. (No idea why; the consistency is stupid. 🙄 ) This case is for a multi image post. If the title is specified, it gets saved to the post_title variable. Nothing to do here.

Next the script grabs the media associated to the Instagram post. It then starts looping through each media item attached. Nothing to do here.
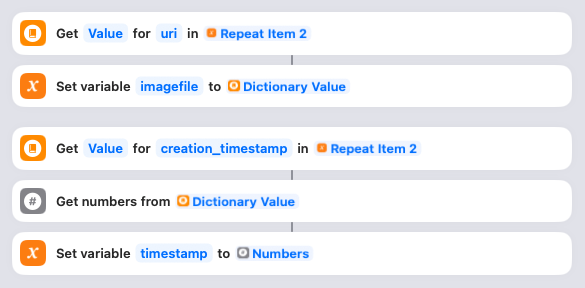
For each media item, it grabs the URI specified in the JSON and saves it in the imagefile variable. It also grabs the timestamp, converts it into a number (rather than a string), and saves it in the timestamp variable. Nothing to do here. (Yes, I know that I’m doing this over and over for each image, even though the creation_timestamp is the same for every item in a post. You can fix that if it bothers you. But if such inefficiency bothers you, you’re probably not using a Shortcut for this anyway. 😂 )

Here’s where the Shortcut actually gets the media file. You need to click on that “yourinstaarchive” link and ensure it points to your downloaded Instagram archive. The URIs are relative to this parent, so it needs to be correct! Assuming the file is an image, it will resize it to 1000 pixels wide, maximum. (You can adjust that if you want, or take it out to leave them full-size.)
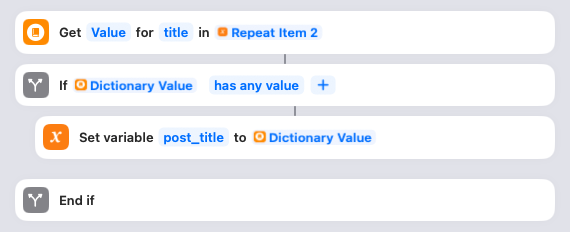
Here’s where the Shortcut handles the case where it’s a single image post. In that case, the title is included with the media item itself. So it grabs that title, and if it has value (i.e. isn’t blank), it saves it as the post_title. Nothing to do here.
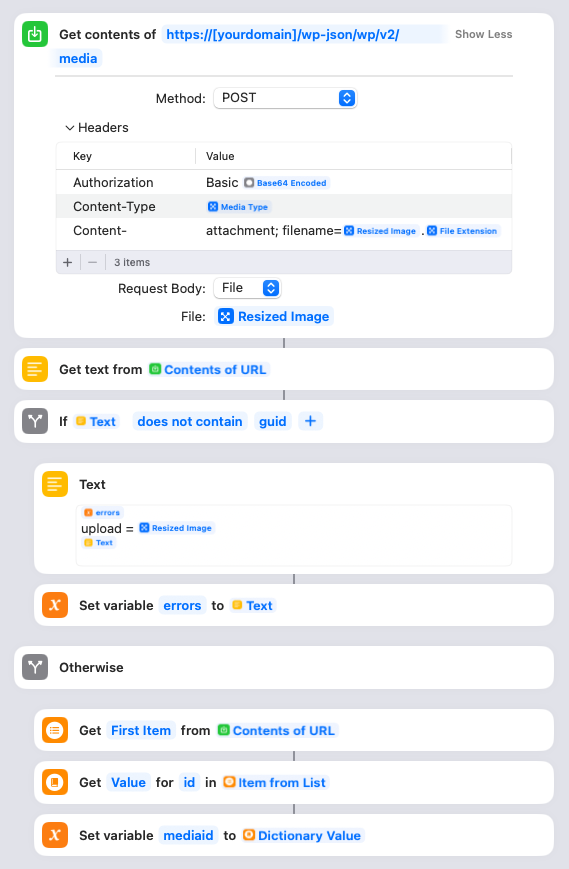
Here’s where the Shortcut actually uploads the resized media file to your site. You will need to put your own domain name into the URL there. Once the image is uploaded, the Shortcut will parse the response from your site and check if there’s an error. All successful responses should have “guid” in there, so if it’s not, it’ll save the name of the file it was trying to upload into the errors variable. If the upload succeeded, it’ll instead save the ID of the newly uploaded image in the mediaid variable and progress to updating the alt text and title.
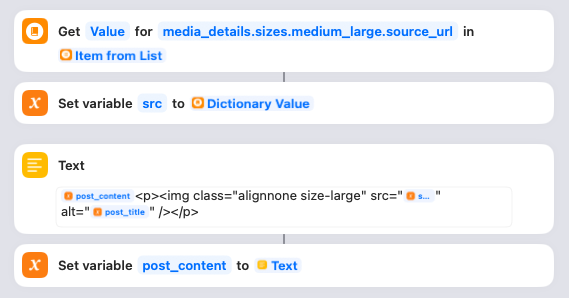
As part of the response, WordPress will send back the URLs for all the different resized versions of the image. The Shortcut will grab the “medium_large” version, which is the fixed width 768px wide version and save it as the src variable. (You can change the image size if you want, but that’s left as an exercise for the you. None of this stuff is well documented, I’m afraid.) The Shortcut will then create the HTML to display the image and save it in the post_content variable. Because of the way the Text item is set up, as you recursively loop through each image in the post it’ll be appended as a series of paragraphs. Feel free to change the HTML to suit your blog if you want, otherwise nothing to do here. (At a later step, it’ll inject the actual text from the Instagram post.)
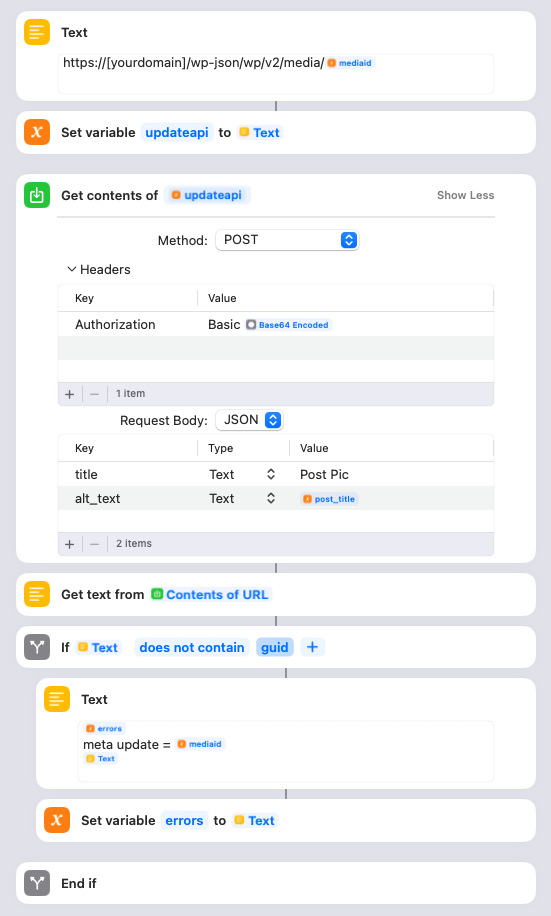
You need to update the Text box with your blog domain. This step is where the Shortcut updates the title and alt text of the image it just uploaded. The title is set to “Post Pic”, but you can change that to something else if you like. The alt text is set to the post_title variable. If this update fails, the mediaid is logged to the error variable.
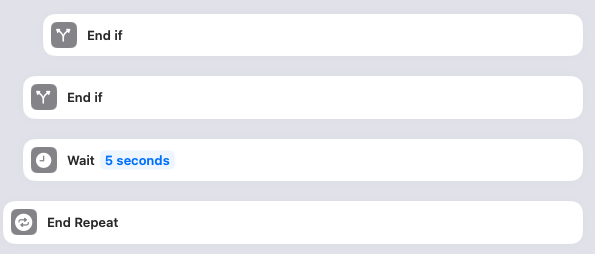
This closes off the two If statements (whether it was a JPG or not, and whether the image upload succeeded), waits for 5 seconds, and then loops to the next media item in the post. You can remove the Wait if you want, or experiment with how long you want it to be. I added it because I know my site struggles under heavy load, and I wanted to spread out the API requests to be safe rather than just blasting them as fast as my MacPro can generate them. Otherwise nothing to do here.

This is where the Shortcut turns the timestamp into an actual date that WordPress can work with. (No, I don’t bother doing anything tricky to handle the timezone, as I don’t need that level of precision on my posts.) Nothing to do here.

Here’s where the Shortcut injects the Instagram post caption at the start of the post_content variable, which at this point is a list of HTML images. You can adjust the HTML if you want, otherwise nothing to do here.
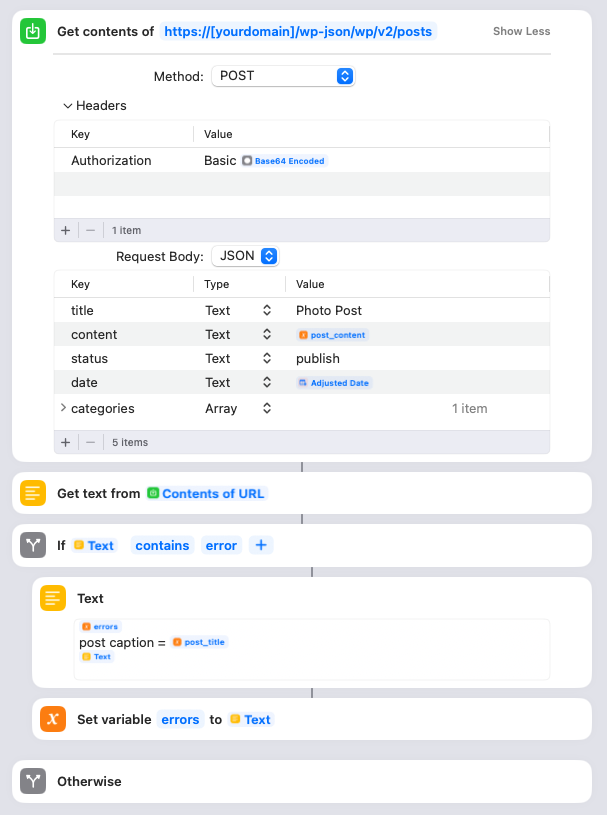
Here’s where the Shortcut actually creates the WordPress post. You need to adjust the URL to have your domain name. It uses the encoded username/password we created way up at the start. I set it to use “Photo Post” as the WordPress post title, but you can change that to whatever you want. The content is the post_content HTML that was created, and the date is the converted timestamp. I also assign the post to a special WordPress category. You can either remove this, or change the category ID to the appropriate one from your site.
Also please note that I’ve set the status to “publish”. This means the posts will go live in WordPress right away, but since the publish date is in the past they won’t appear on your home page or in your RSS feeds. You may wish to change this to “draft” the first few times you run it. I found though that when I went into WordPress to check and publish those posts, it updated the published date to the current date – meaning the post no longer appeared at the correct date in the past, and it showed up in my RSS feed as a new post. So once you’re satisfied that the script is working, I suggest changing it to “publish” directly and then they’ll be saved with the correct date.
The Shortcut will also check if there were any errors returned upon publishing the post, and if so save the caption of the post in the errors variable.
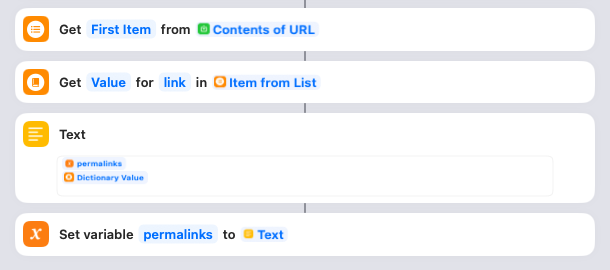
If there were no errors, the Shortcut next parses the response from the WordPress API and pulls out the link to the post that’s been created. It then gets appended to the list saved within the permalinks variable. Nothing to do here.
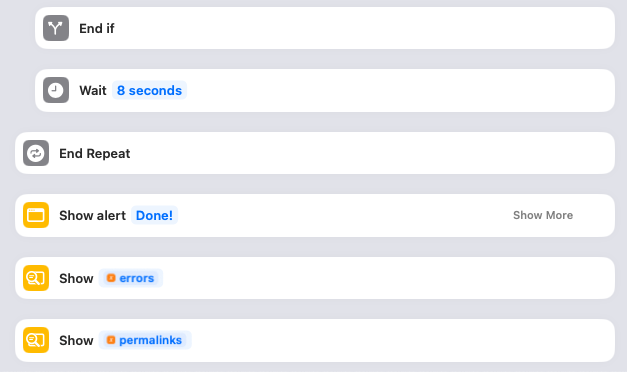
Final step! Again, I have a “wait” set after the if statement finishes just to space out the post loops. You can remove this, or adjust as necessary. Then the whole thing loops back around to the next Instagram post in the JSON. Once the loop is finished, it’ll show an alert box that says “Done!”, then one with any errors that occurred, and then another with the list of permalinks. This allows you to investigate and fix any of the errors, and to spot check some of the permalinks to make sure they look correct. Note: The error checking may include some false positives, if you actually used the word “error” in the post! So if it looks fine on your site, you can disregard that error.
Optionally, you could use the Shortcut action “Append to Text File” or “Append to Note” if you want to write those errors or permalinks to a file. I leave that as an exercise for you to work out. 🙂
Step 4 – Run the Shortcut
Once I had the Shortcut properly configured, I copied out just a small portion of the fixed JSON into my posts_scratch.txt so I could test it. To run it, I just clicked the “Play” button on the Shortcut. Shortcuts will highlight each step as it moves through the flow. Once I was satisfied it was doing what I wanted, I increased the number of items in my posts_scratch.txt file.
Why not just run the whole thing? Well, I found it crashed every now and then. I’m not sure why – whether it was a memory issue with Shortcuts, or my server being flaky, or WordPress itself just throwing an error. That’s why I started adding some “wait” pauses in there, and why I found it easier to work in smaller batches. Whenever it crashed, I could look in my WordPress dashboard to see the last Media item that had been uploaded, and then find that point in the JSON and delete everything before that item. Then I’d delete the Media item in WordPress and start the Shortcut over again at that point. 1000 lines or so seemed to be the sweet spot, but you need to make sure you aren’t cutting off one of the items in the JSON, of course.
Update: The above was written before I figured out how to add error checking to the Shortcut. Now it should run without actually crashing the Shortcut, logging errors to a variable. I would still be wary about running a really large file, as I have no idea how Shortcuts would handle that…
One last heads up – you’ll probably get a lot of Permissions requests from your Mac at first due to the large number of files you’re transferring. I just kept clicking the option to “Always Allow” and eventually it stopped asking.
After the import…
As mentioned, this Shortcut only handles JPGs, so I then went through the original JSON file looking for mp4 files to decide what to do with them. Some of them I discarded, and others I uploaded to YouTube and manually created posts for them.
I also searched through my existing WordPress posts for any places where I had previously embedded or linked to Instagram images. (Search for “instagram.com” or “instagr.am” to find these. I also had some that were done with IFTTT, so a search for “ift.tt” will find those.) I either replaced those with links to my posts, or removed them as necessary.
Finally it was time to remove my content off Instagram. I didn’t want to nuke my account yet, which meant I needed to delete the images one by one. (There are apps that claim to do bulk delete, but I didn’t like the look of any of them.) To do this, I went to “Your Activity” -> “Photos and videos” in a browser window. Then click “Select” and start clicking away. Once you hit 100 (the maximum), click “Delete” to blast them.
I’ll give it a few weeks or so before I delete the account entirely, to make sure folks know where to find my content going forward!
Next up…. Facebook. *cracks knuckles*
