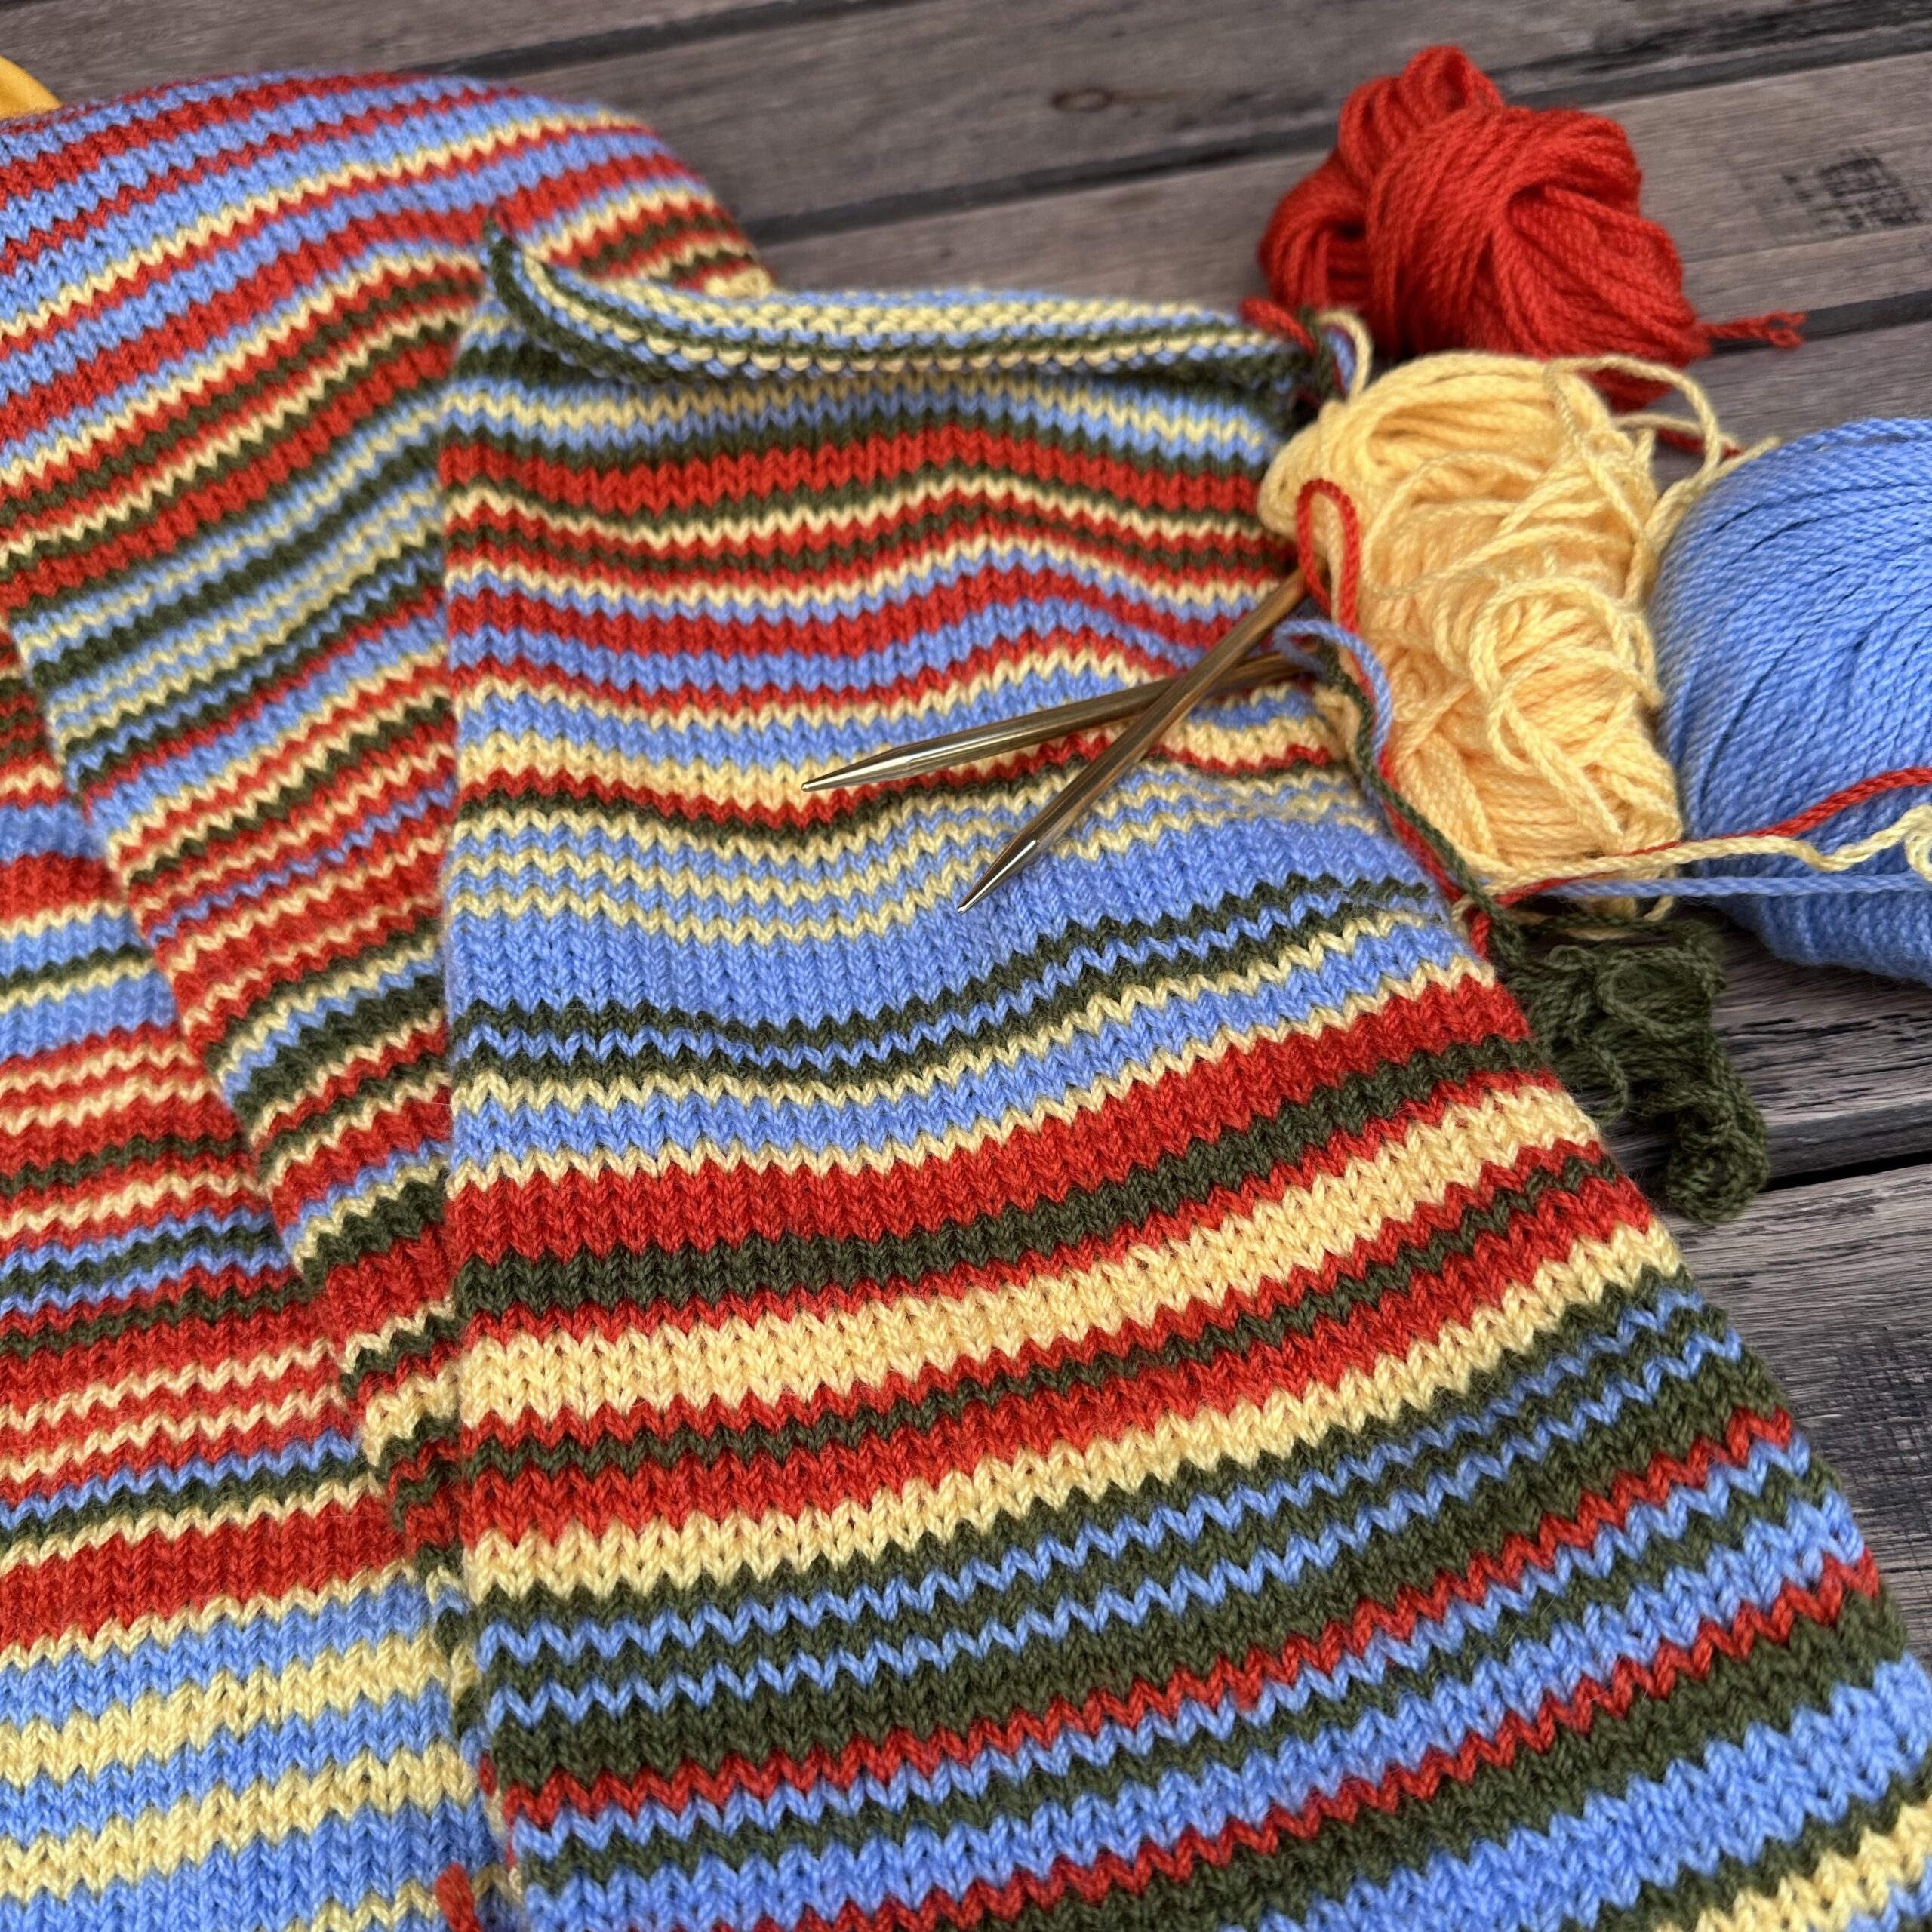
I’m finally finishing off the scarf I started during the first lockdown. It encodes a small part of the genetic sequence of one of the Covid-19 strains! 🦠
Category: Crafts
Craft projects of mine
-
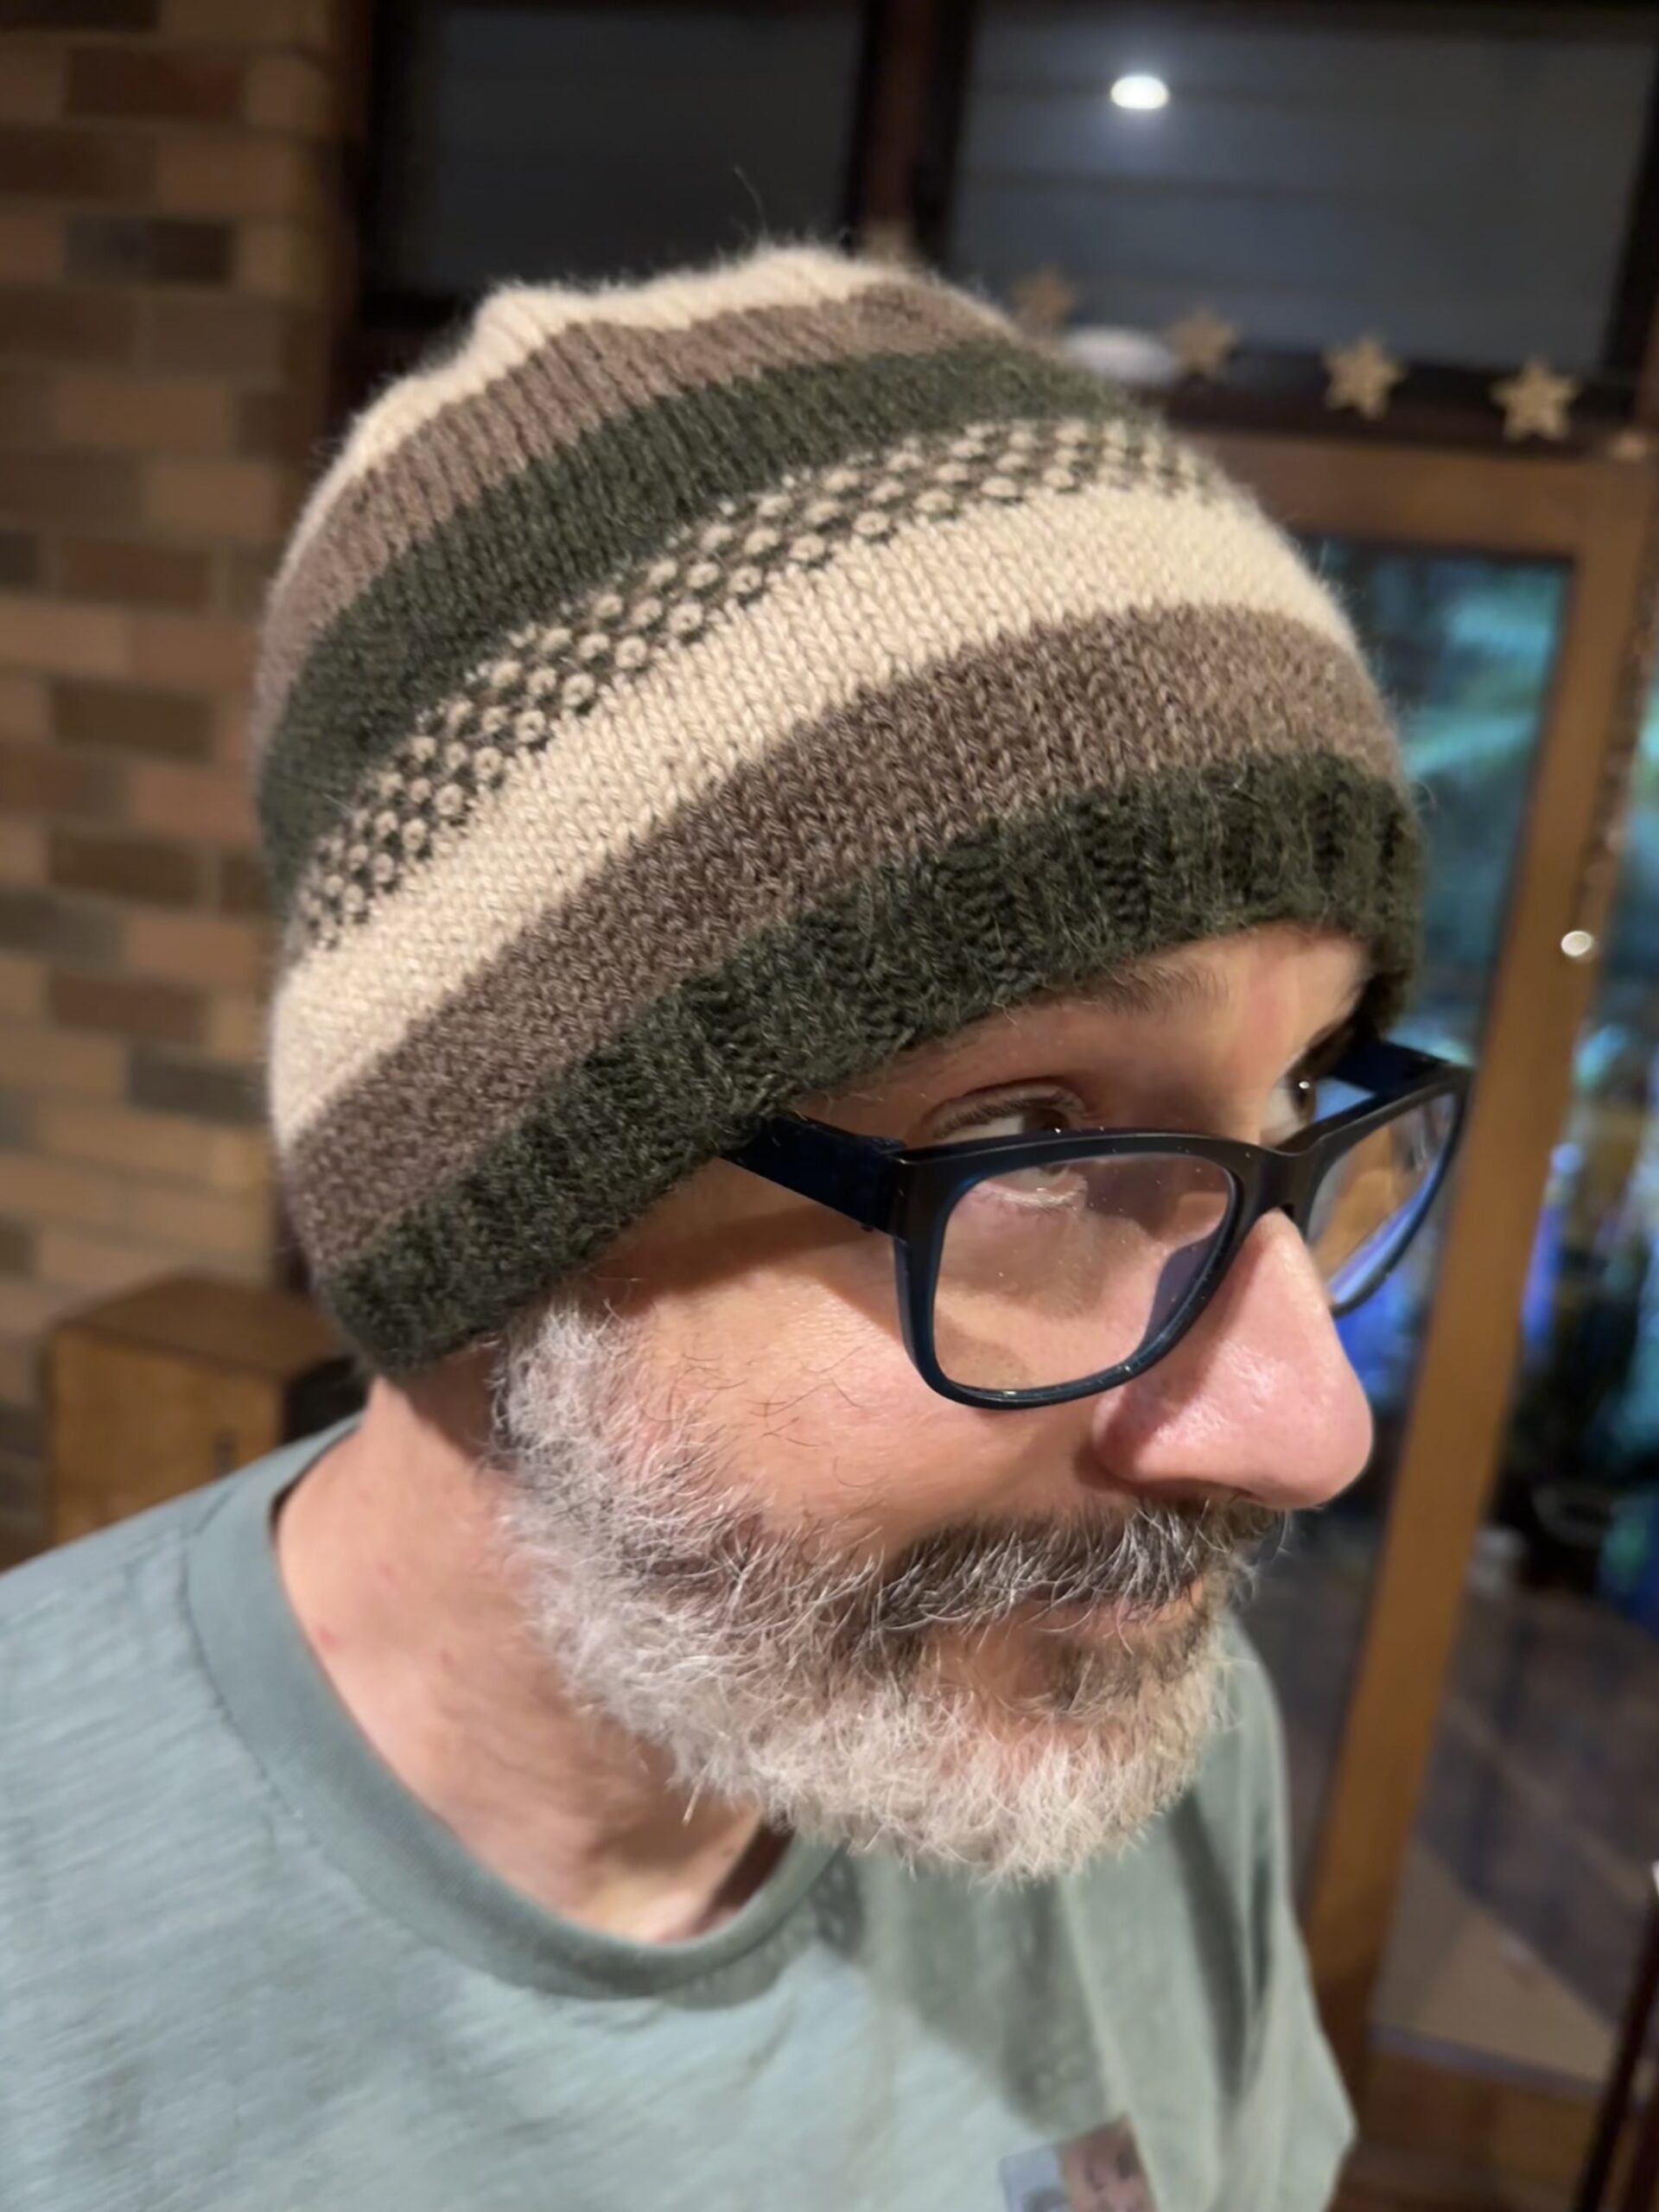
Alpaca Beanie
I finished the alpaca beanie for the Snook! This was purely to use up the extra bits I had left over from making his scarf. I casted on 132 stitches and then just made the pattern up as I went. His scalp is pretty sensitive and he doesn’t like hats that grip too tightly, so I only did a minimum amount of ribbing at the bottom. (The alpaca is nice and soft too.) I put in a band of the same slipstitch pattern I used on the scarf, and I did radial decreases at the crown. I just need to weave in the ends and give it a block!

-
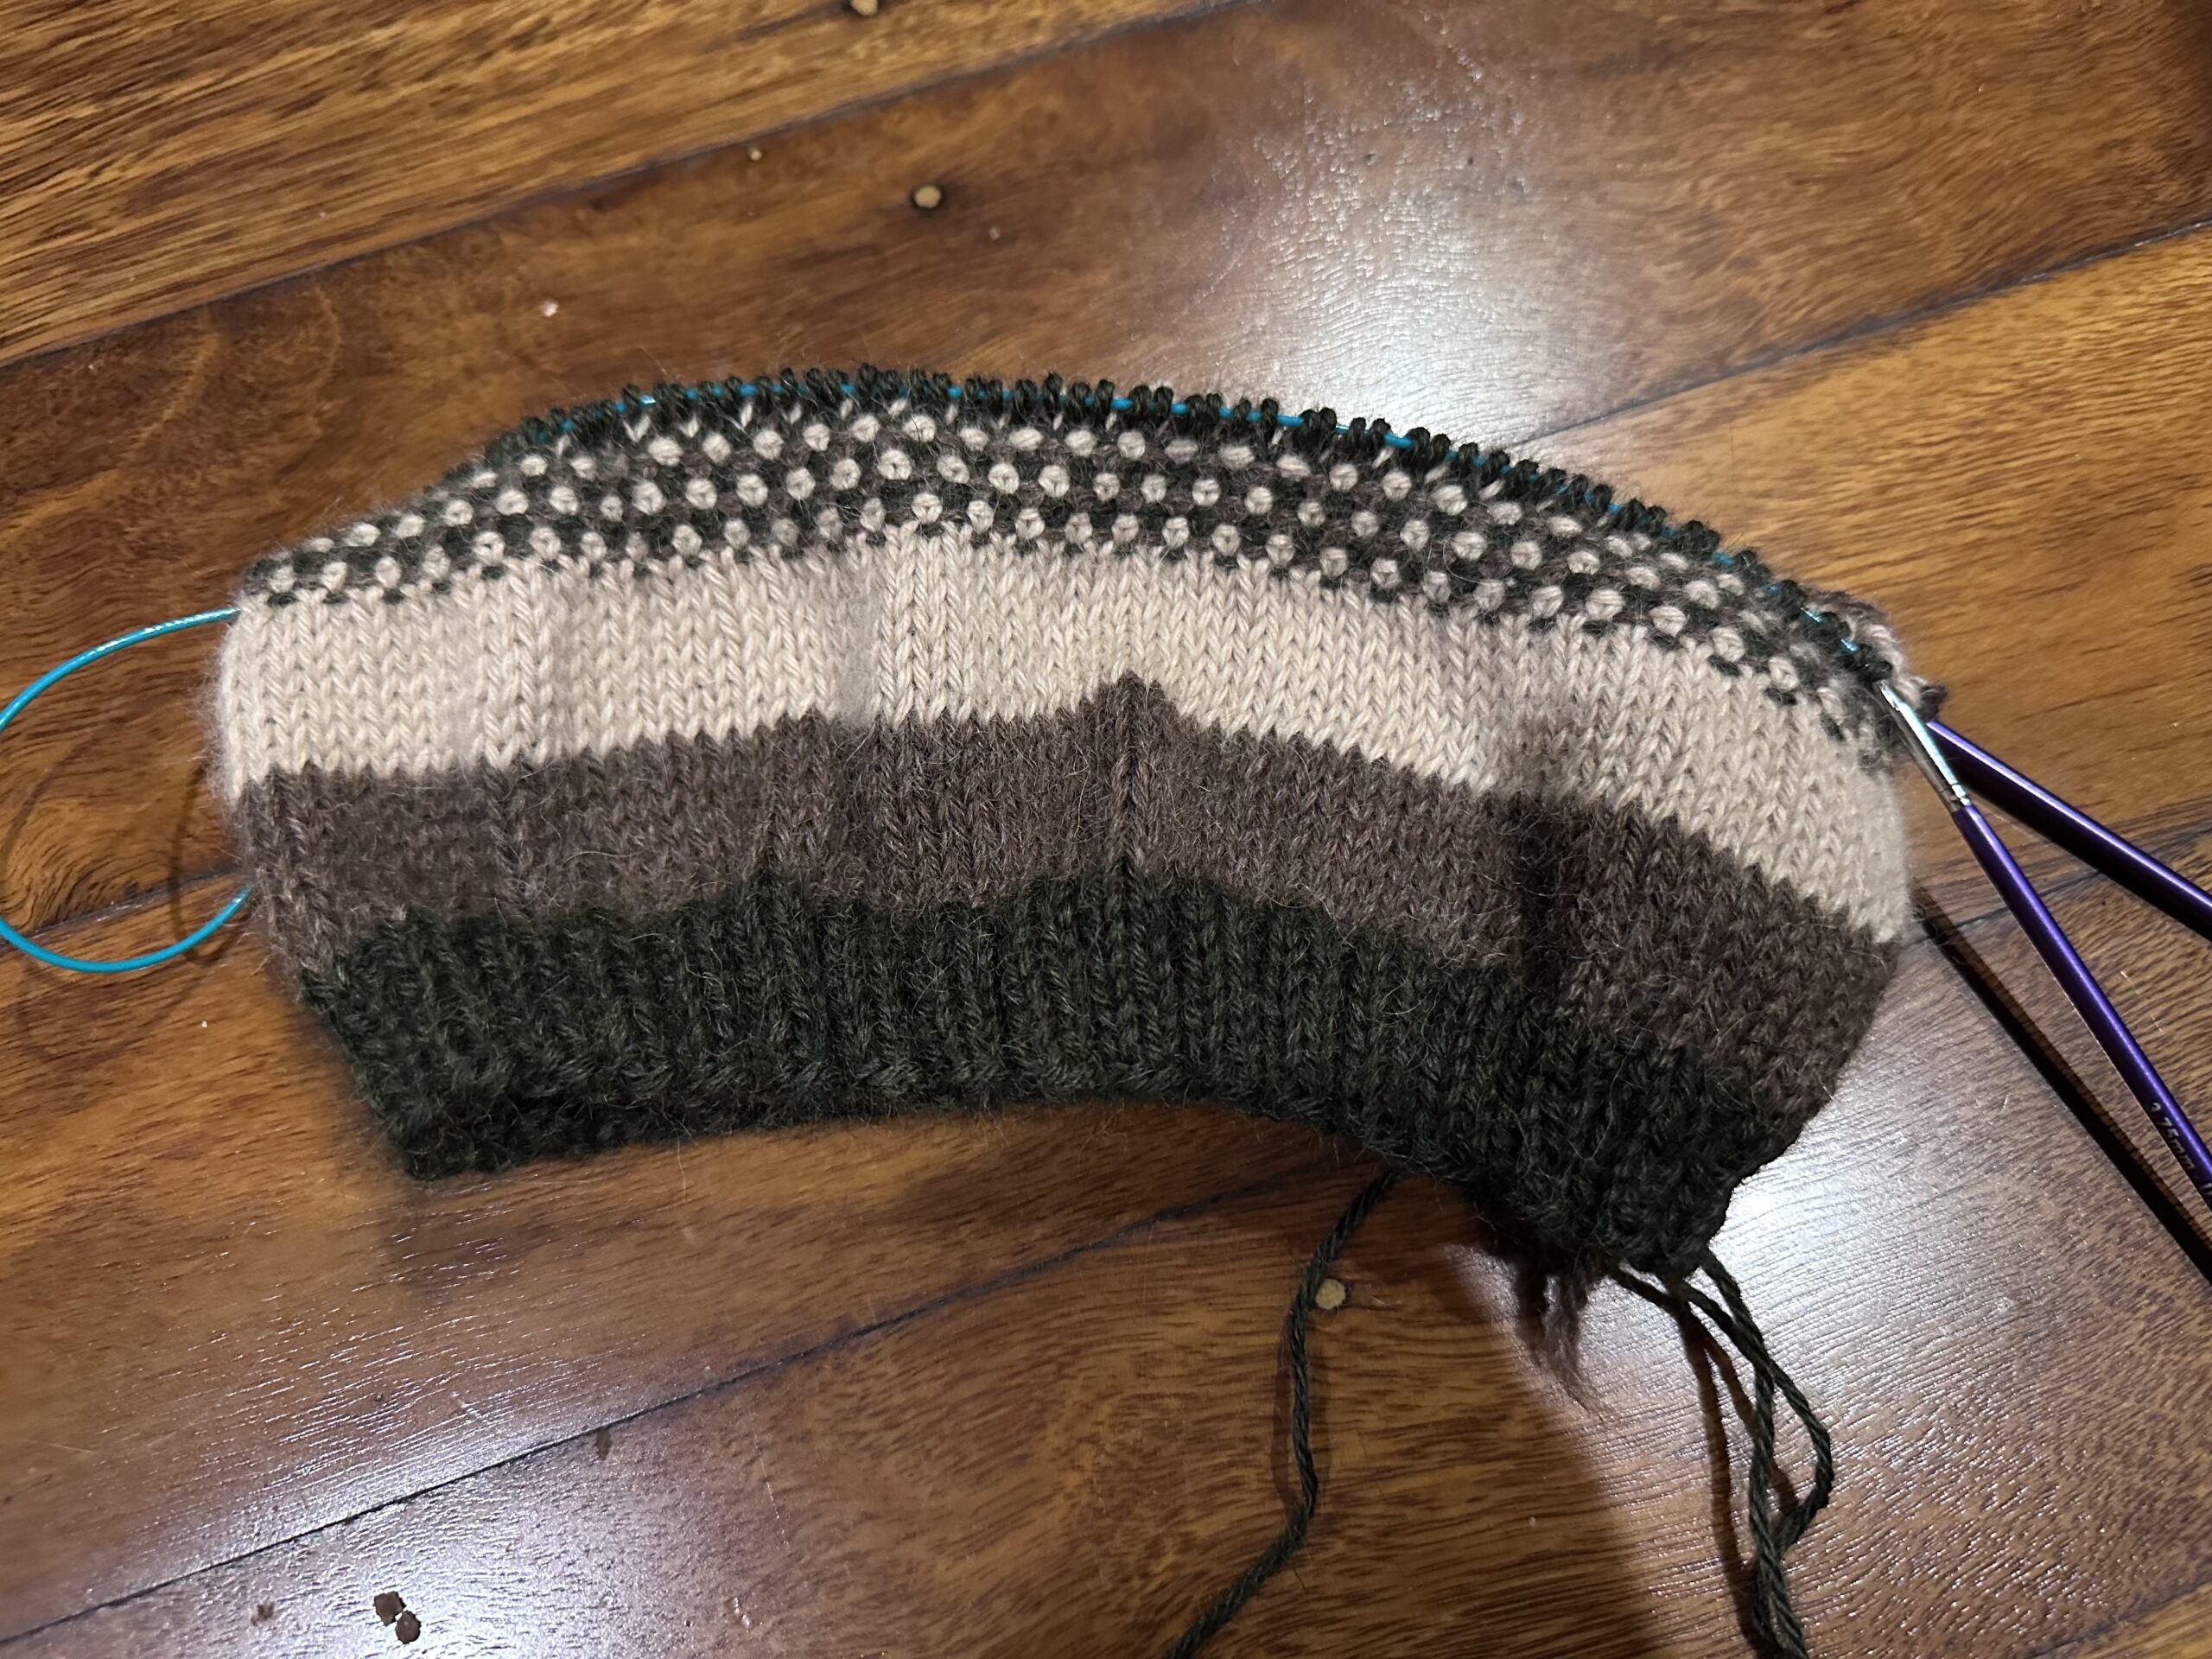
Beanie progress
I’m making good progress on the alpaca beanie I’m knitting for Rodd to match his scarf. No pattern; I’m just making it up as I go.
-
Textile exhibition
Queer quilts, rebellious knitting and political pants: the radical world of textiles – What a cool looking exhibition! I love those trade union flags… and the pink shorts. 😉 If you’re going to Adelaide in the next four months, I’d definitely check it out.
-
Peer Gynt Quilts
If you like classical music, patchwork quilting, or in-depth explanations of creative design process, you will absolutely love this blog series about 4 Peer Gynt-inspired quilts. The artist Deborah Pickett was inspired by this painting based on Ravel’s Boléro. Doesn’t that just make you want to make some art?
-
Needlepoint Cushions with Mrs. Morris
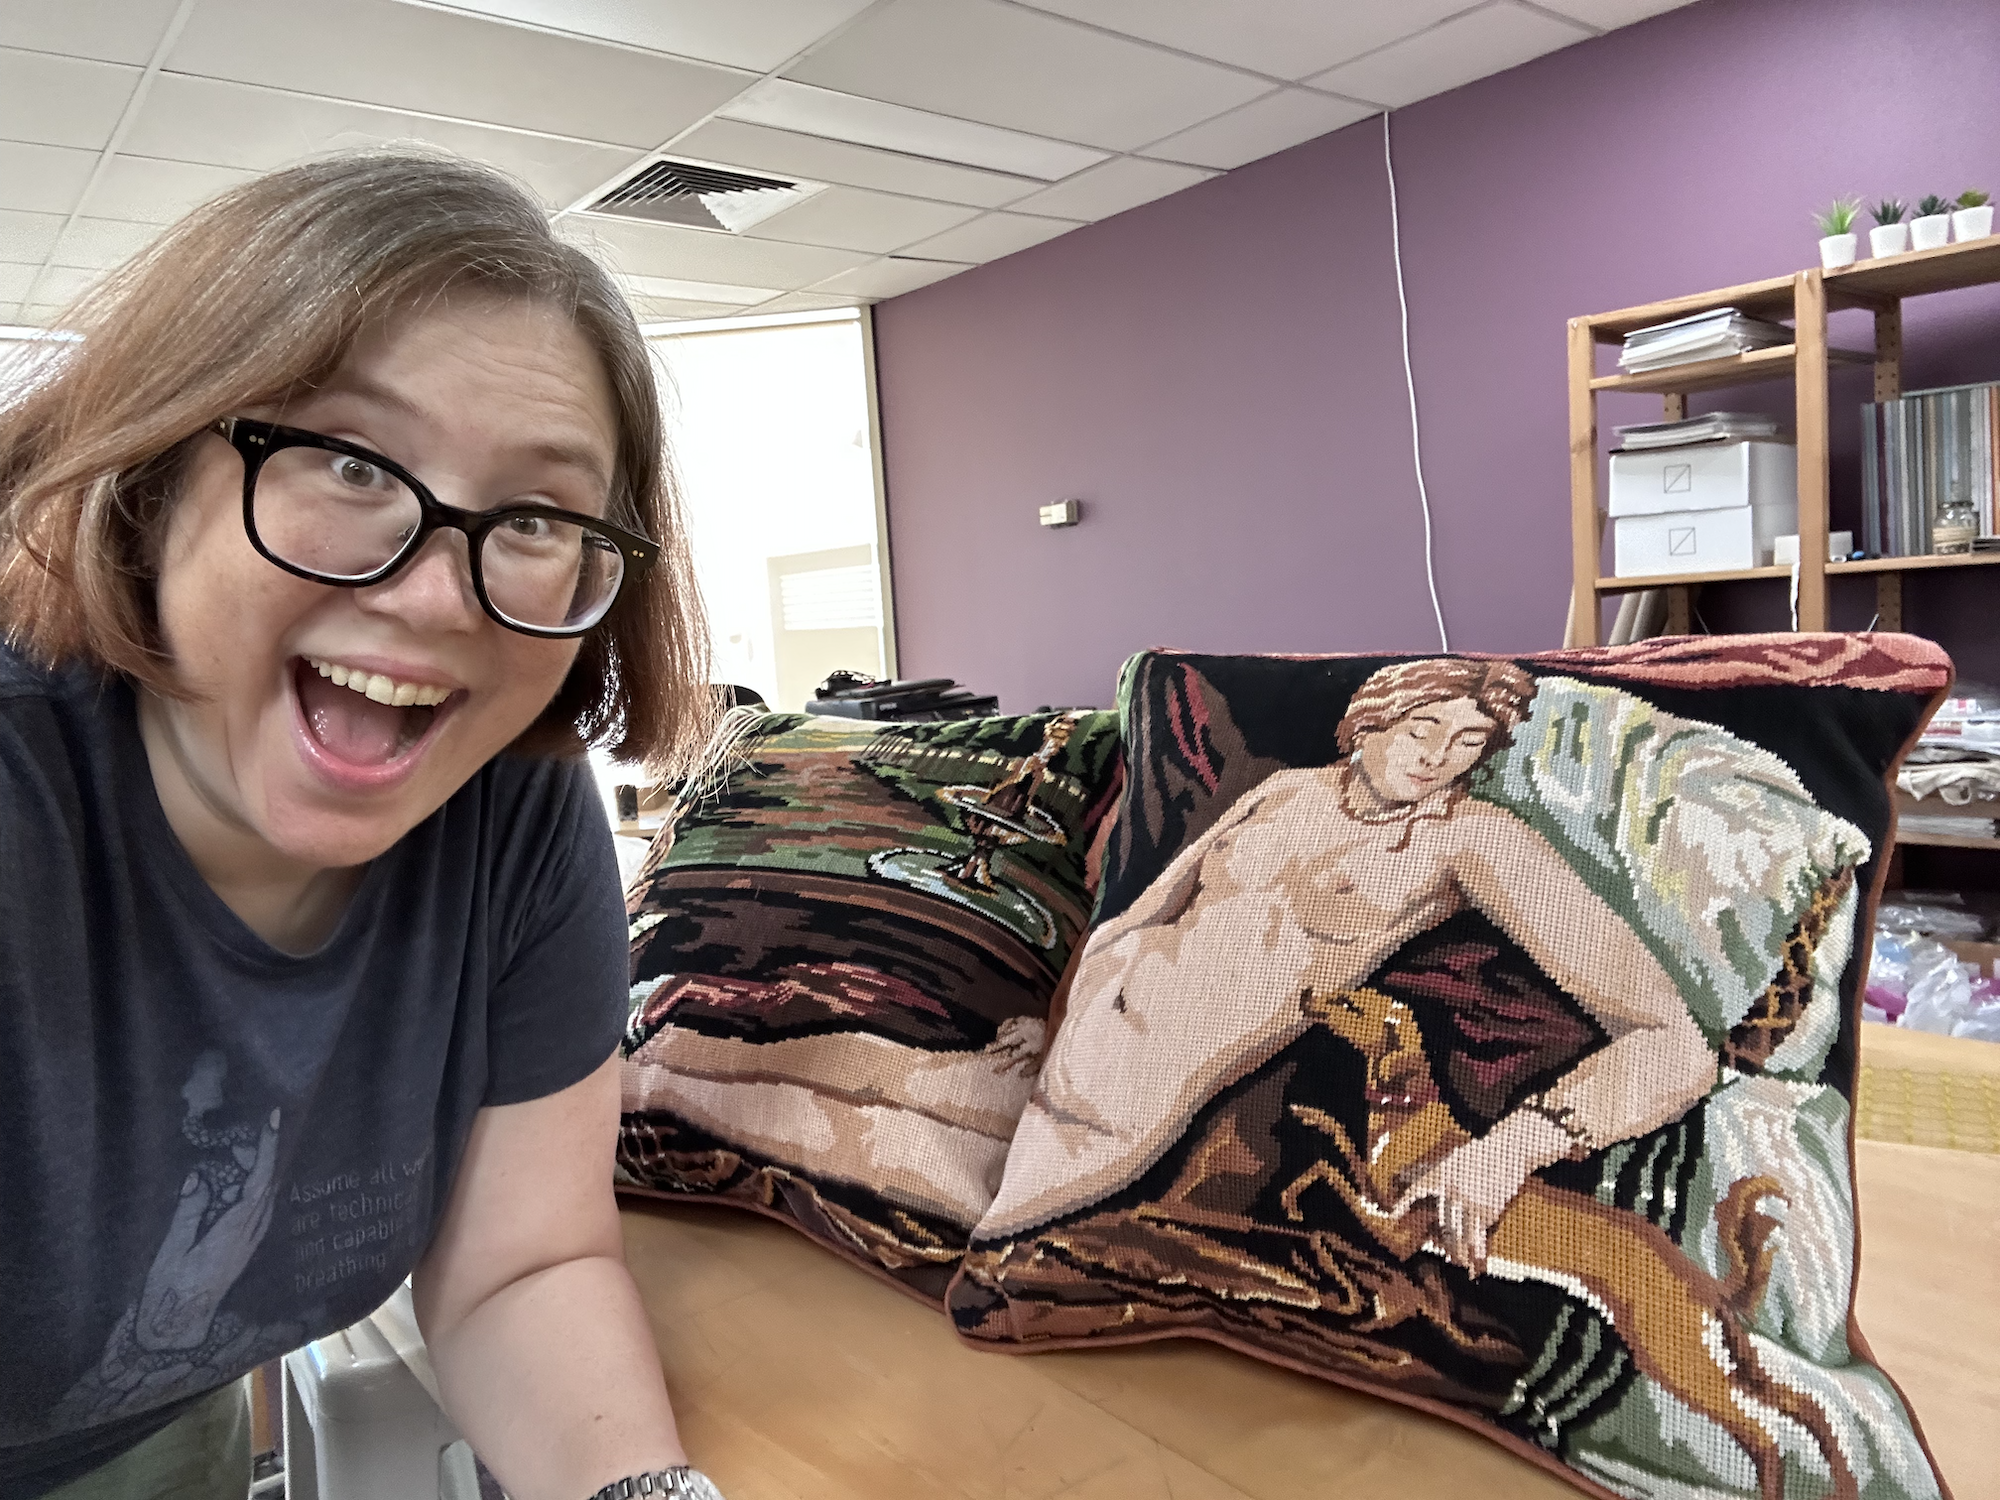
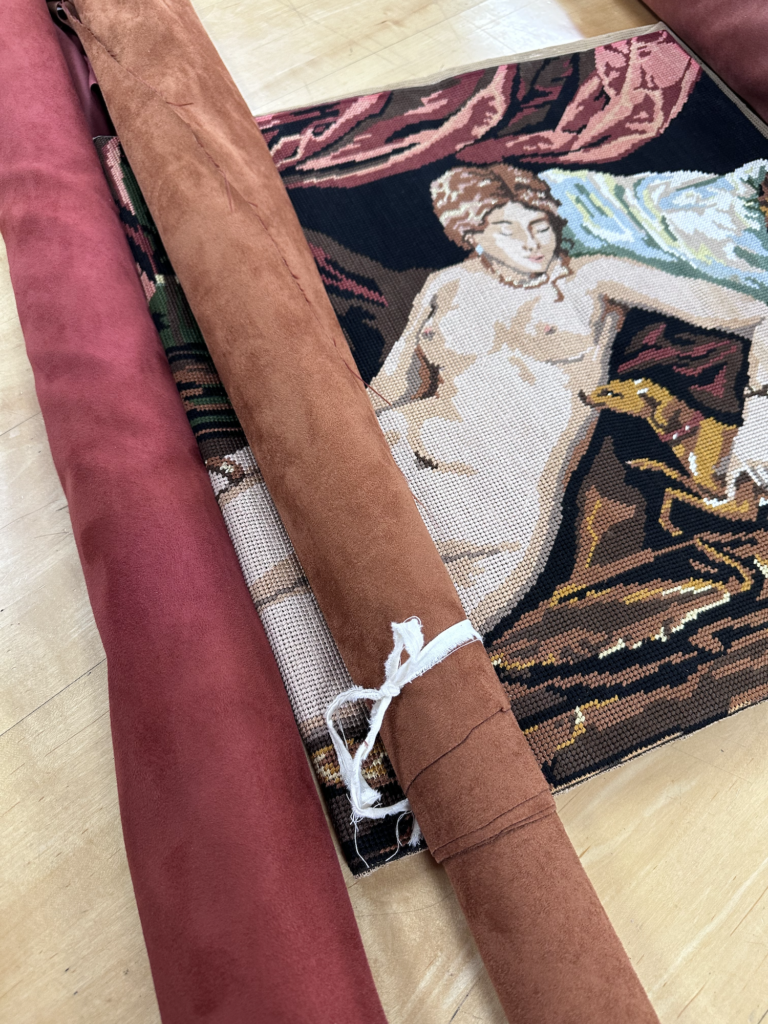
Eighteen years ago, Mr. Snook’s grandmother (“Kathy-Nanny”) moved into a retirement village, and I was gifted one of her many needlepoint tapestries: a tasteful nude reclining with a whippet. If you don’t know much about needlepoint, it generally involves a heavy canvas with a picture printed on it that you then embroider over with slanted stitches. Many of them are based on fine art, and Kathy-Nanny’s was titled “Venus d’aprés Titien.” (It’s clearly based on “Venus and Musician,” just with the leering musician removed.) It was in a heavy ornate frame, and while it was well-executed and beautiful work, it didn’t really… go with any of our other stuff. I put it in a closet for safekeeping and it basically sat in storage for the better part of two decades.
A couple months ago, we moved back into the house after our extensive renovation, and I decided it was time to bring Venus back to life. Rather than hang her on the wall, I thought that turning her into a pair of cushions might be the best way to go.
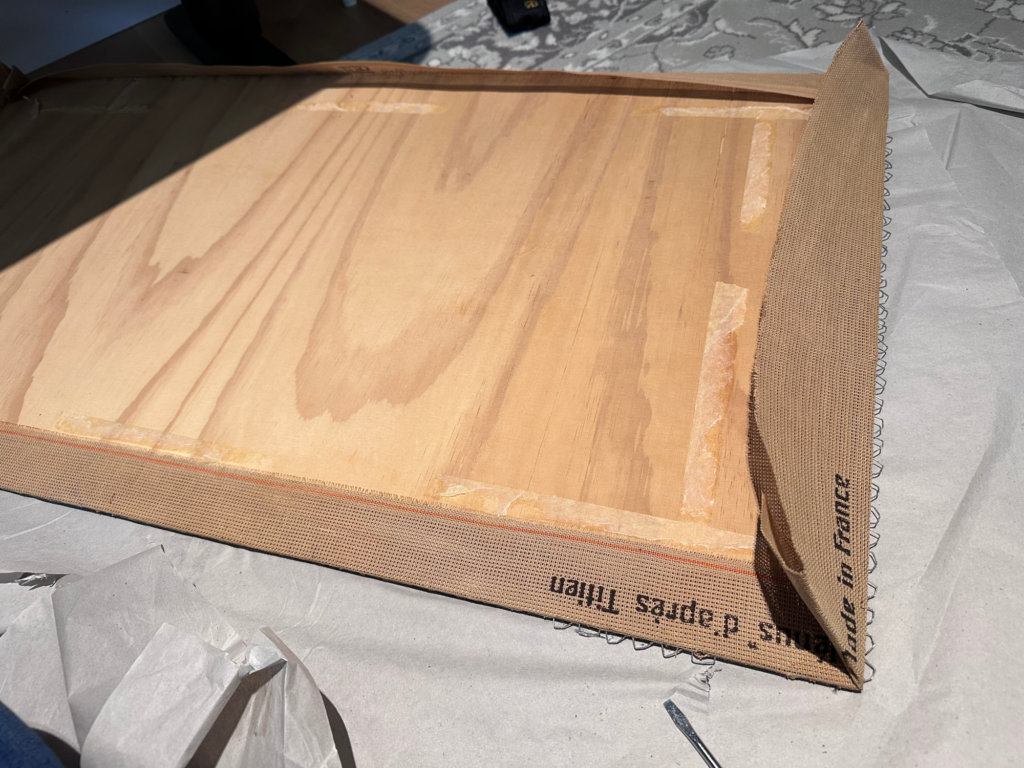
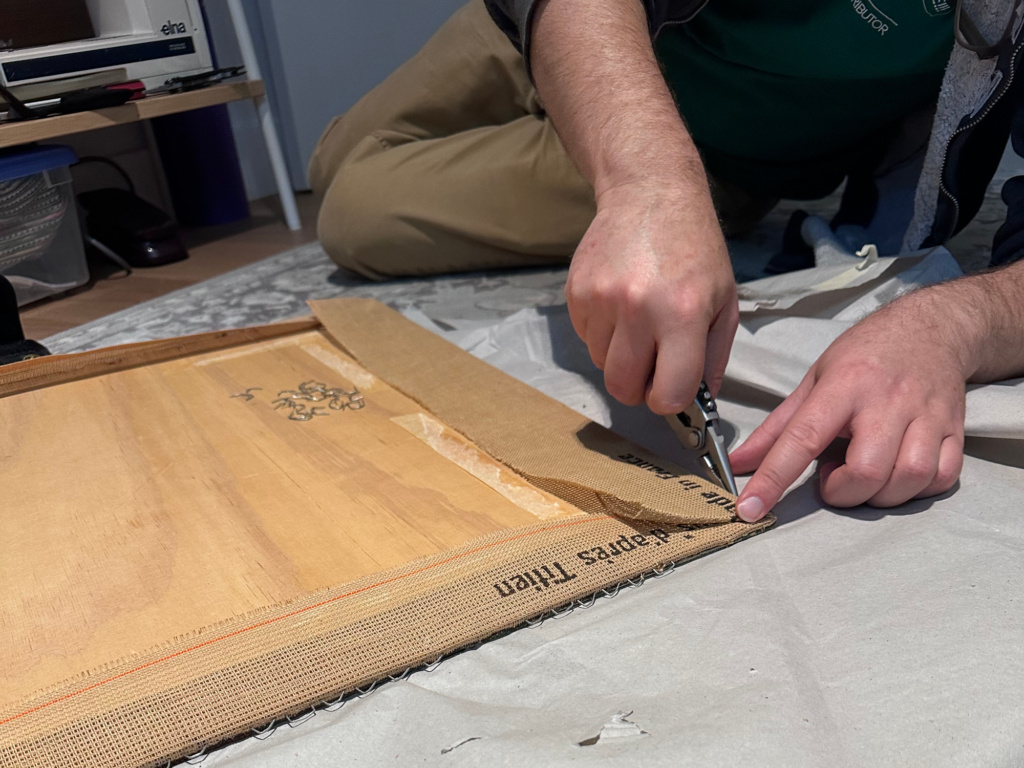
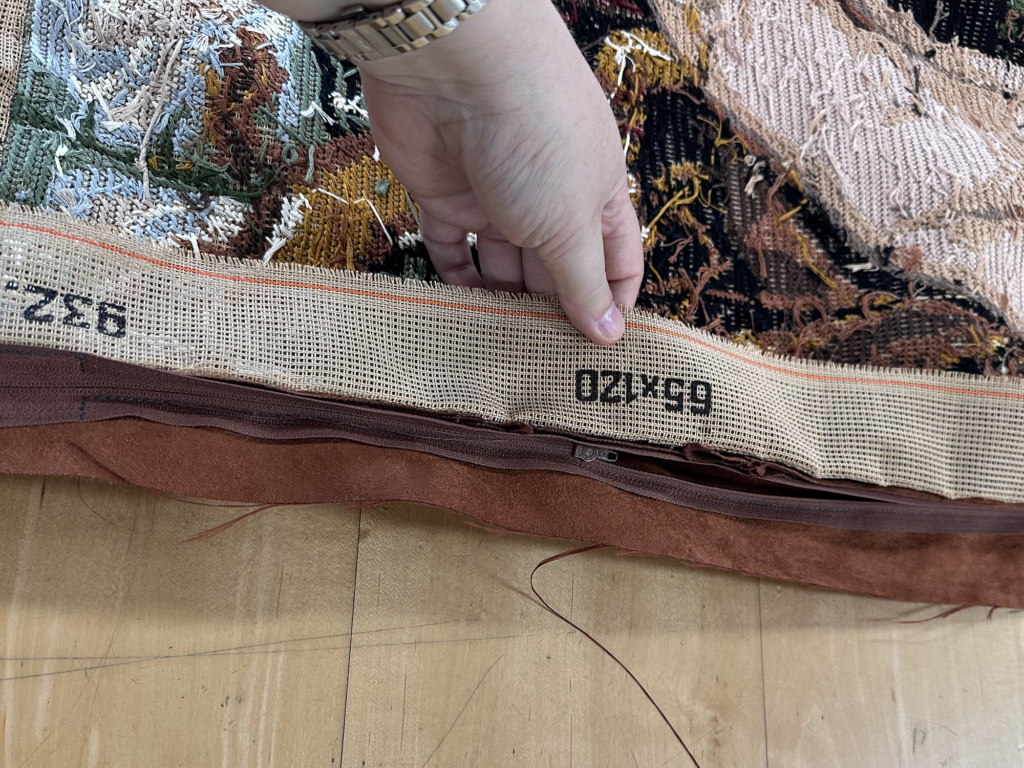
First, I had to get her out of the frame. Underneath I found the tapestry wrapped around a piece of plywood and stapled all the way around. There were hundreds of staples, each of which had to be pulled out by hand.
Thankfully Mr. Snook helped me. The staples were really dug into the edge, so I pried them loose enough for him to grab with a pair of pliers. It was back-breaking work.
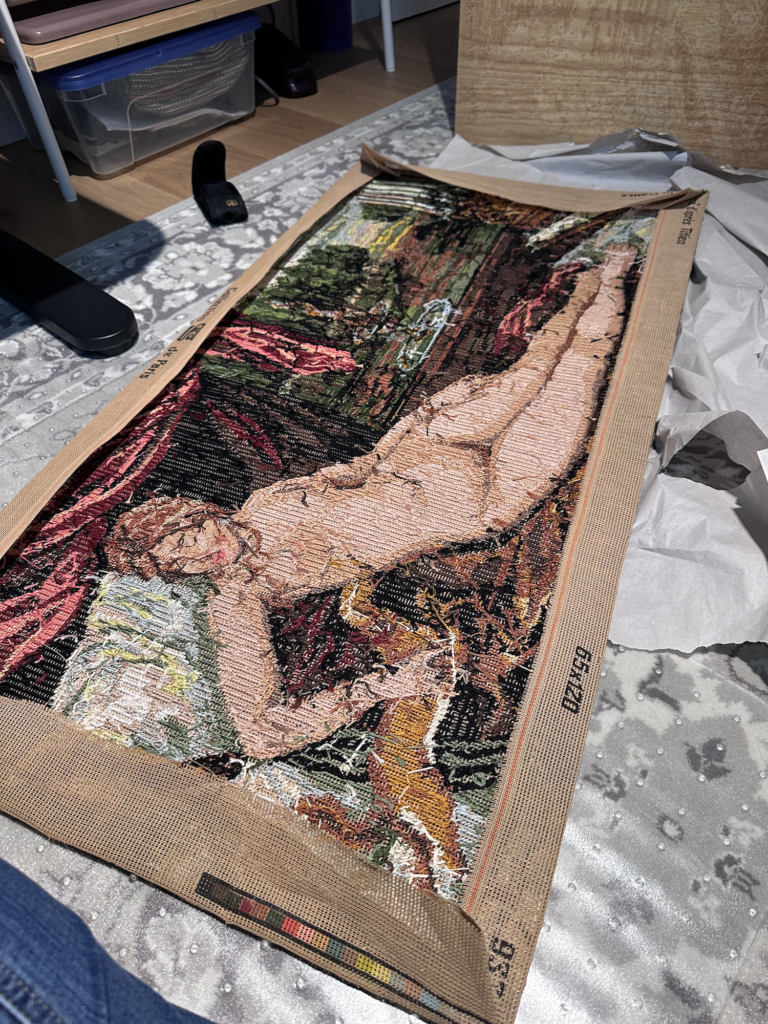
At last we had the tapestry free of the plywood. This is what it looked like from the reverse. Even on that side, you can see what a good job she did with the stitching.
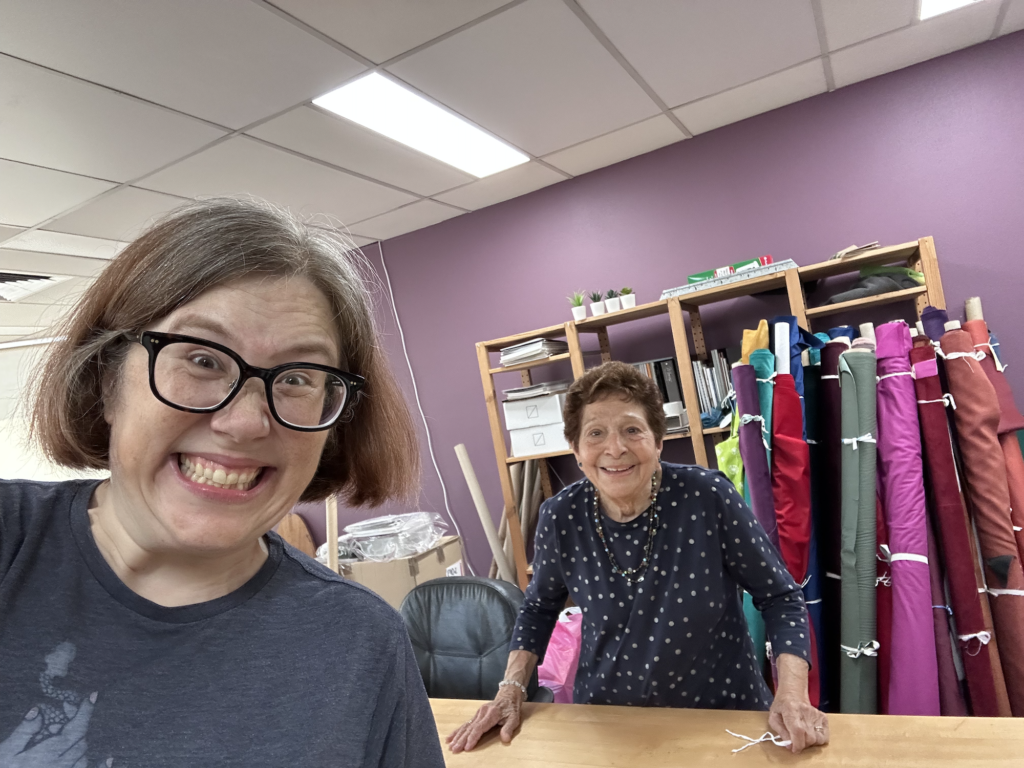
Once I had it free, I rang up my friends at Morris & Sons. Mrs. Morris has sewn more needlepoint cushions than probably anyone in all of Australia, and she kindly offered to teach me how to do it. I met Mrs. M at her workshop, where we started by deciding on the backing fabric. We narrowed it down to these two velvets, and I decided to go with the more orangey-brown one.
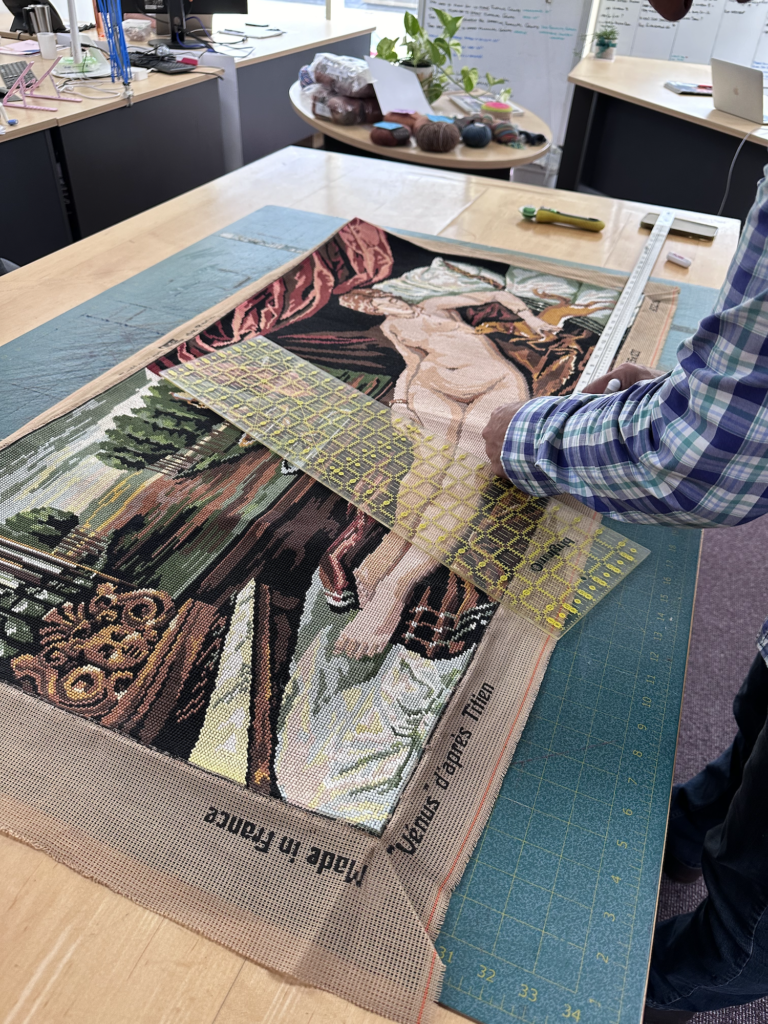
Then her son Joseph helped me work out what size to make the cushions. We measured up and realised that if we simply sliced her in half, we’d get two very nearly square cushions out of it. They were both incredulous that I wanted to cut it in half, and Mrs. M couldn’t quite get over the fact that I’d have a cushion with just LEGS on it. But they were game for the experiment, so Joseph cut it up the middle.
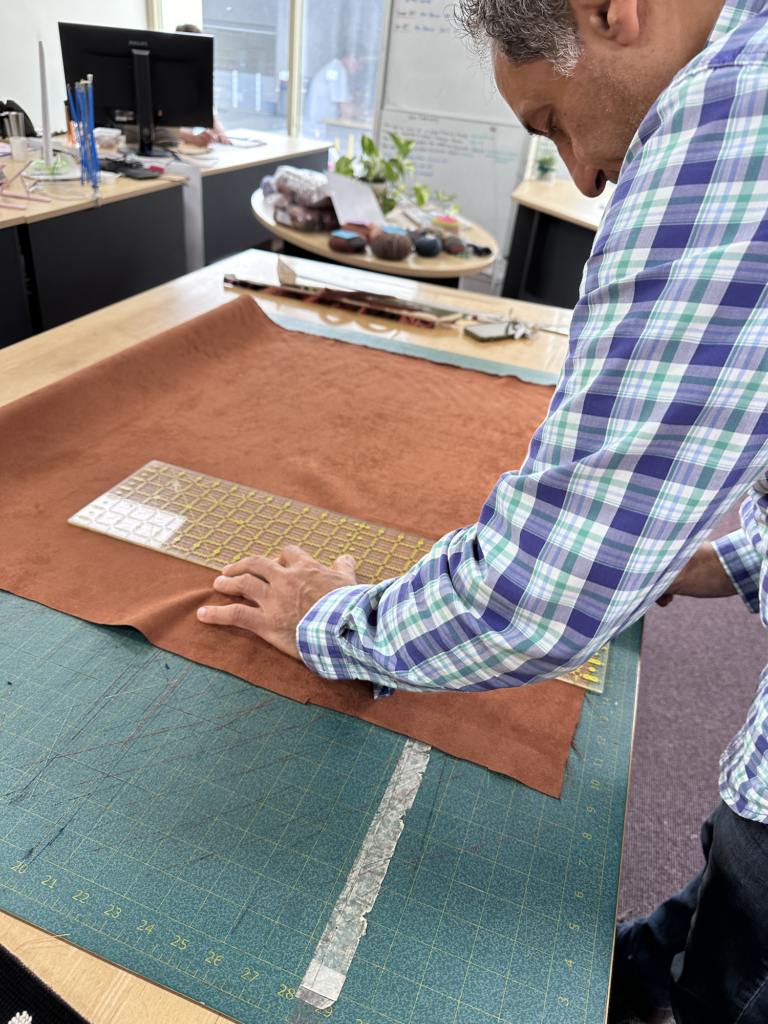
Joseph also helped me cut appropriately sized pieces of the backing fabric, as well as slicing up many pieces to be used to create piping.
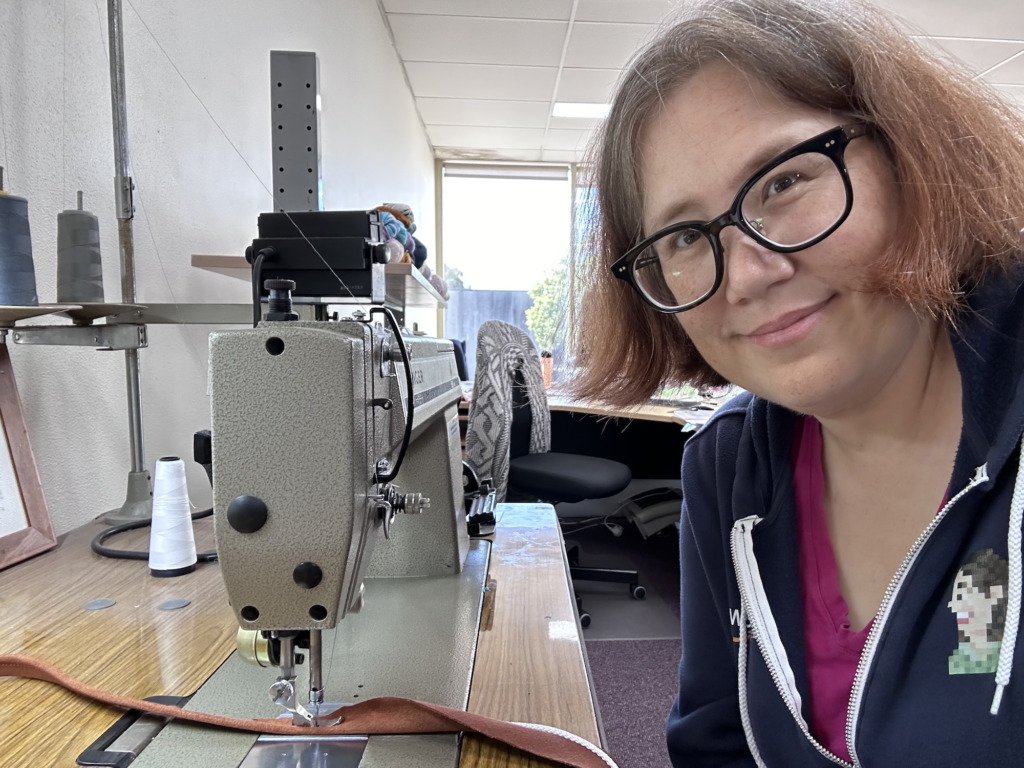
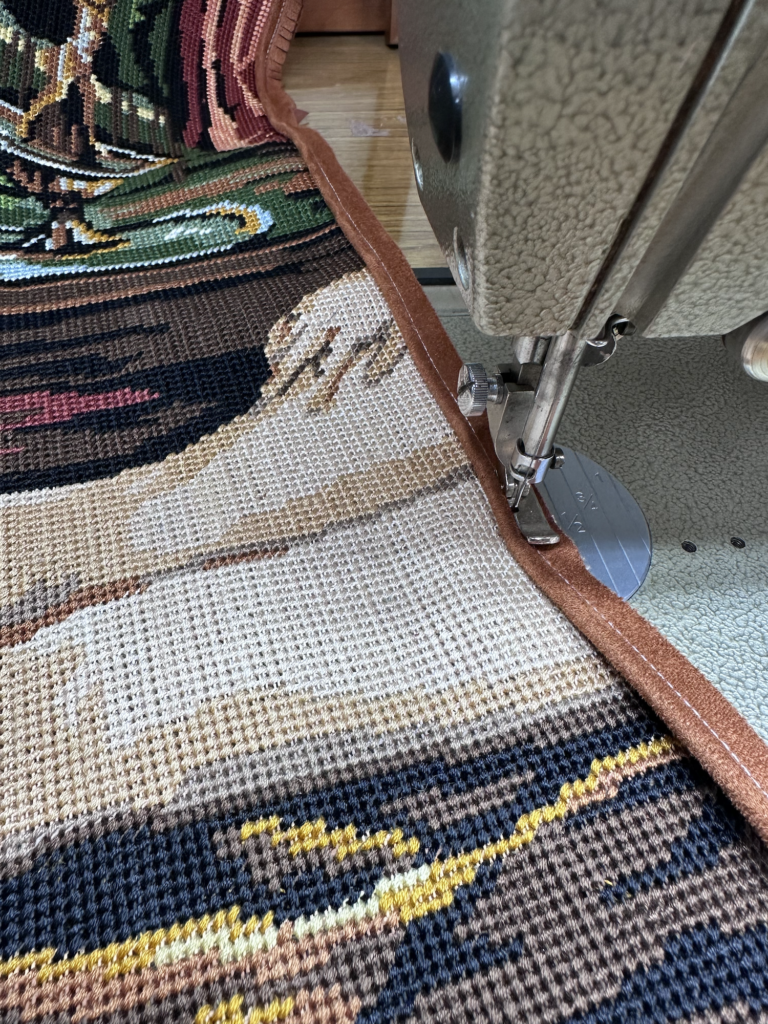
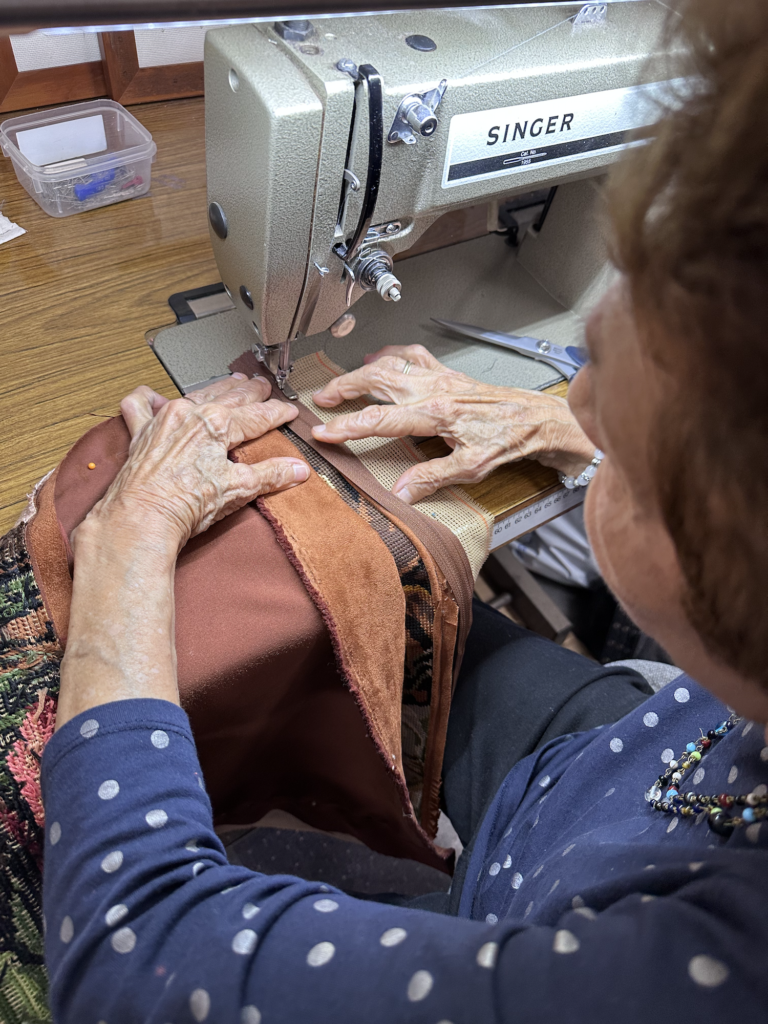
Then the real lessons began! I don’t want to give too many of her secrets away, but at a high level: Mrs. M first showed me how to piece the strips of velvet together into one very long strip, taking care to ensure the nap always went the right direction so it didn’t look or feel odd. Then I created meters and meters of piping, wrapping the strip around a long cord and sewing it down tightly. The Morrises let me use one of their industrial Singer machines, which took a bit of practice to get the hang of. It had a large foot pedal and a knee lever for controlling the presser foot.
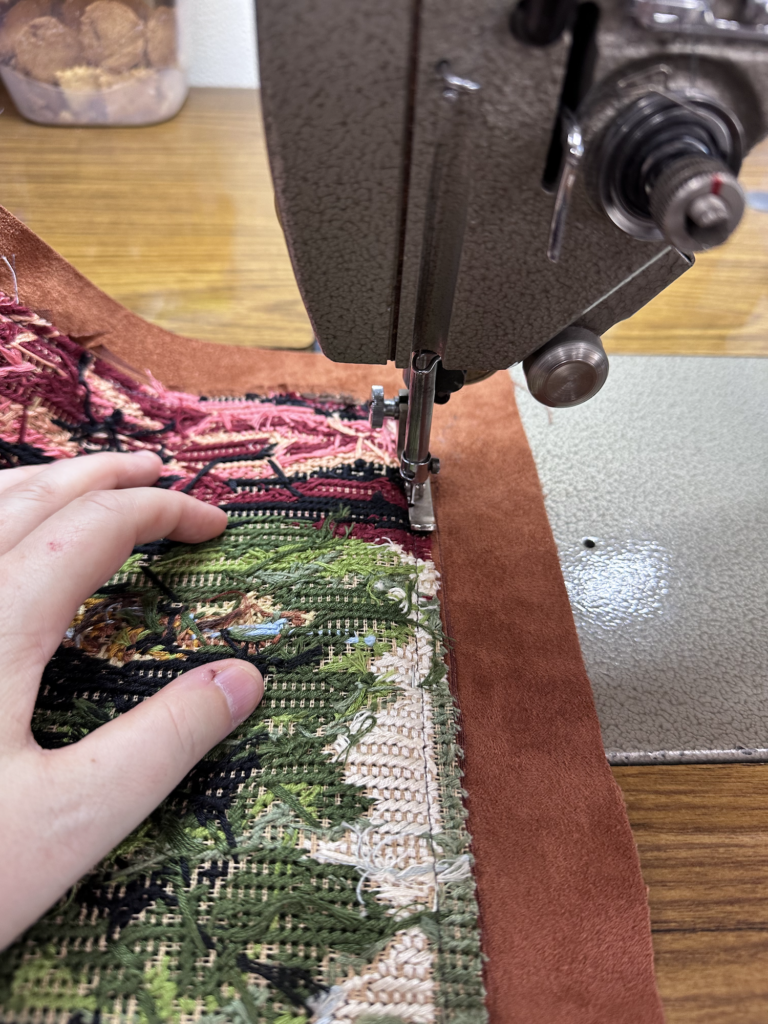
Next Mrs. M showed me how to sew the piping down around the border of each cushion top, with some special tricks for navigating the corners and for joining the ends up neatly at the bottom.
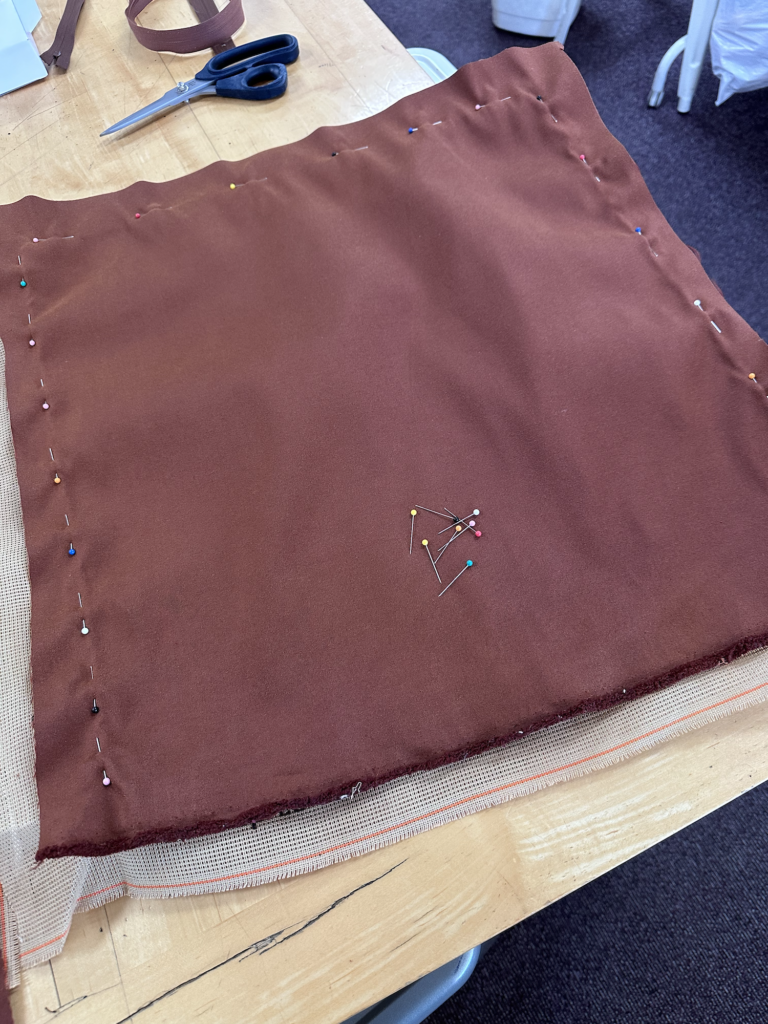
Next I put the backing fabric onto each cushion top, face-down, and pinned it around three sides tight against the piping (leaving the bottom open).
Oh no, it’s time to insert the zipper! Mrs. M is a true legend and assured me that it was going to be much easier than I feared.
I watched her closely as she showed me her method. I took lots of photos and notes to try to capture the trickier bits!
First we sewed one side, and then the other. Hey, I was getting the hang of this!
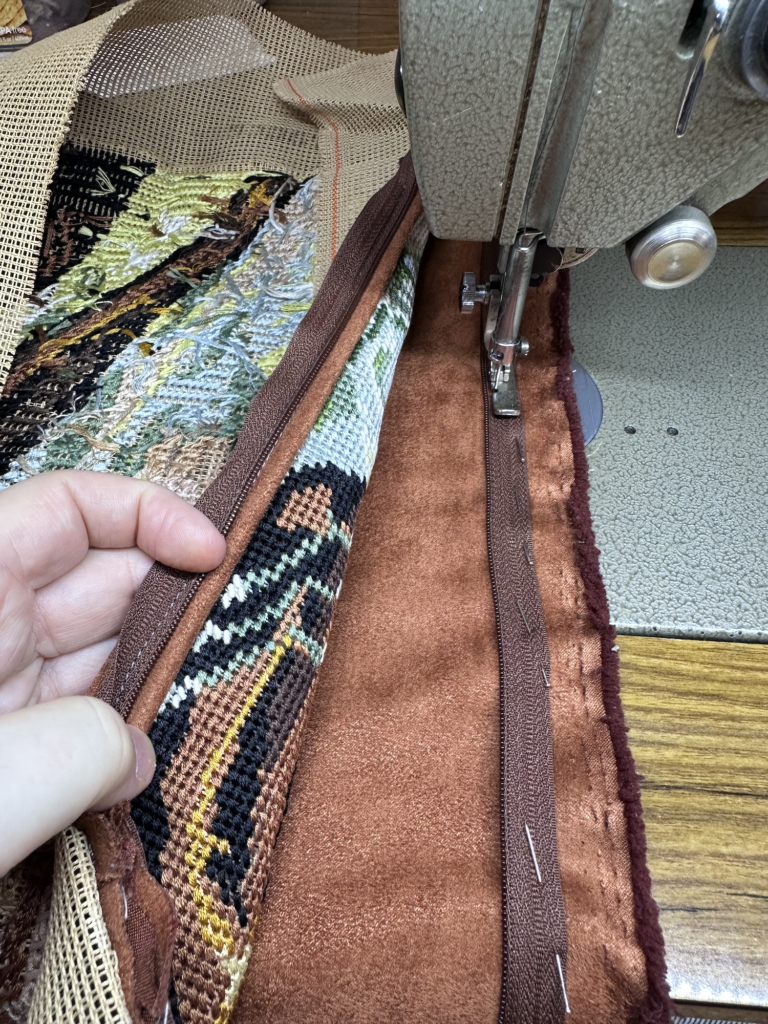
I managed to insert both zippers without too much trouble, only having to unpick one or two bits where I got a bit too close to the zipper teeth.
Then it was time to sew the other three sides of the cushion. The bits at each end of the zipper were the trickiest part, and I had to redo them a couple times. The rest was smooth sailing though.
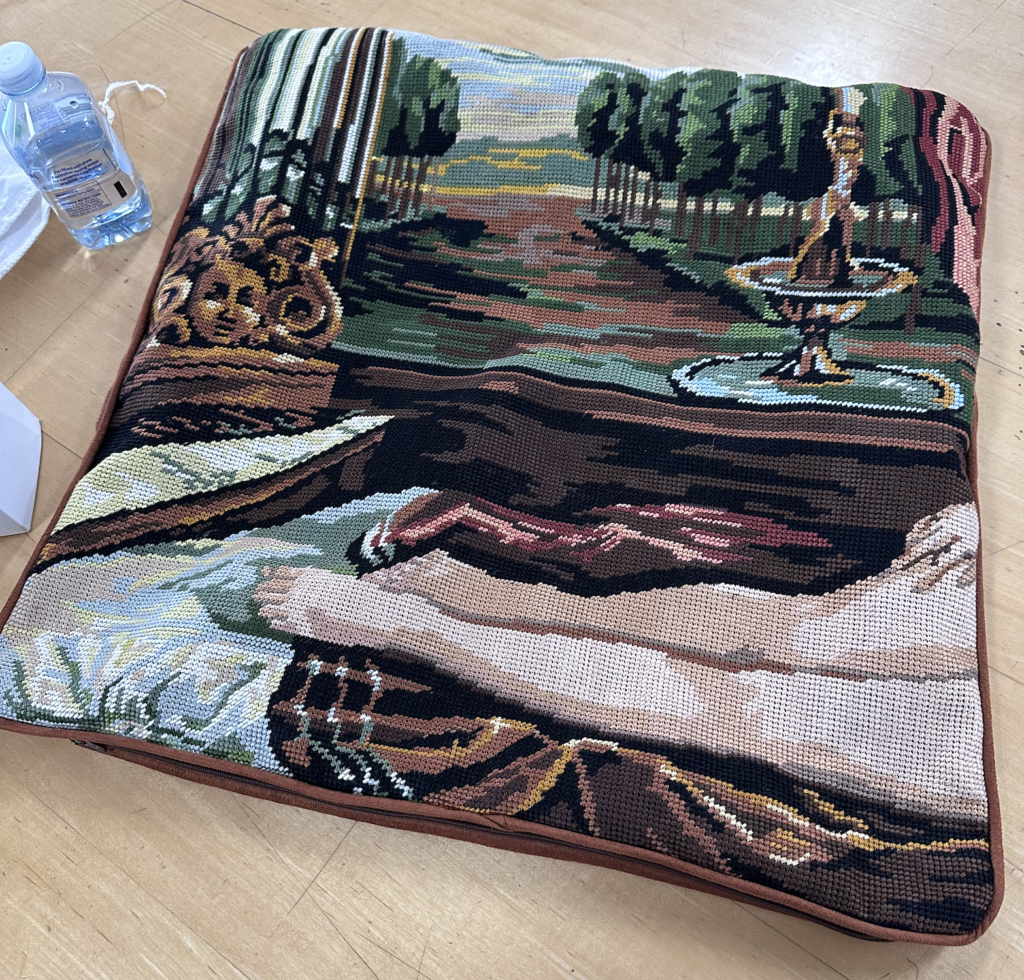
After turning it rightside-out, I had a finished cushion cover! The legs made me smile immediately. I knew this was going to turn out even better than I’d hoped.
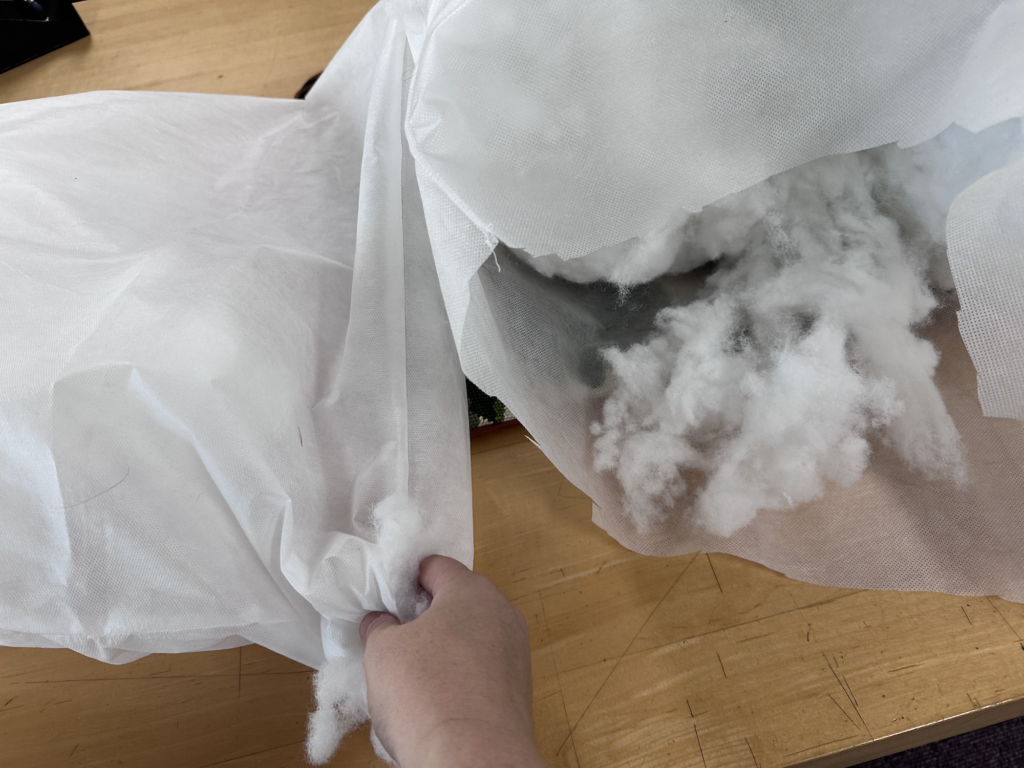
The final step was to sew custom-sized cushion inserts. Mrs. M showed me how to gauge the correct size and how to put them together. Each one took a fair bit of stuffing! The hardest part was then sewing the openings closed when they were so full and fluffy.
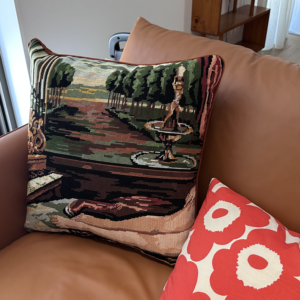
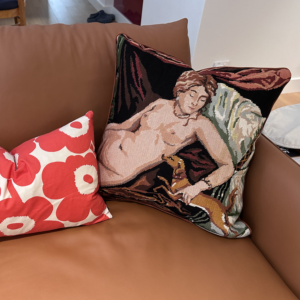
And here are the completed cushions! As you can tell, I was pretty stoked with how they turned out. It’s still obvious that they are part of the same picture, and I only lost a tiny bit due to cutting her in half.

While I’m sure there are other needlepoint nudie cushions in the world, these are pretty special. They look spectacular on the new couch too! They got a big thumbs up from both Rodd and his sister.
If you want to make needlepoint cushions of your own, Morris & Sons is definitely the place to start. They have everything you need including tapestry kits with canvas and threads. They also offer a professional service to make up the finished cushions for you once you’ve finished with the embroidery, which is handy if you don’t have an industrial-strength sewing machine at home.
Thank you to Mrs. M and Joseph for all their help with these! I’m so pleased we’ve been able to keep one of Kathy-Nanny’s pieces alive in our new home. 🩷
-
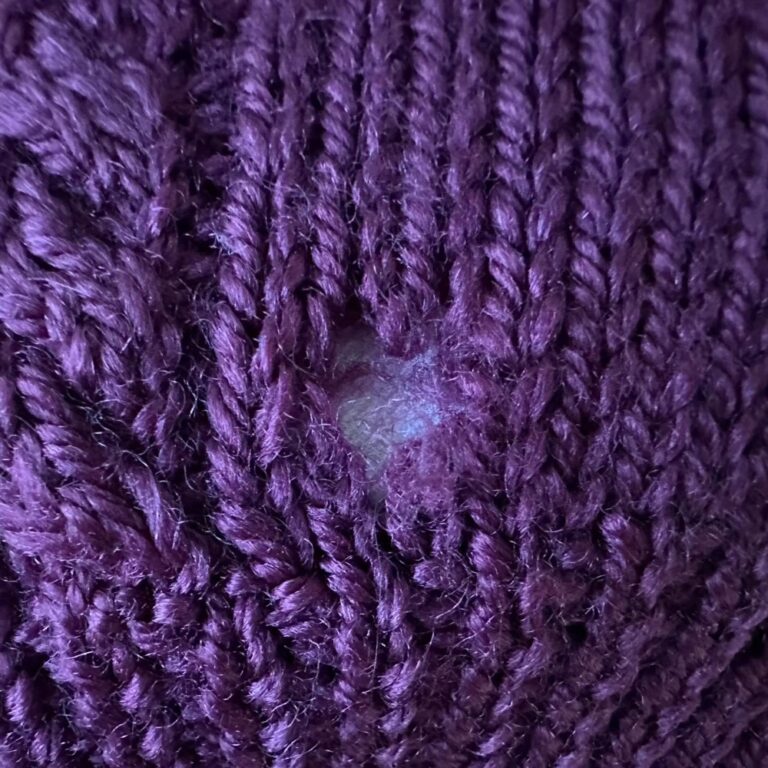
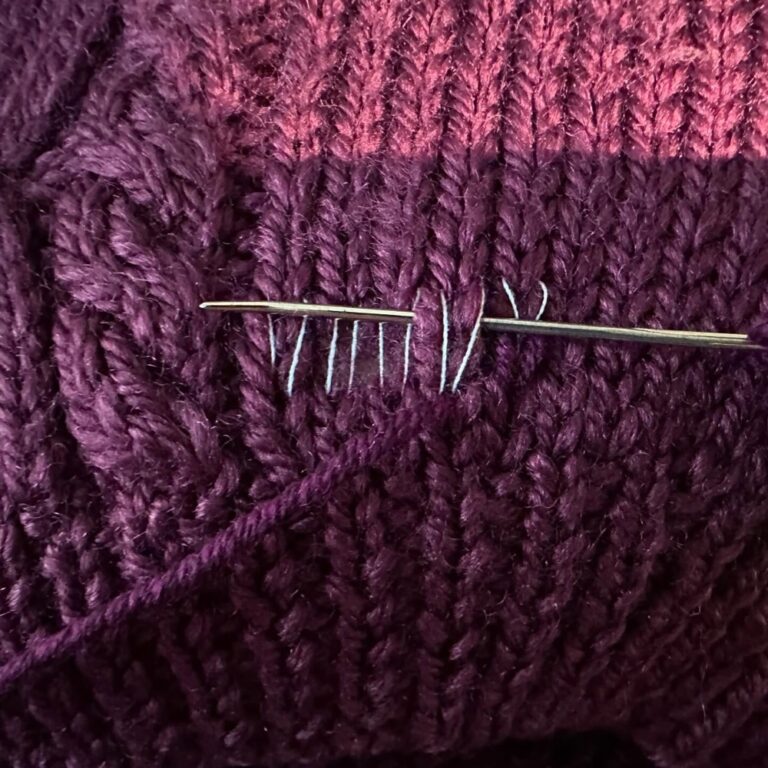
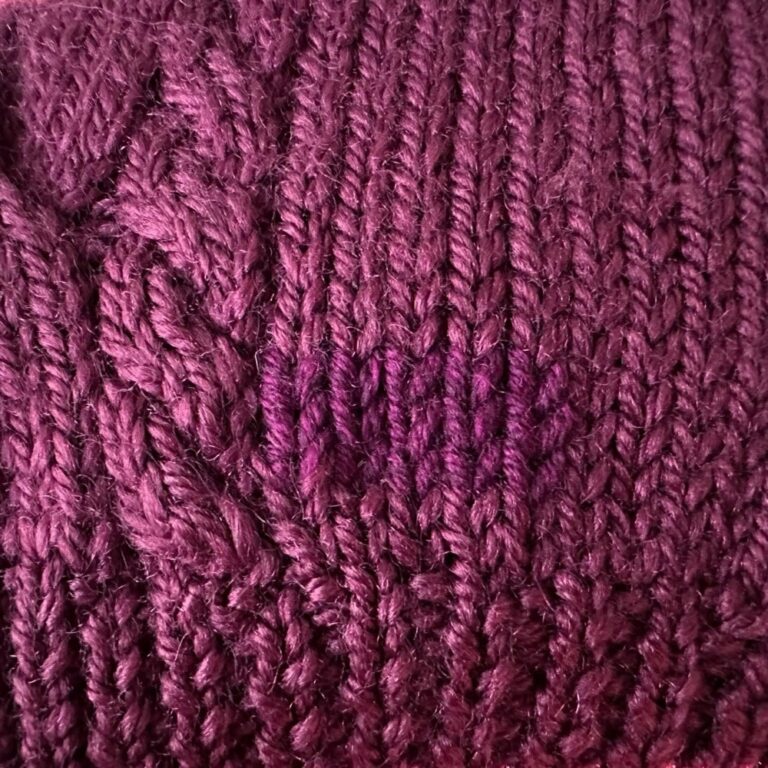
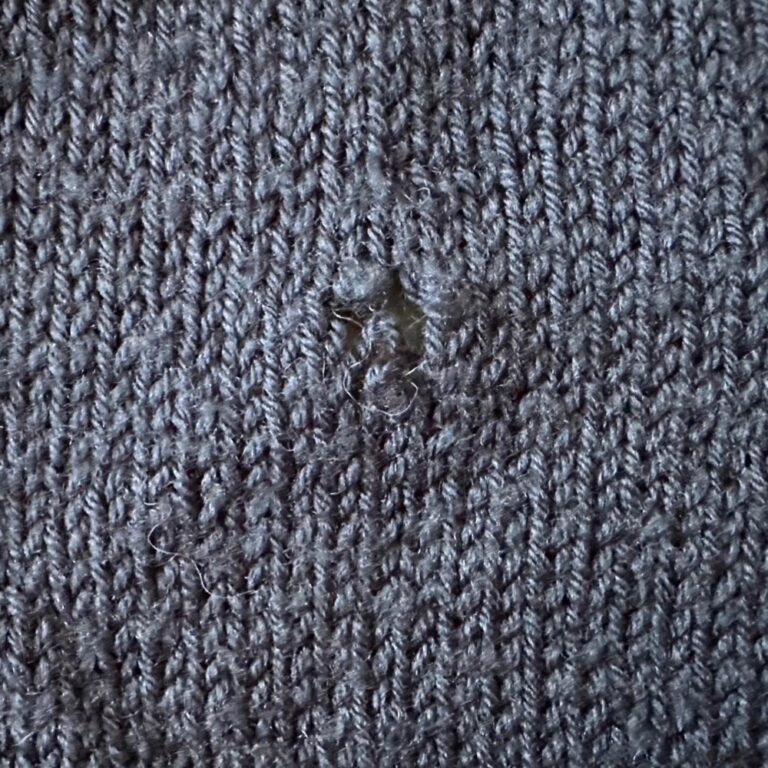
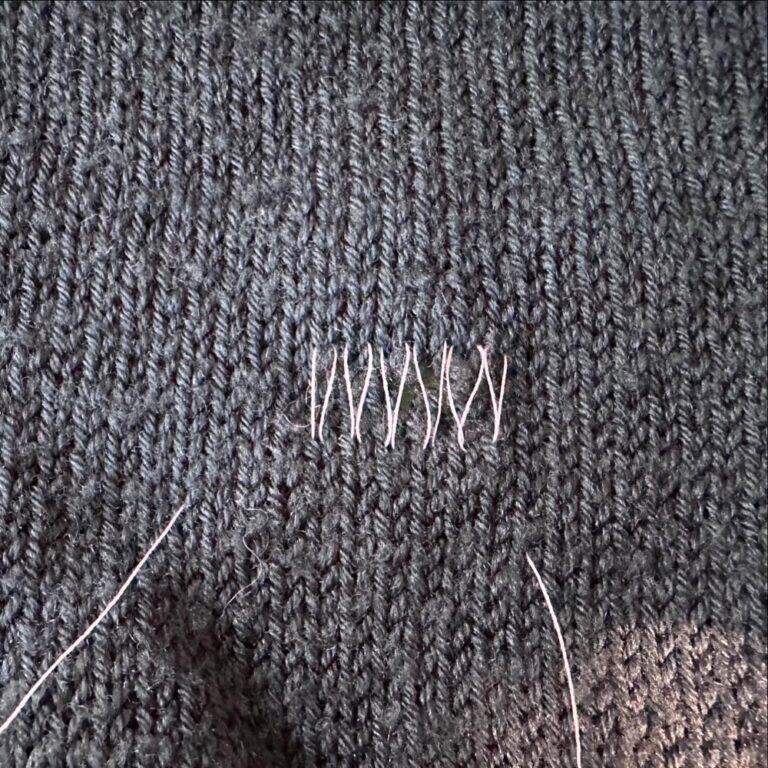
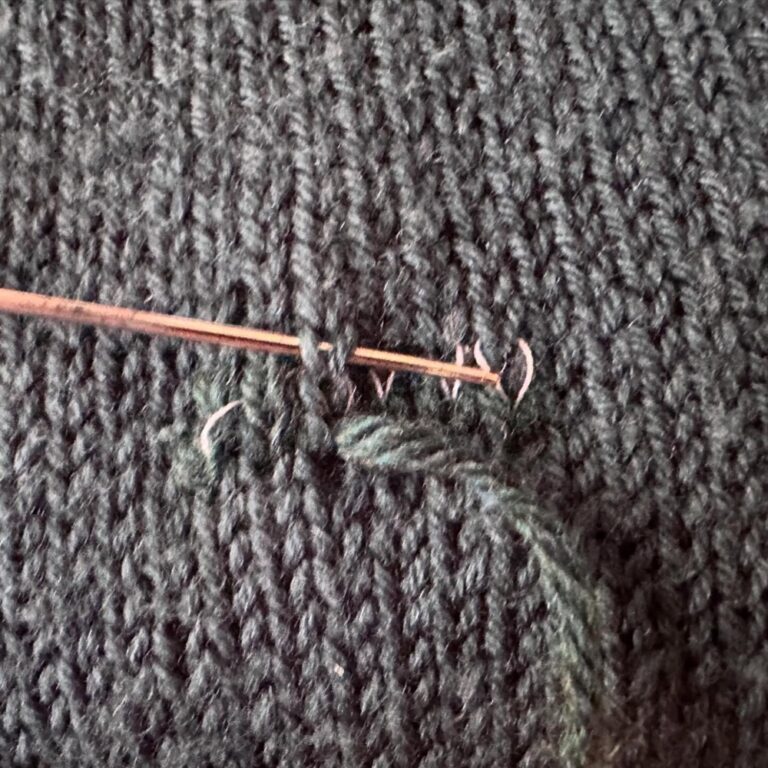
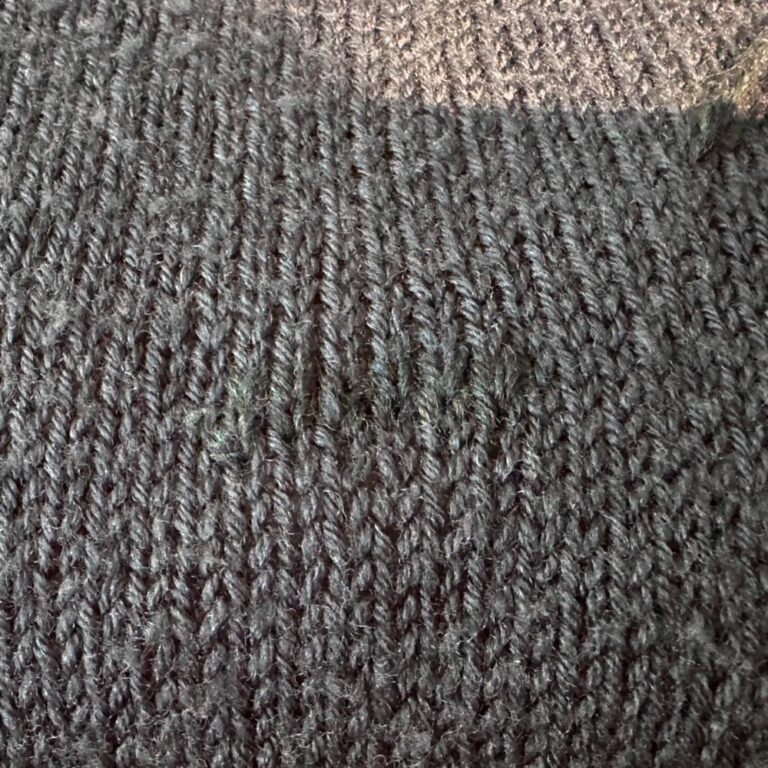
Photo Post
Mending day! A couple of our jumpers had worn holes and needed fixing. I’ve watched heaps of those videos of invisible darning, so I gave it a shot. I used sewing thread to provide a scaffolding and then Swiss darned over the top. Very pleased with the results! Hardly noticeable. 😍🧶
-
Photo Post
I finished it! This is the Easy Eyelet Yoke Lite in my reclaimed @hobbii_yarn Twister. Such a fun knit, and really suits this yarn. ❤️🧶

-
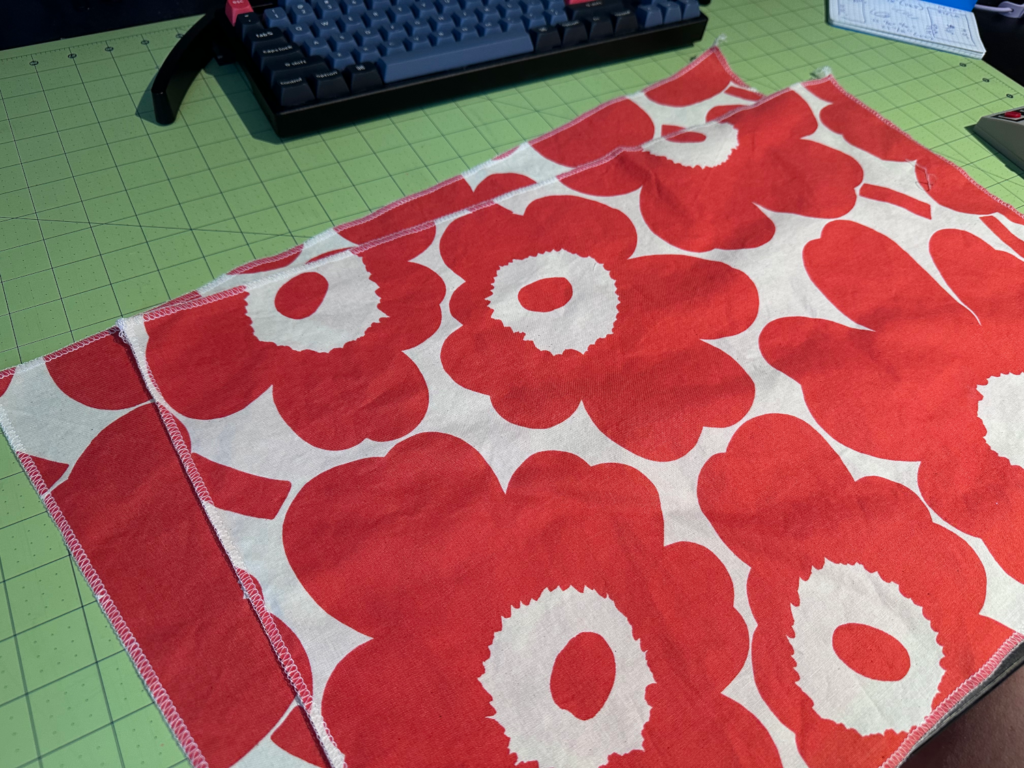
Marimekko cushions for the new couch
I’m a big fan of the Finnish design house Marimekko. They’ve been making gorgeous fabric prints and homewares for 70+ years. The only problem is that their stuff can be very, very expensive (especially here in Australia). A few months back though they had a clearance sale, and I picked up a couple meters of the iconic Unikko print cotton at 40% off. Today I decided to use it to make a couple cushions for our new couch.
We already had a pair of old IKEA cushions with covers that were starting to fall apart. The feather inserts were still good though, so I removed the covers to see how they were constructed. They were rectangular — 59cm/23.25″ long by 37.5cm/14.75″ wide — with a lapped zipper along the bottom edge. I decided to make the new covers a little smaller so they’d feel a bit plumper. (They’d lost a couple feathers over the years!)
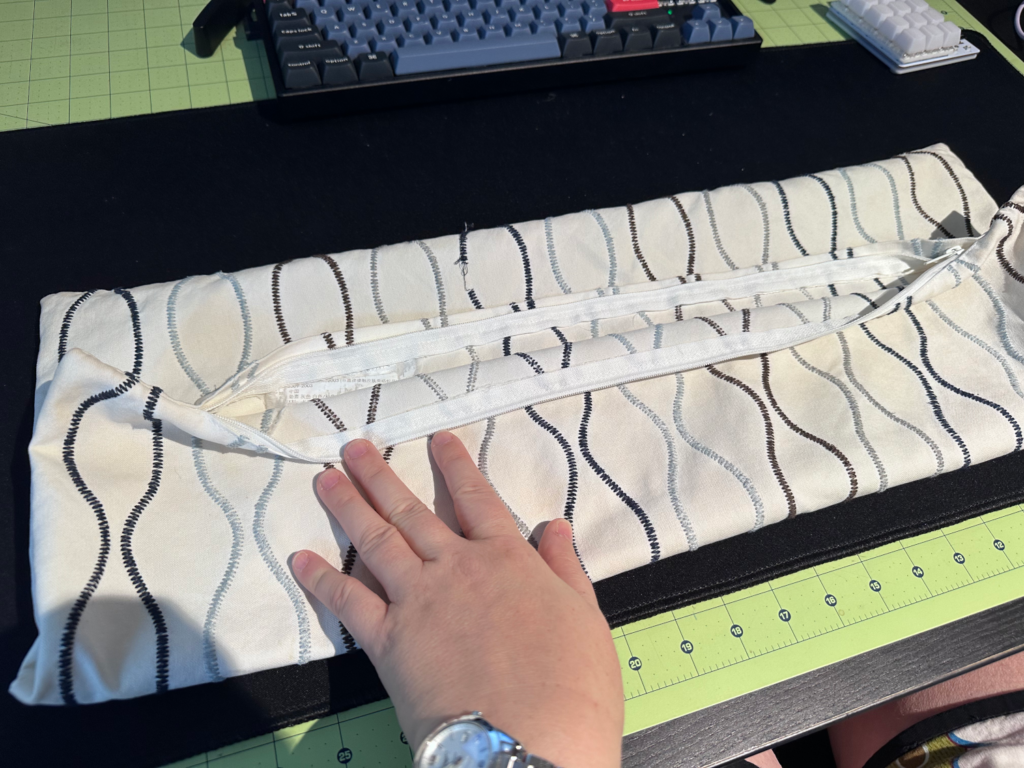
At this point Rodd was like, “So are you going to reuse the zippers?” I realised that was an excellent suggestion, so out came the seam ripper.
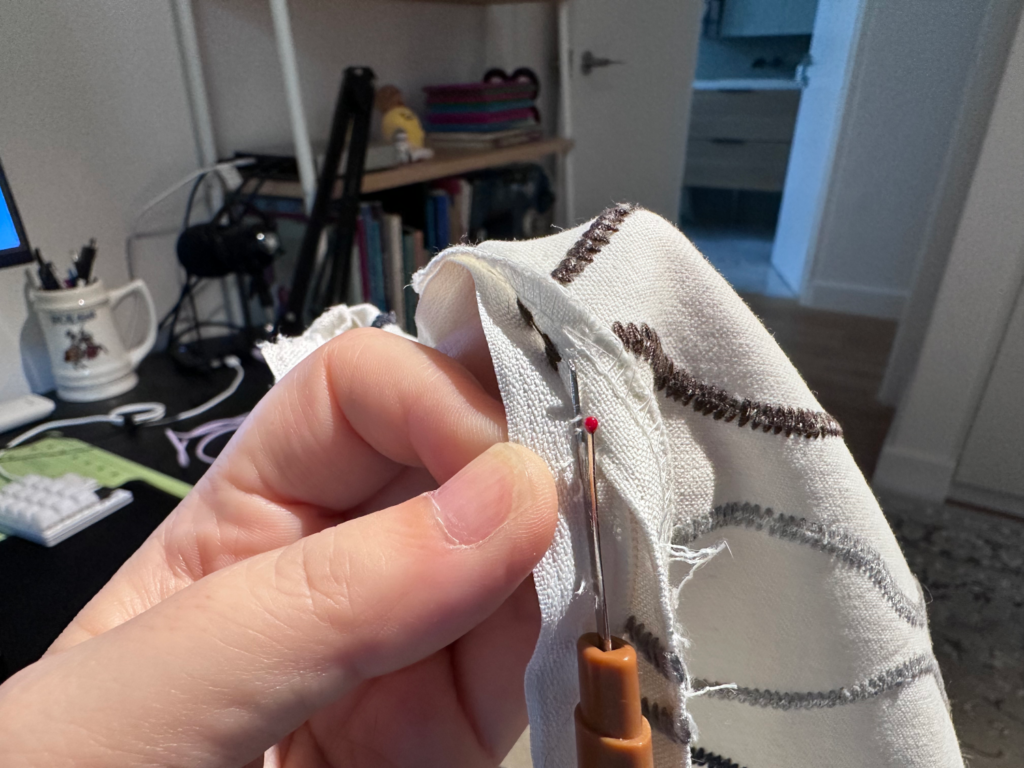
Once I worked out what size I wanted the new covers to be, I added on a bit for seam allowance and then cut out 4 panels from my fabric. I then used my overlocker to finish all the raw edges.
I’ve installed a few zippers in my time but I’m by no means an expert. I found this tutorial from The Sewing Directory to be really helpful. Once I had the zipper joining two panels together, it was very simple to sew around the other three sides.
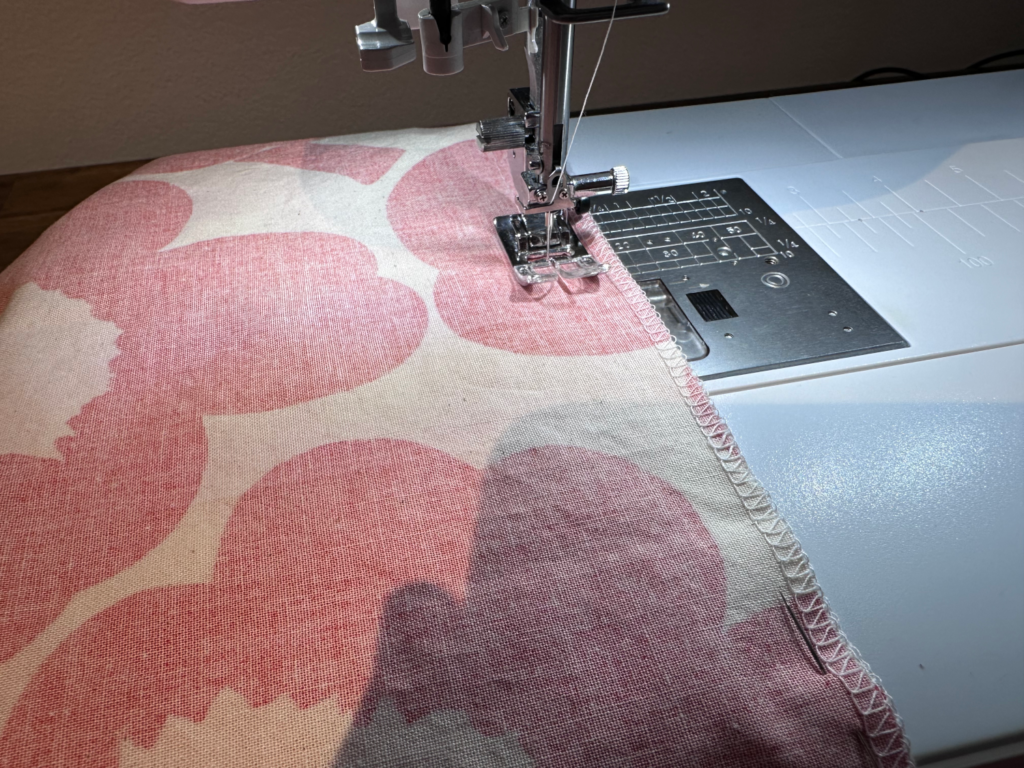
And here’s the finished cover showing the lapped zipper! Why yes, I did sew one side of the zip with red thread and one with white, thank you for noticing. 😂

Here’s a cushion in all its plump glory. To buy one would probably be like $90 AUD, so my version came out a fair bit cheaper. (That’s discounting my own labour though, which you should never do if you’re actually selling stuff you create!)

Don’t they look lovely on the new couch? I might need to make some more…

-

Craft Room IKEA Hack
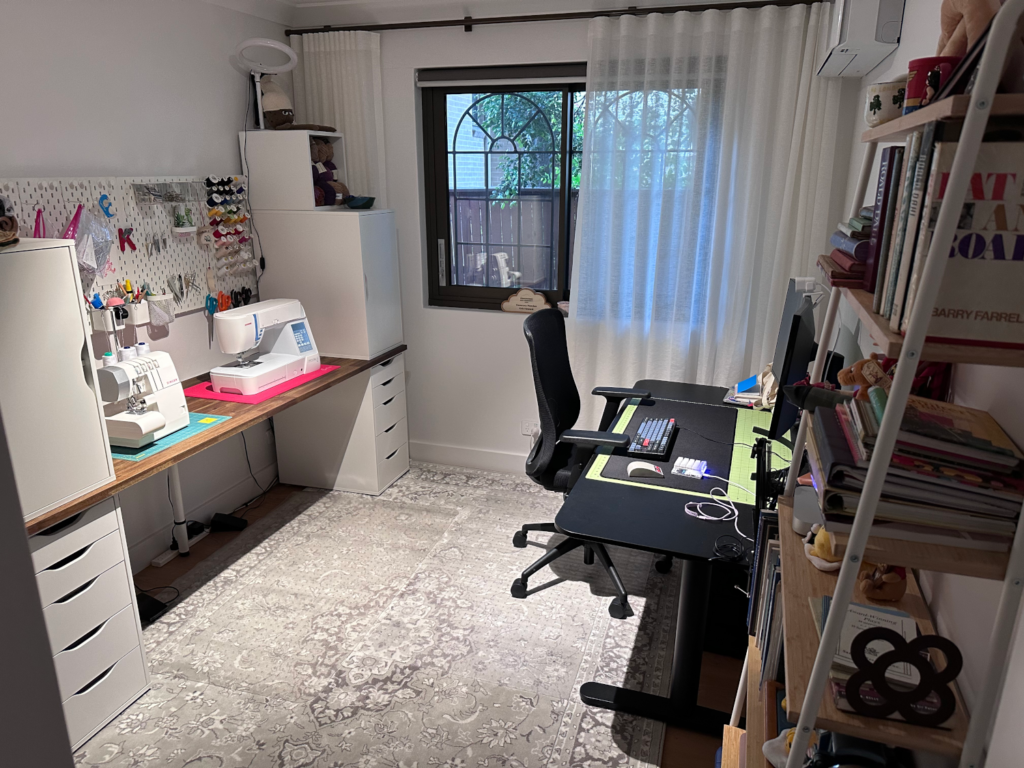
In 2024 we embarked on a pretty major home renovation, and once we were moved back in I spent a lot of time thinking about how I wanted to set up my office. I knew that I wanted a dedicated sewing table where I could have both my sewing machine and overlocker set up, with all my tools and supplies in easy reach. I also wanted a cutting table (preferably height adjustable), and somewhere to set up the ironing board for a sewing session. I also needed storage for my fabric and wool.
In terms of assets I had an existing IKEA Bekant standing desk, which serves as my computer workstation but can also conveniently double as a cutting table. I have a large cutting mat that I leave on it, and I can pretty quickly clear away everything when I need to cut something big. I also have a rolling office chair. Beyond that, the room was a blank slate.
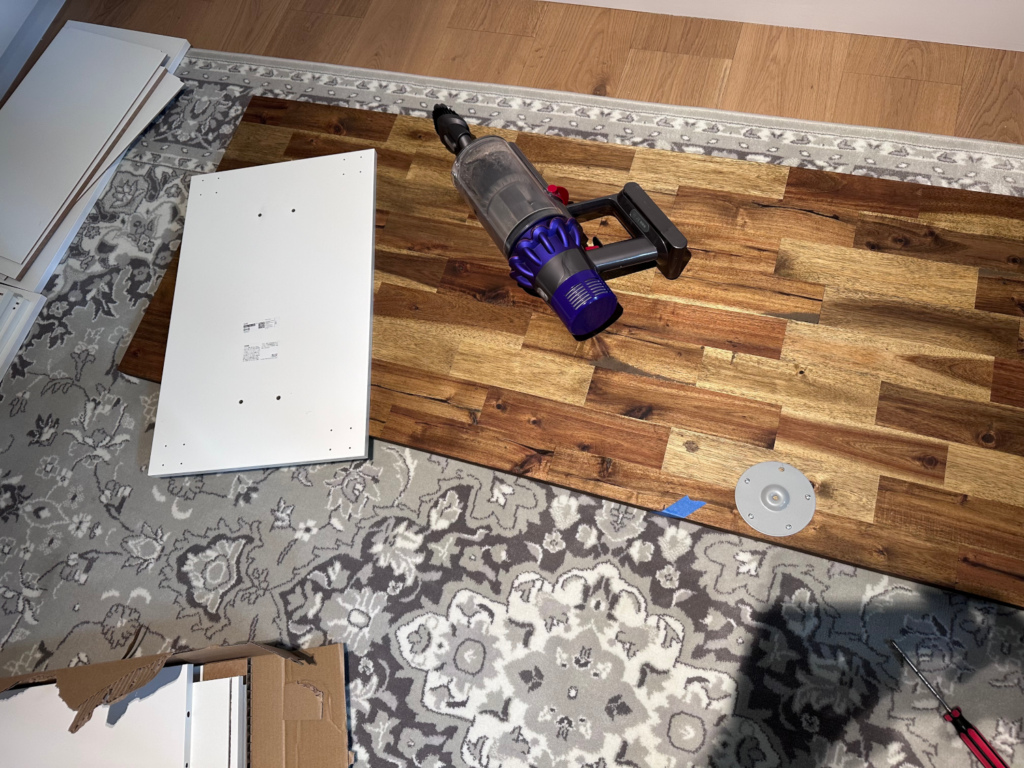
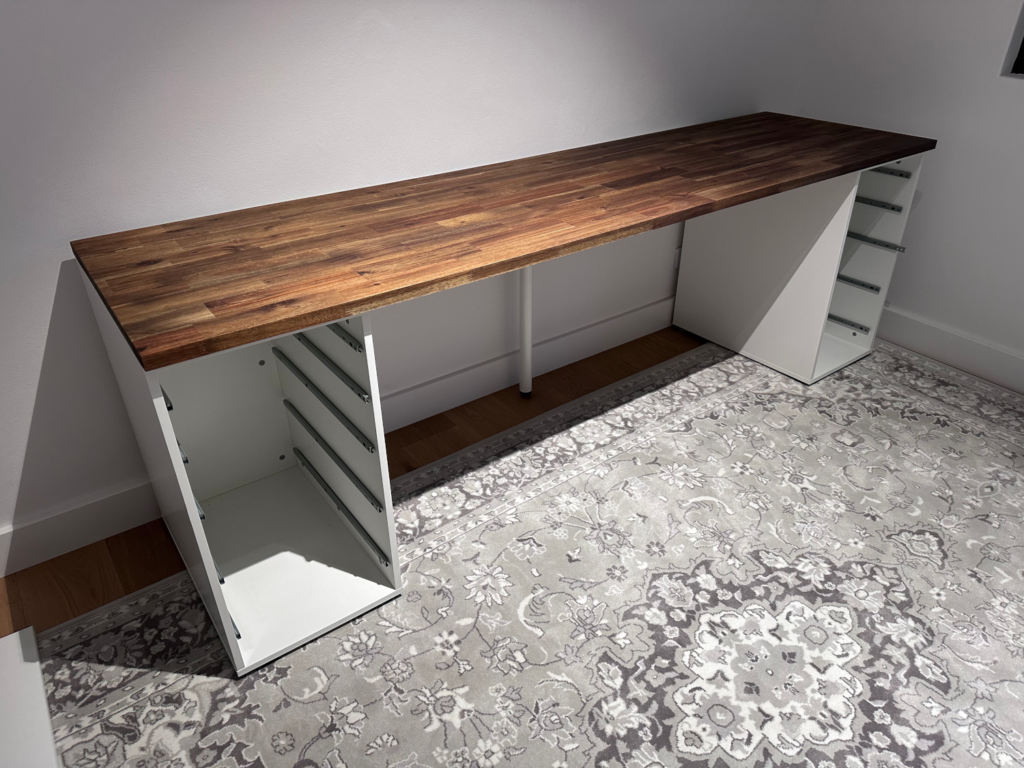
I did a lot of googling at what others had done, and I was very inspired by this Garage Workbench DIY. I realised that the IKEA Lagkapten/Alex desk combination was a good starting point, but it had one significant drawback — durability. The Lagkapten has a honeycomb core, and apparently it will sag over time if you put a lot of weight on it. (That’s why IKEA always show a center leg on any of the longer desks.) And guess what? Sewing machines are pretty heavy. I read a lot of posts about people using “stiffening rods” and such to try to reinforce them, but eventually realised it would be a lot simpler to just use an actual wooden desktop. Bunnings make a pre-finished timber panel that I realised would work perfectly. With all that in mind, I used SmartDraw to mock up the floorpan and see how everything would fit.
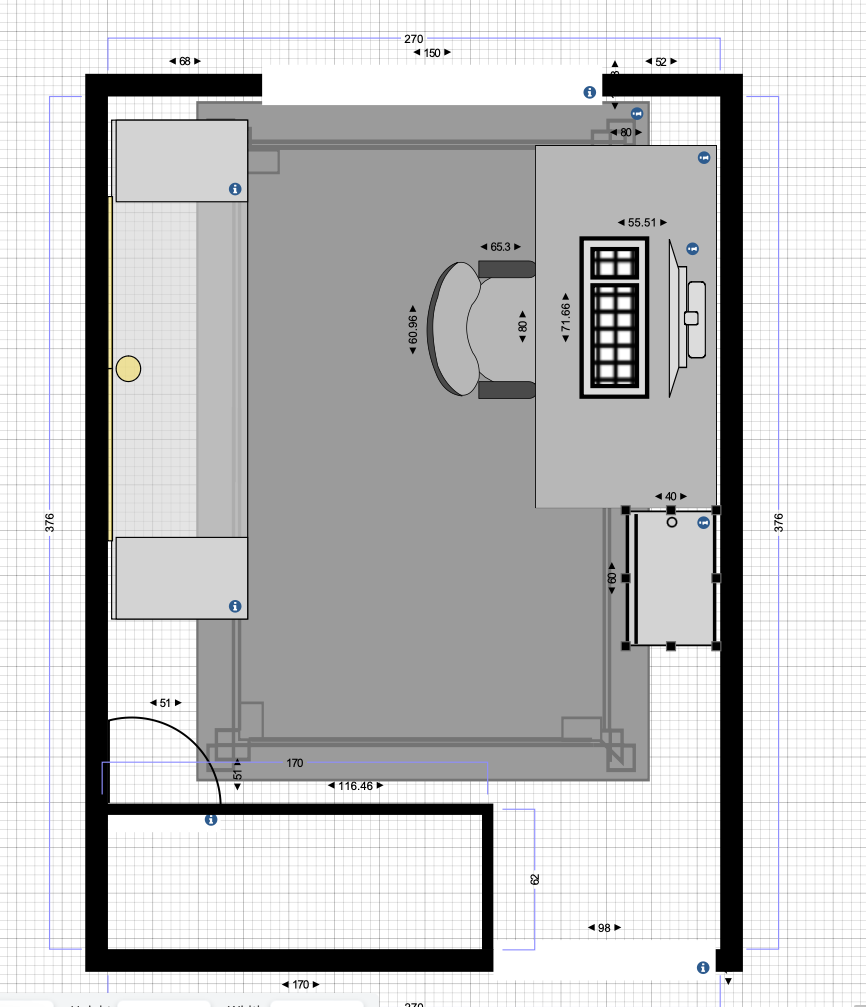
Once I had the plan, it was time to go shopping! Protip: before you make any major IKEA purchase, check to see if you’re able to access any discounts. We learned that Macquarie Bank sell IKEA gift cards at 6% off, which was a nice savings for not much effort.
Thankfully, we were able to find everything we needed. First step: protect the floor.
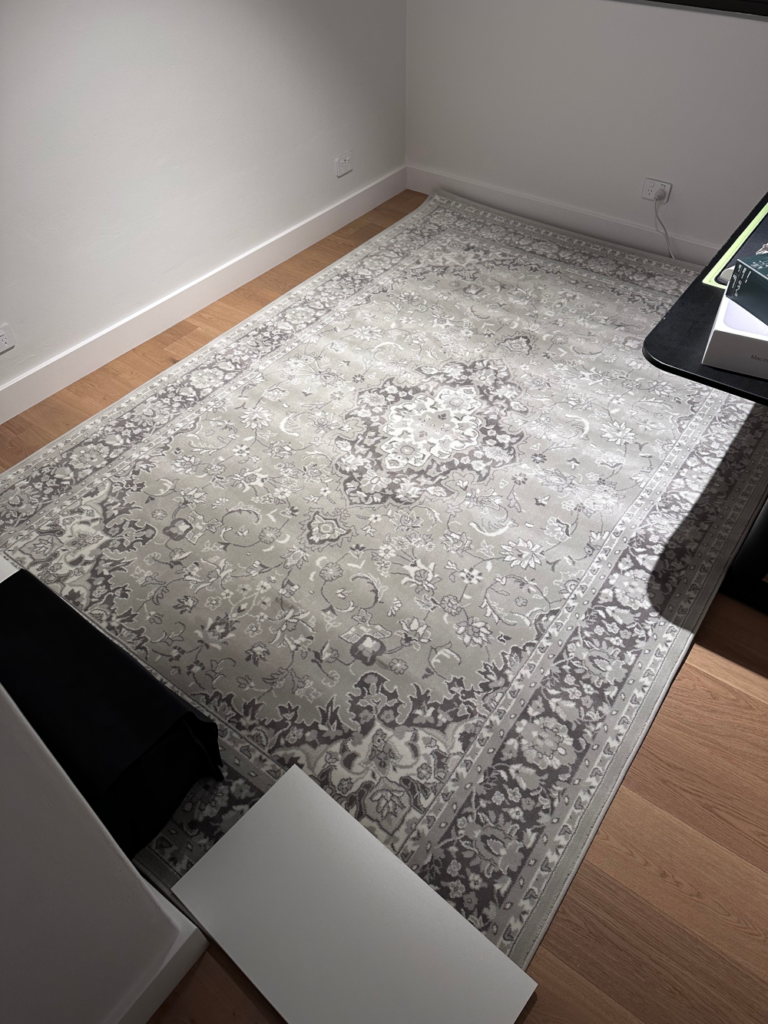
I wanted to protect our lovely new wooden floors from the rolling wheels of my chair. This is the IKEA Vedbäk rug. It’s not real wool, but I don’t mind so much in here. We put out an underlay first to keep it from shifting around, and then unrolled the rug. I put some boards and boxes down on it overnight so help it flatten out.
Then it was time to start assembling.
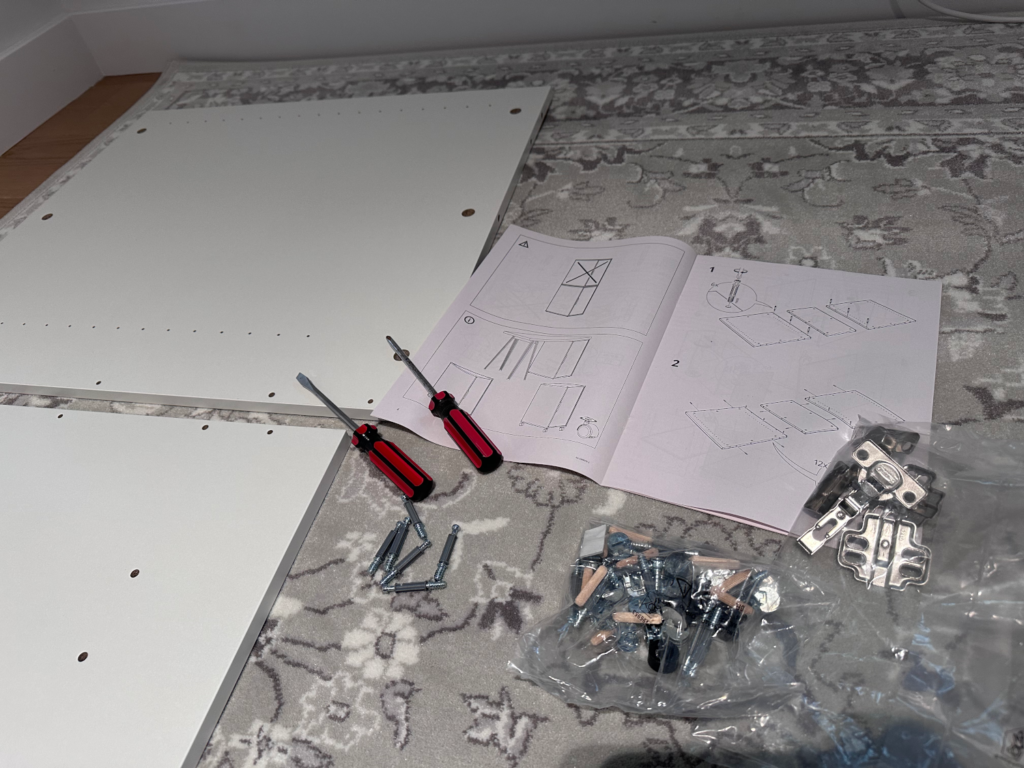
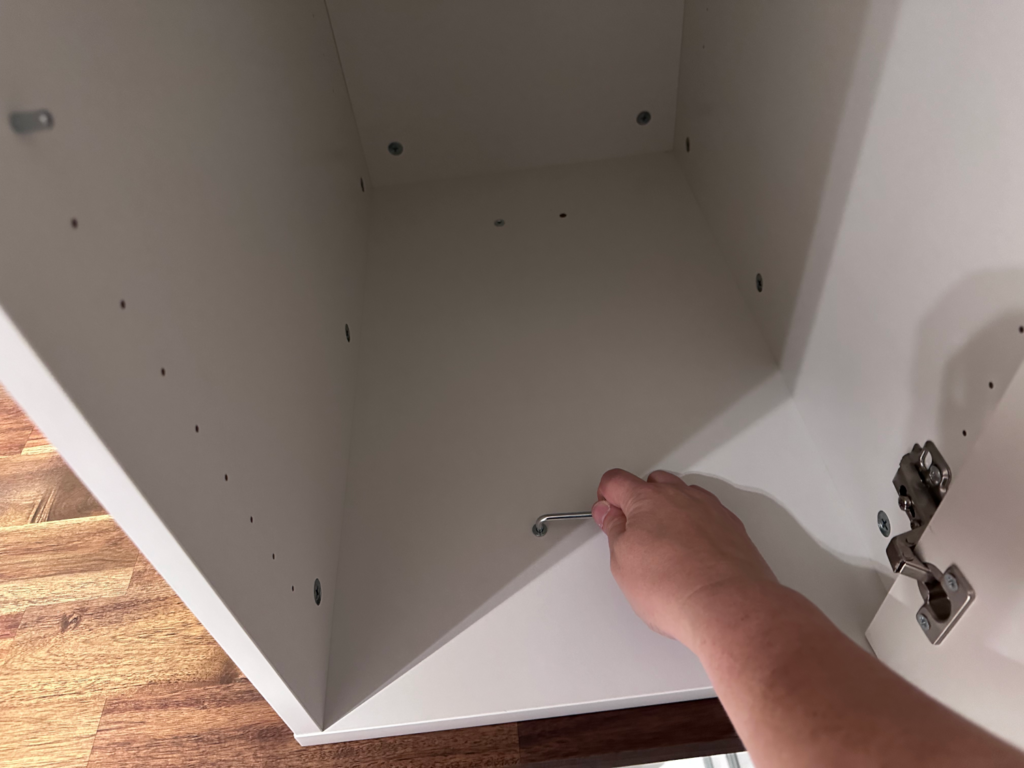
I started with two Alex storage units. Here they are put together and set aside. I made sure that the door openings mirrored each other. The Alex units come with a panel with pre-drilled holes that you can use as the top or the bottom, depending on how you want to set them up. Here I made sure the holes were at the bottom. (You’ll see why in a bit.)
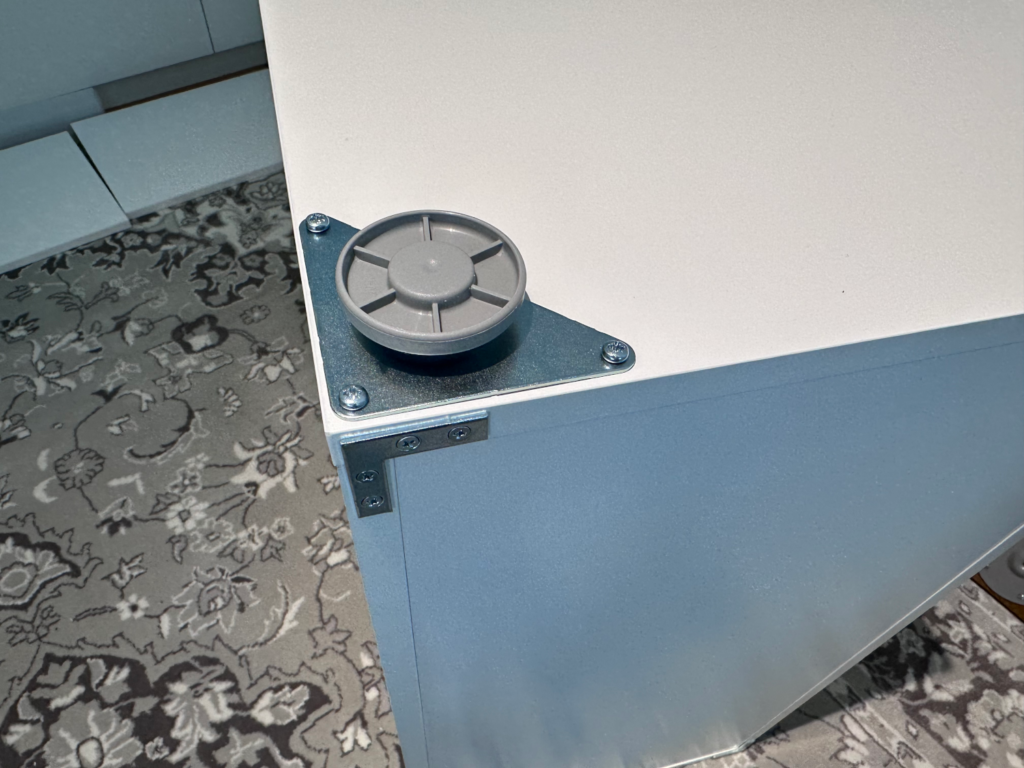
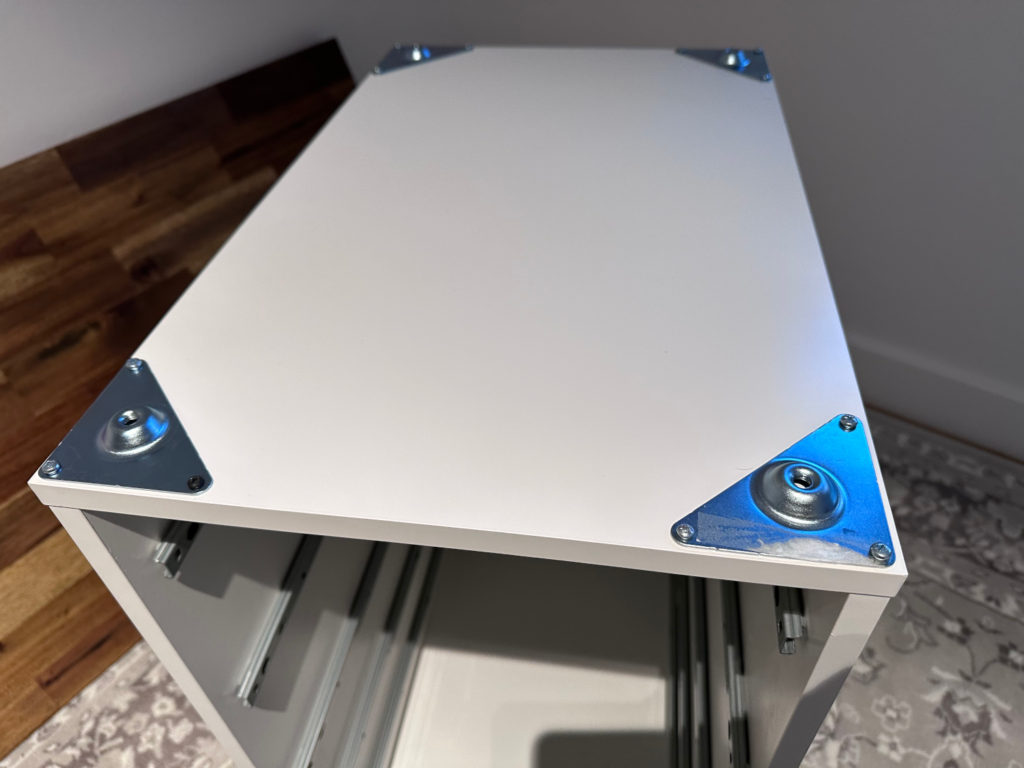
I knew that I didn’t want to just rest the desktop on the units, but instead to bolt everything together so it would be rigid. Before I put the other two Alex units together, we wisely had the idea to use one of the bases to mark out holes for pre-drilling the desktop. We also attached the base plate for the Adils leg. (While I knew my desktop would be strong enough without it, I figured it wouldn’t hurt to have it. We pushed it as far back in the center as we could.)
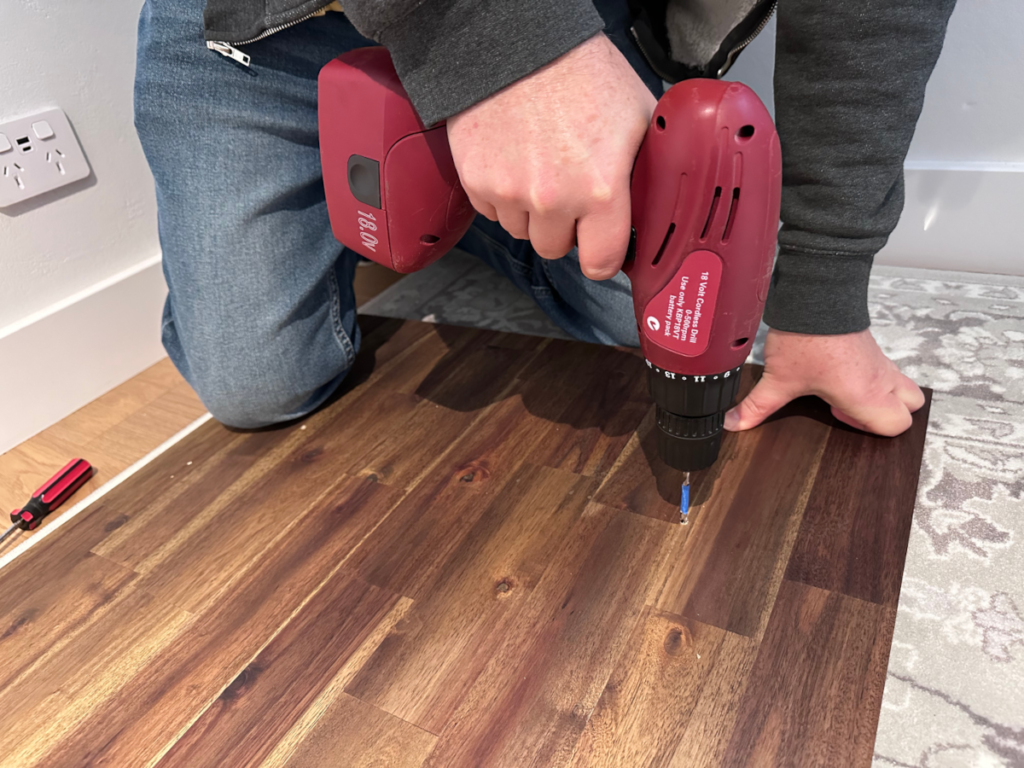
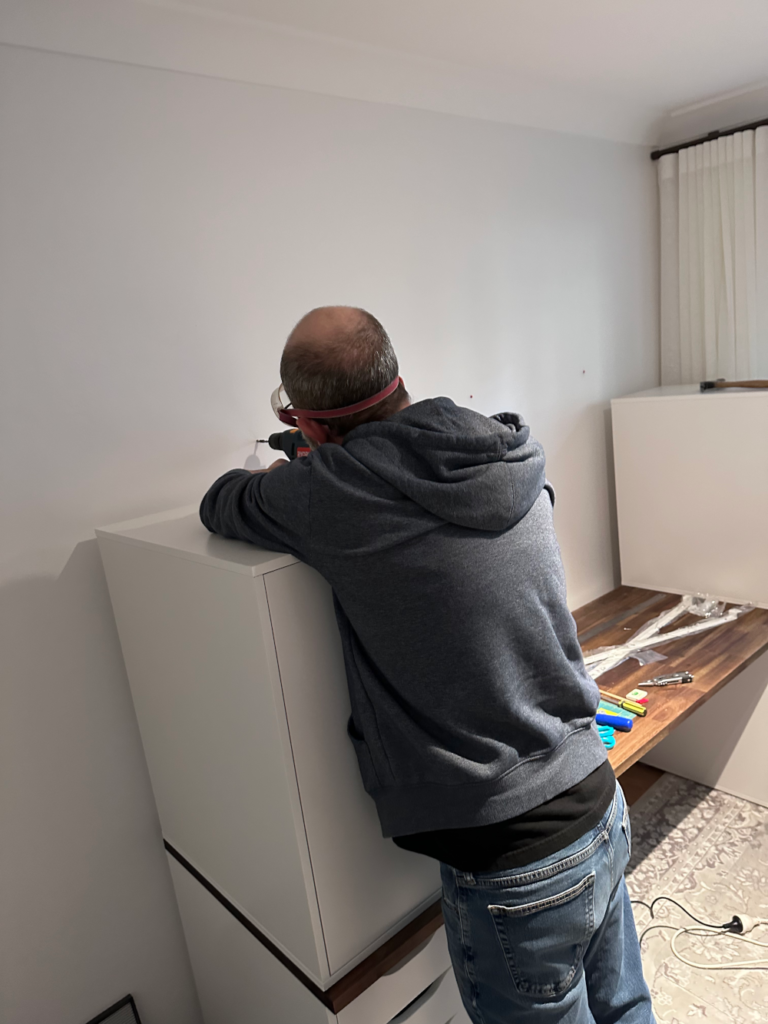
Here you can see Rodd marking the holes for drilling. The Alex unit bases have 4 holes, and we decided to use the inner set for securing the upper units (on the top side of the desktop), and the outer set for the lower units (on the bottom side of the desktop). That way the screws had no chance of hitting each other. We lined the base up flush with the back and edge of the worktop and used a pointy screwdriver to mark the spot.
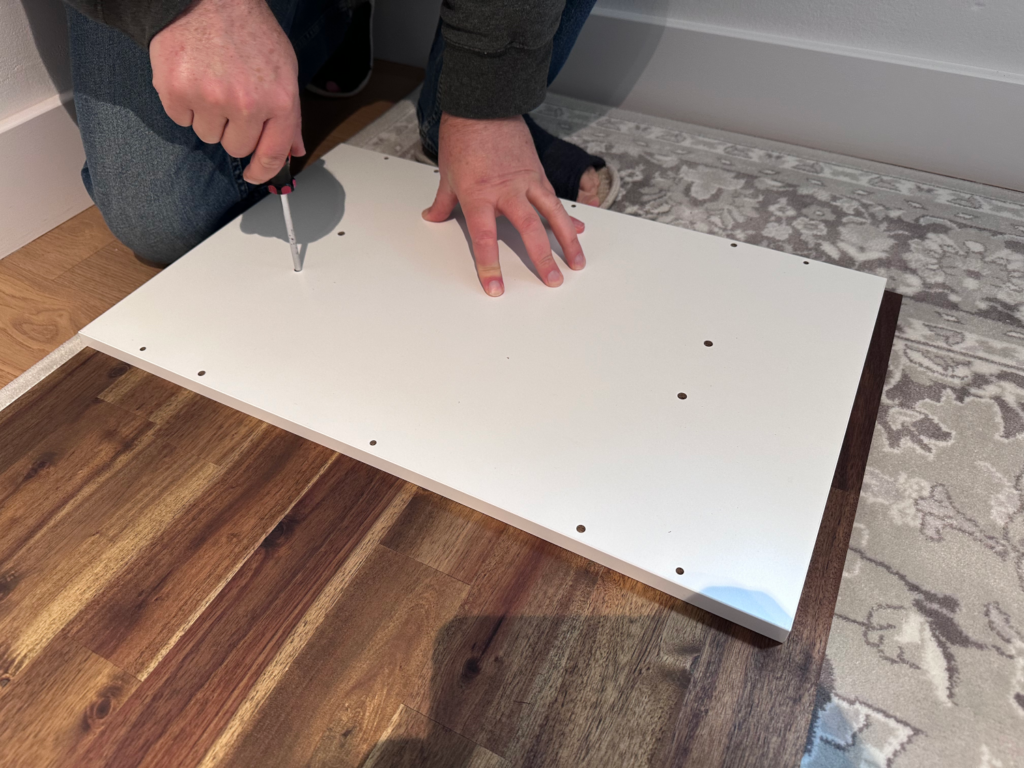
Here’s Rodd drilling one of the holes. We worked out the depth needed based on our wood screws and the depth of the Alex base plate, and he put a piece of tape on the drill bit to show him how far to go.
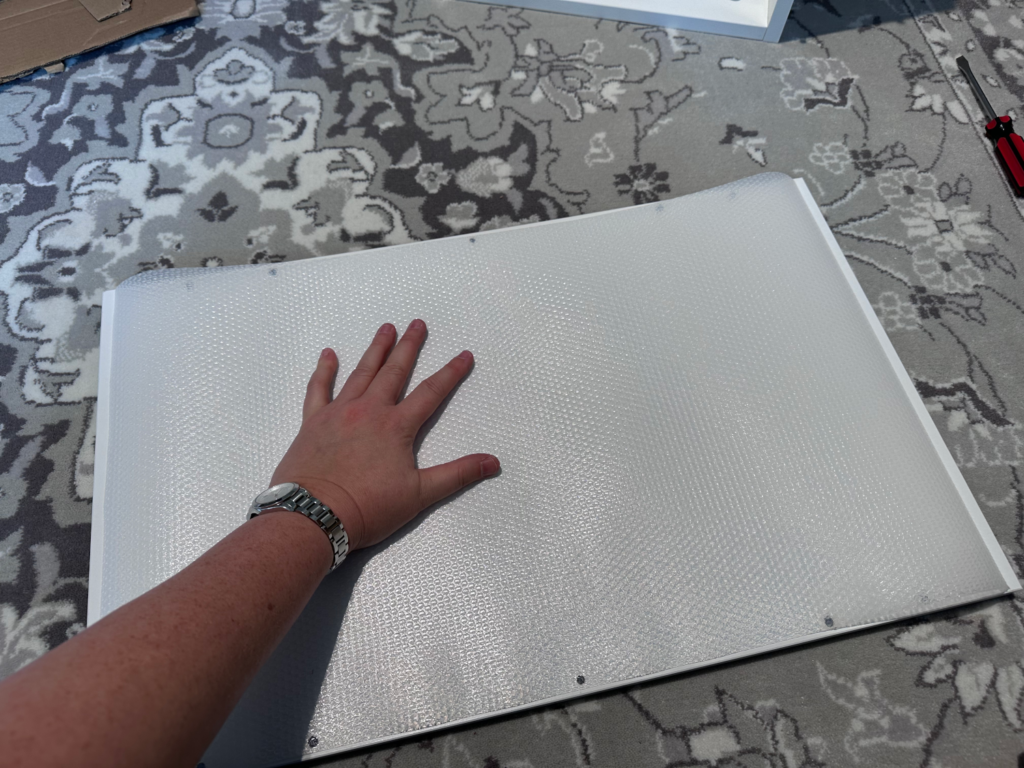
We also had the idea to put something in between the Alex units and the desktop, to add some cushioning and to protect the desktop a bit (in case we wanted to use it for something else in the future). I’m not really sure this step was needed, to be honest. But I bought some of IKEA’s Variera drawer liners and used the Alex bases to cut out appropriately sized pieces.
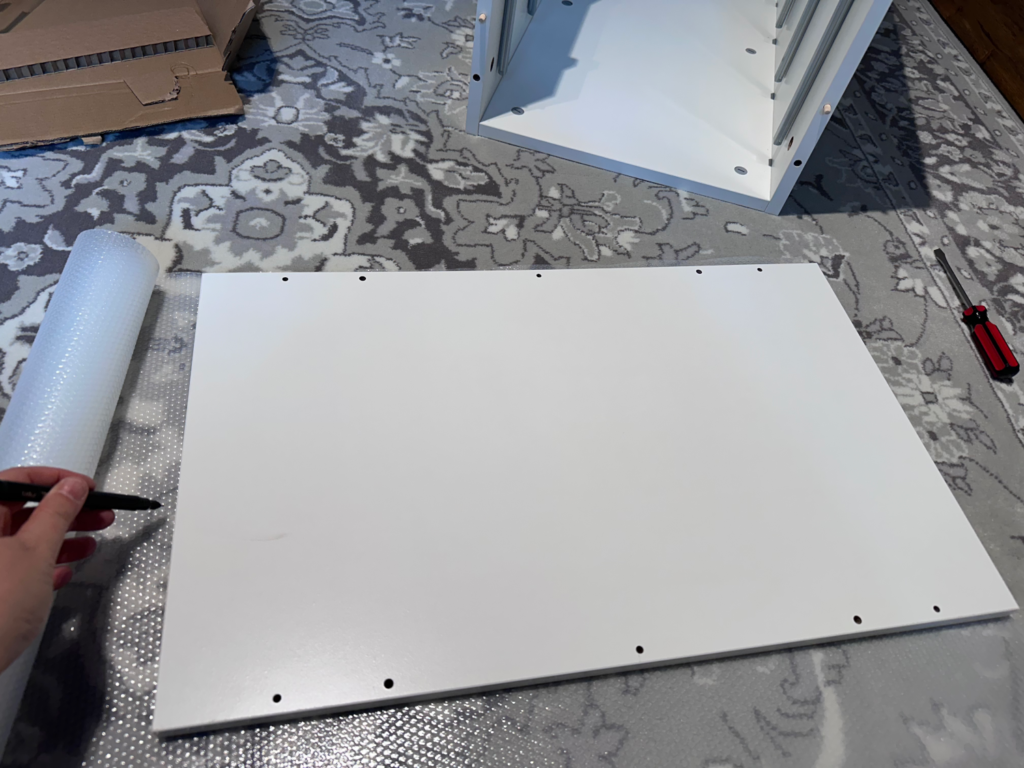
Here you can see one of the drawer liner pieces, ready for final assembly.
For the bottom supports, I went with two of the Alex drawer units. For these, I made sure that the base with the holes was on the top since we’d be screwing into the desk. I was a little worried about how well they’d stand up to the weight we’d be putting on top (desktop plus another Alex unit). IKEA don’t really seem to recommend stacking them. I decided therefore that a little extra support couldn’t hurt. We bought a couple packs of these corner braces at Bunnings…
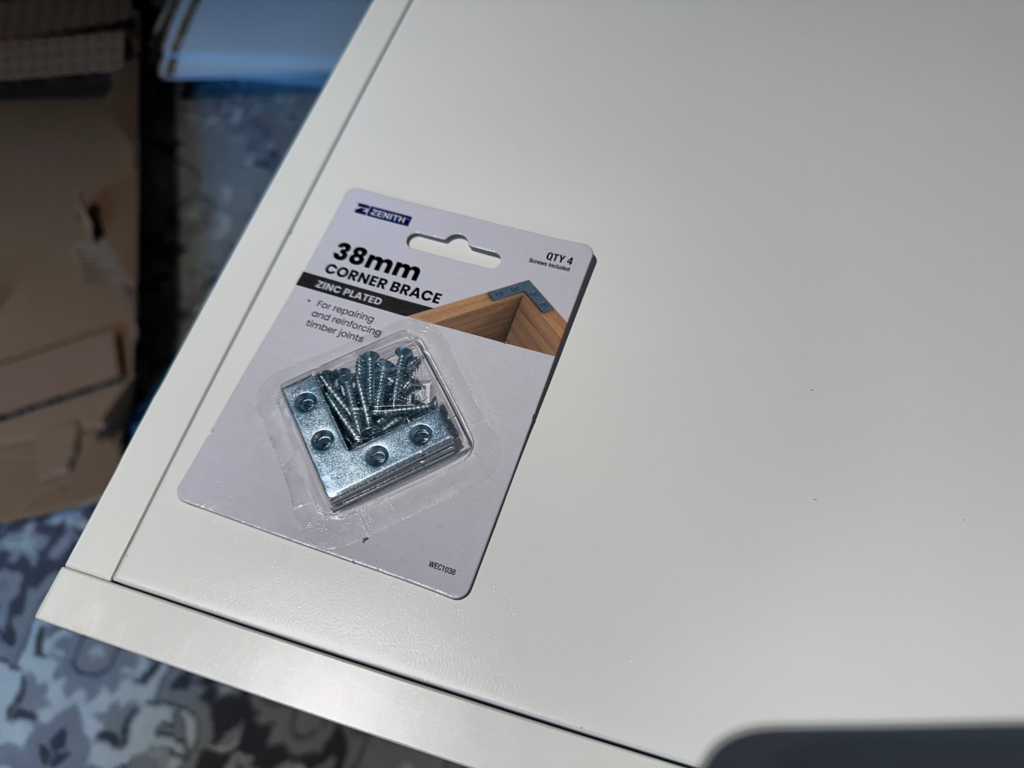
And I screwed them into each corner on the back of the Alex drawer units.
You can also see that we purchased Eket feet to use on the bottom units. These are adjustable, so I knew that would help to level the whole thing given that the front would be sitting on the rug. Happily, the screws for the foot base plate didn’t run into the ones for the corner braces. Here’s one of the bottom units upside down. Important note: while you can use longer screws for the outer holes since they run down into the sides, you need to use pretty short ones for the inner one to avoid breaking through the base.
Hopefully this will help illustrate what I mean.

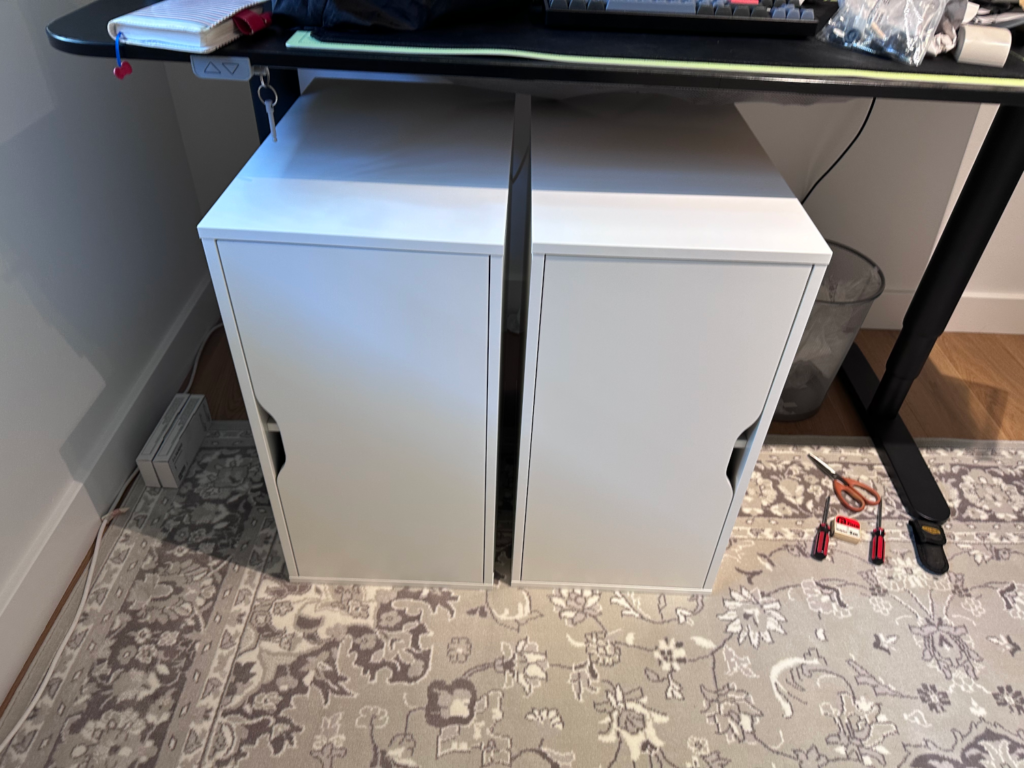
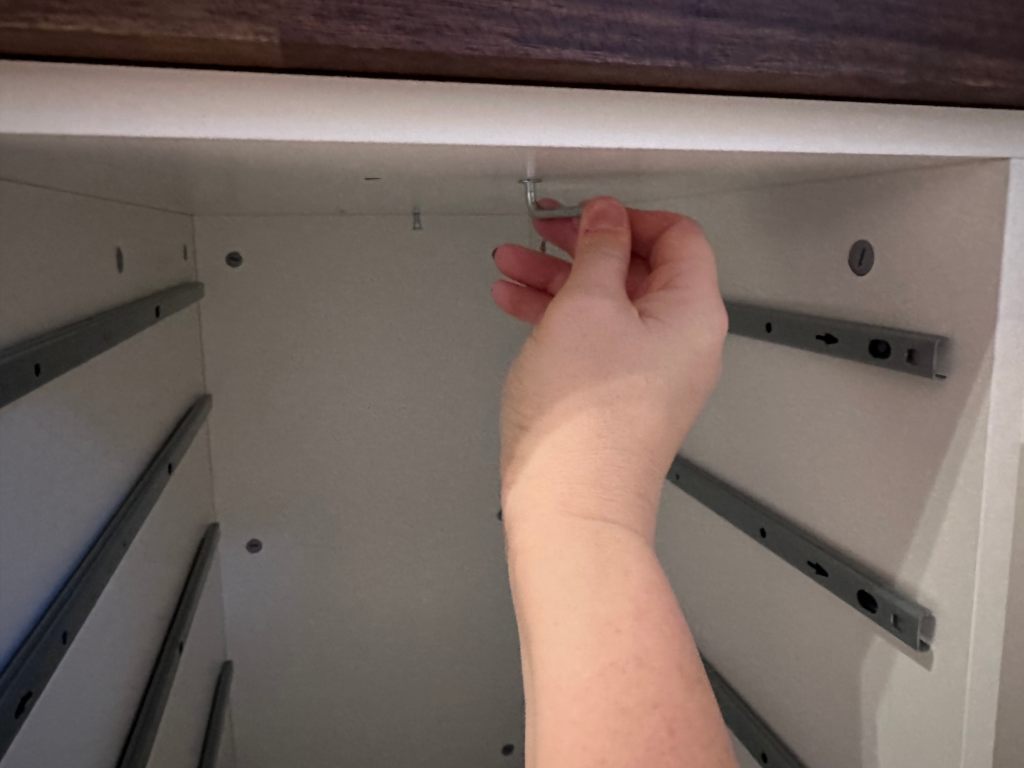
And now it’s finally time to start putting the thing together! We set up the bottom two Alex units, placed the drawer liners on top, and then placed the desktop on top of that. Then I reached up from the inside with a hex key to screw in the wood screws. (These are the ones that come with the Alex and would normally be used to attach it to the Lagkapten top.) I had to first poke through the drawer liner, of course, and then it was a bit of faffing about to get the holes exactly lined up with the ones we predrilled. But eventually I managed to get them screwed in. Remember, on the bottom we secured just the two outer holes, front and back.
Here’s what we had so far. So that’s two Alex drawer units on the bottom, each with reinforced corners (on the back side) and Eket adjustable feet underneath. The desktop is screwed to the top of each from inside the top of the Alex units (using the two outer holes). There’s also an Adil adjustable leg at the center back.
Next it was time to stack the upper Alex units. I put down my pre-cut drawer liners and then carefully placed the upper units. Again, I had to poke through the liner and then laboriously shift things around until I had the holes exactly lined up. But eventually I was able to get each one screwed down, this time using the two inner holes.
Here it is with one upper unit attached…
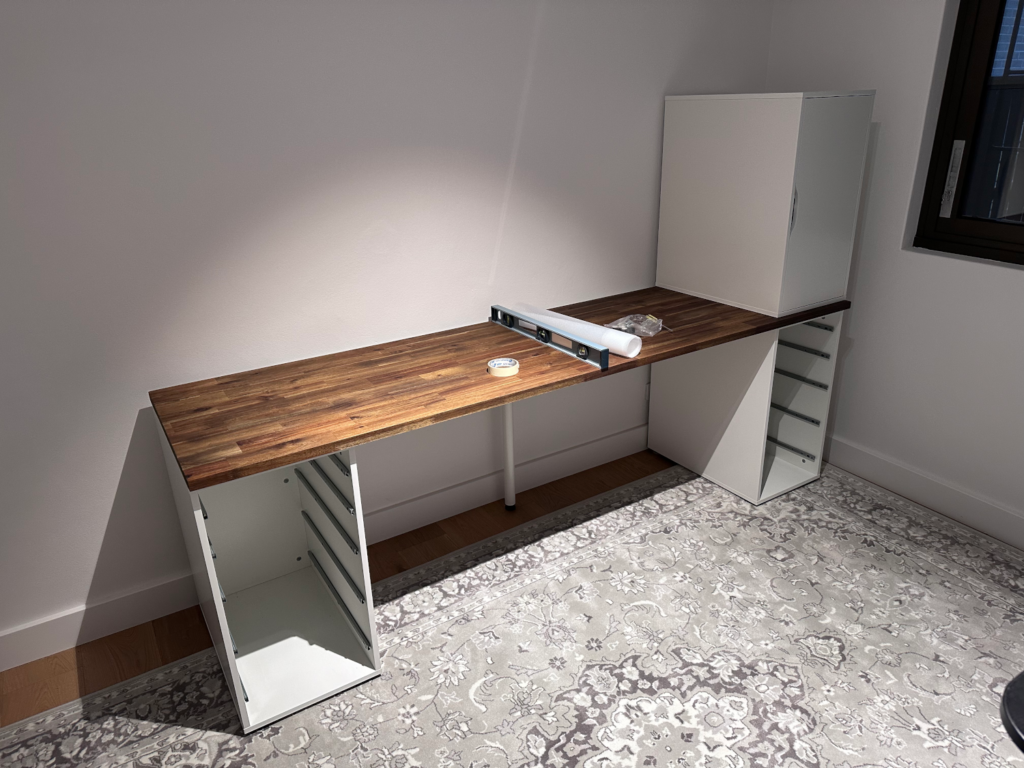
…and now with both upper units attached and all the drawers inserted!
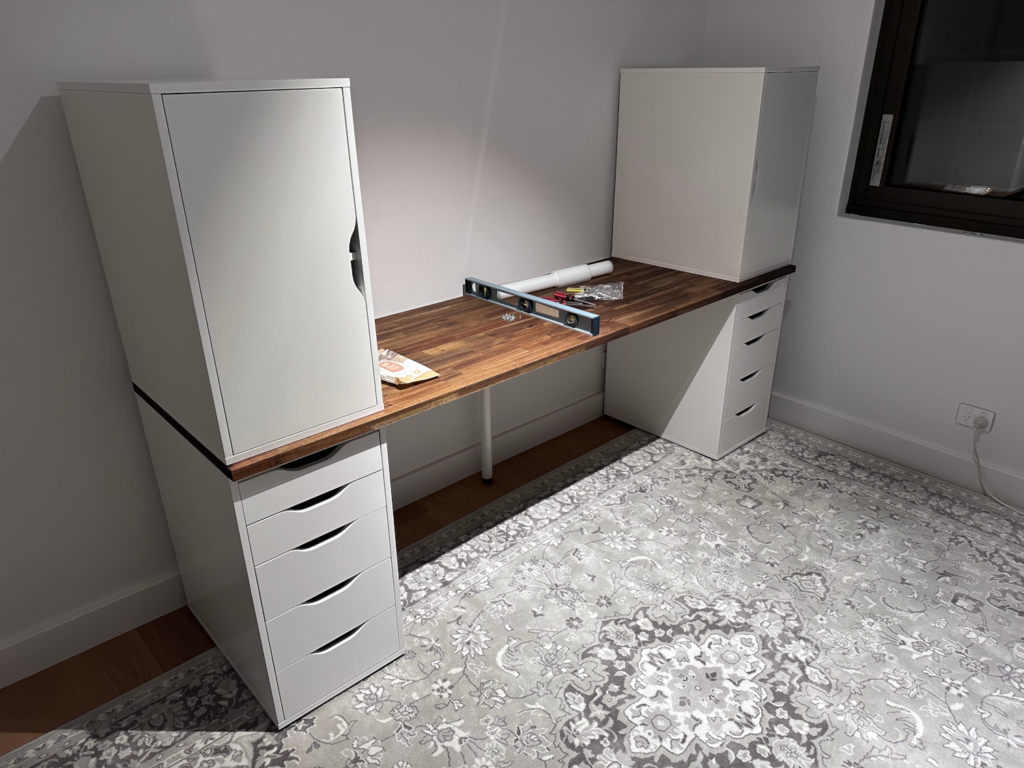
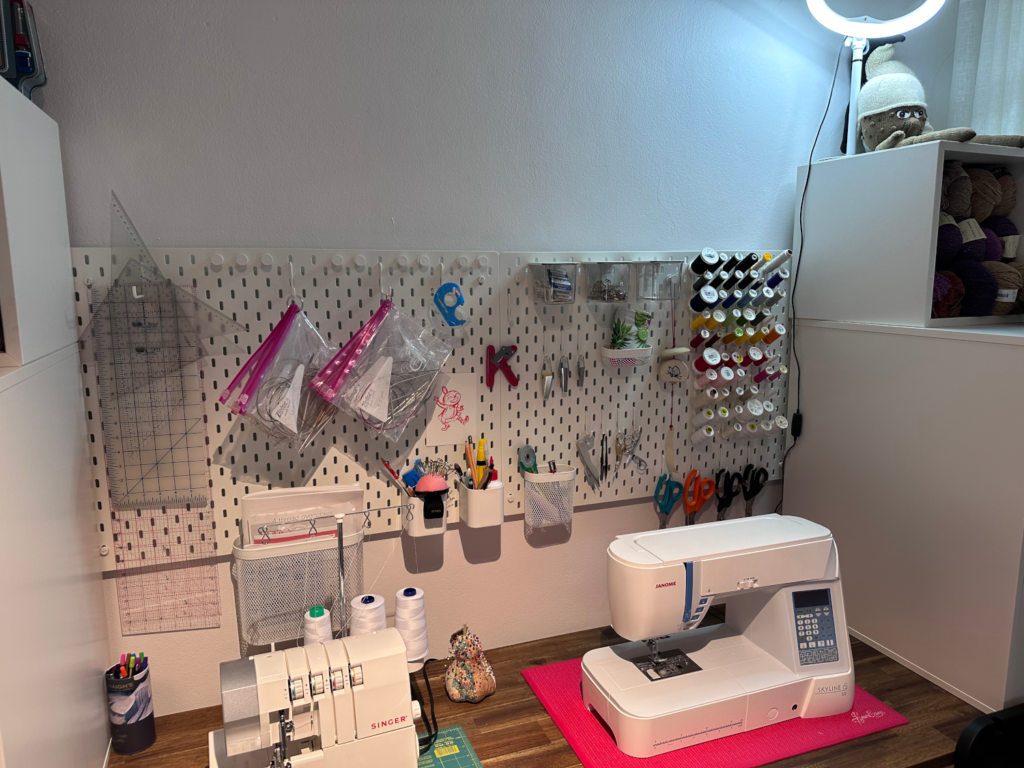
The space in between the upper units was perfect for two of the Skådis pegboards. We first used some of the connectors to mount them directly to the desktop…
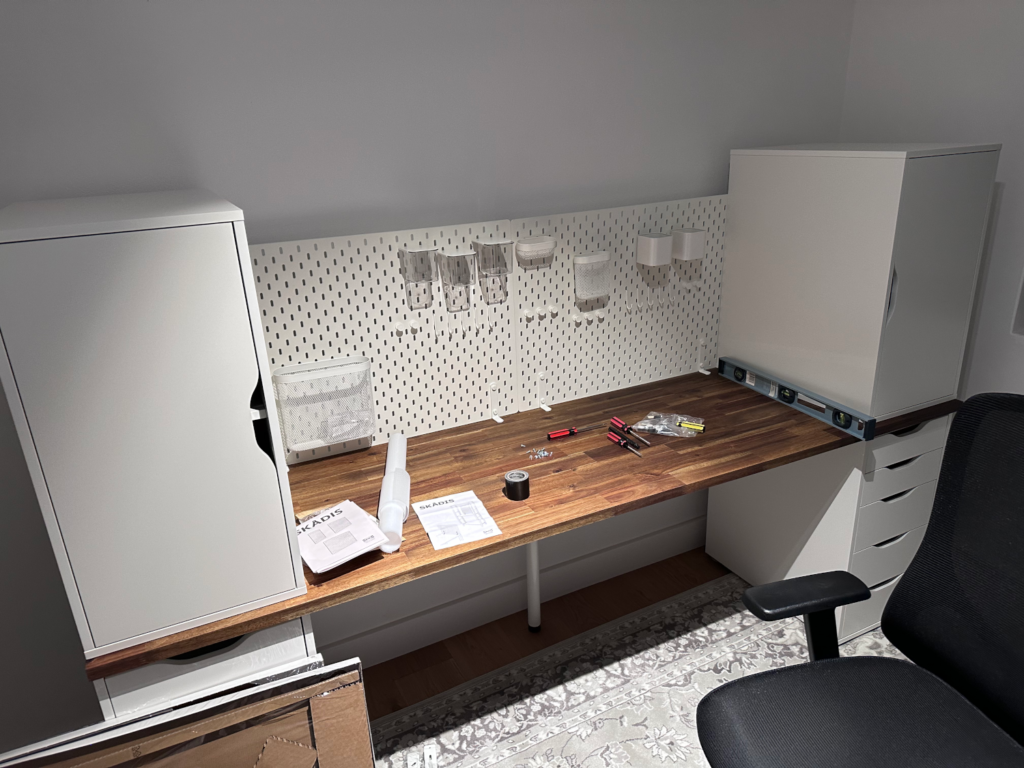
…but I realised quickly that this wasn’t ideal. There was no opening for the power cords for my sewing machines, and because the pegboard was so low I really couldn’t make full use of it. So the Snook kindly broke out his hammer drill and helped me mount the pegboards directly to the wall.
And this is my favourite thing of all. I discovered that some nice person designed a sewing thread spool holder that fits the Skådis pegboards, and which can be 3D-printed. My awesome friend Bobbie printed a dozen of them for me, which allows me to store 60 spools of thread!

And here’s the end result! Raising the pegboard makes it much more useful, and allows me to run the power cords down the back of the desktop. My sewing machine sits on a special vibration mat that it came with, and the overlocker is sitting on a spare cutting mat. I picked up a couple Eket cubes off Facebook Marketplace that I simply stacked on top of the Alex to add some additional storage for all my prettiest wool skeins. I’ve also got a ring LED light that I can turn on to add light when I’m sewing. And the ironing board can be stored and set up on the left, with a power strip down at the bottom to plug in the iron.
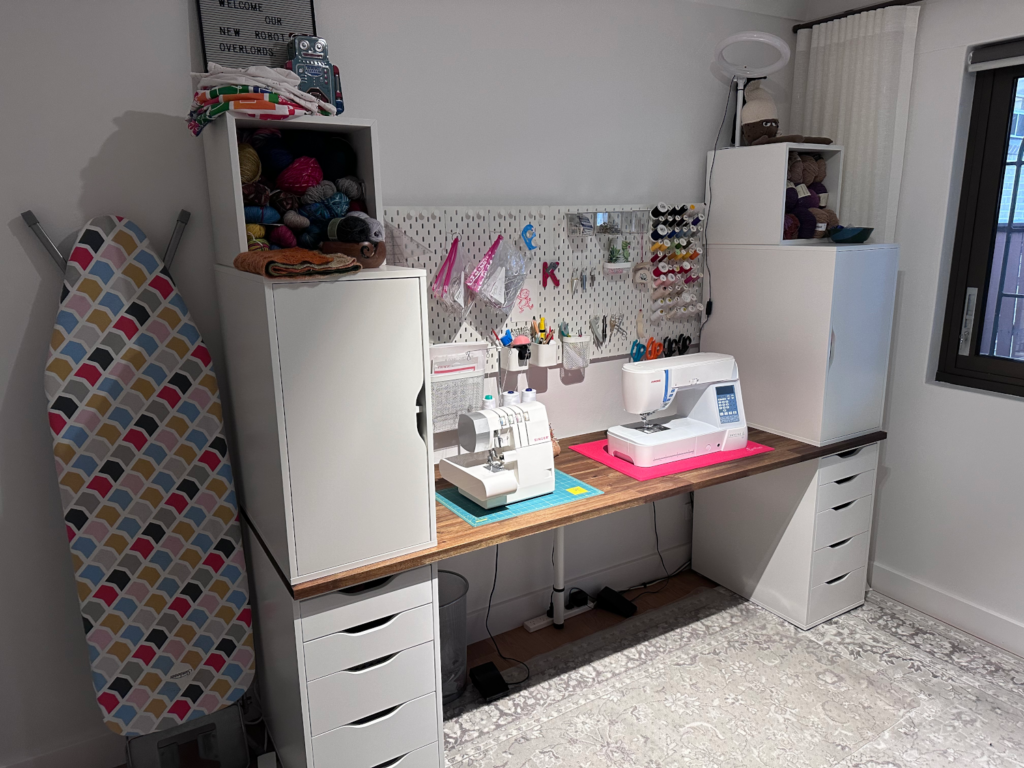
I bought a bunch of the different Skådis accessories to hang and store my tools. I’ve had a lot of fun figuring out the most efficient place to put things! I also organised my circular knitting needles by size into Ziplock bags, which I then threaded onto split key rings and hung from a hook. Very tidy!
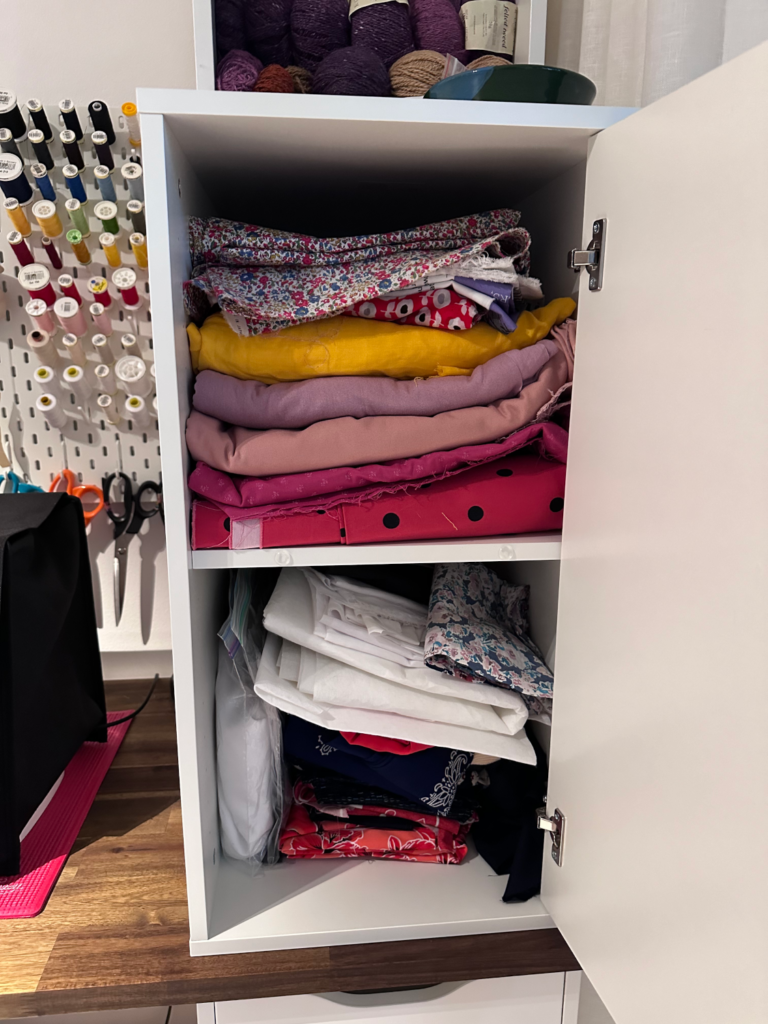
The upper right Alex unit has my fabric stash, with scraps on the bottom and project-sized pieces on top. (Not pictured are the two giant boxes of old fabric that I donated to The Sewing Basket. 😬 I’m working on hoarding less stuff, and making sure that what I have is useful.)
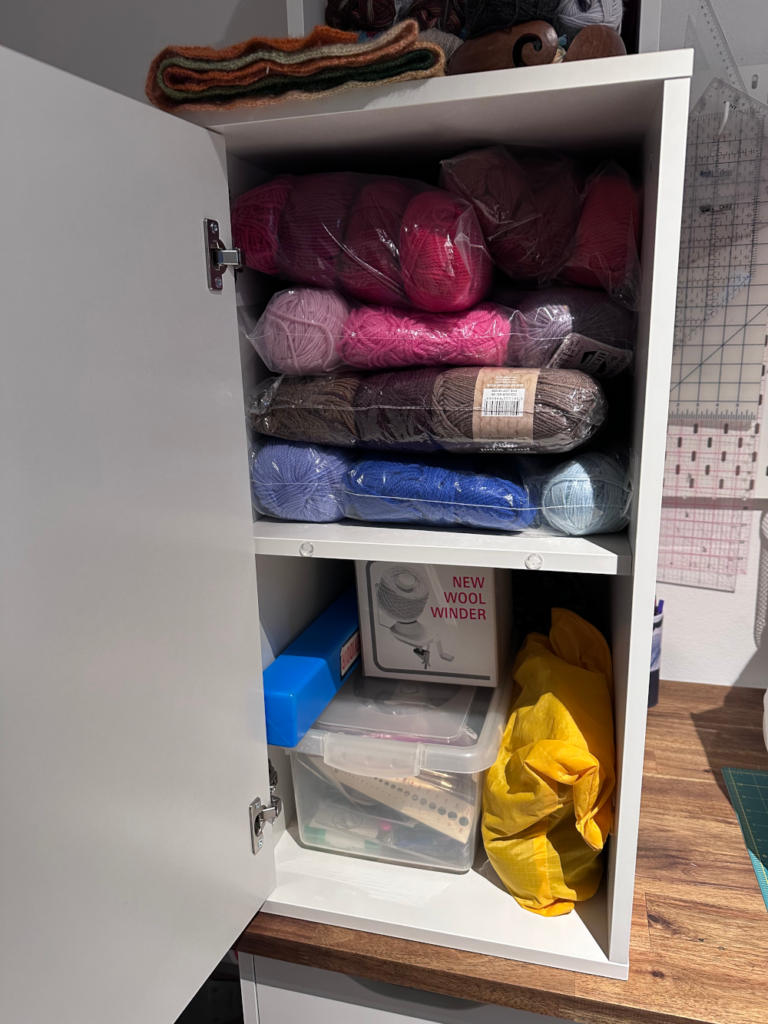
On the left is my stash of knitting wool and supplies. This is the utilitarian wool, while the prettier stuff is in the Eket boxes on display. (Again, I donated a bunch of old stuff to charity.)
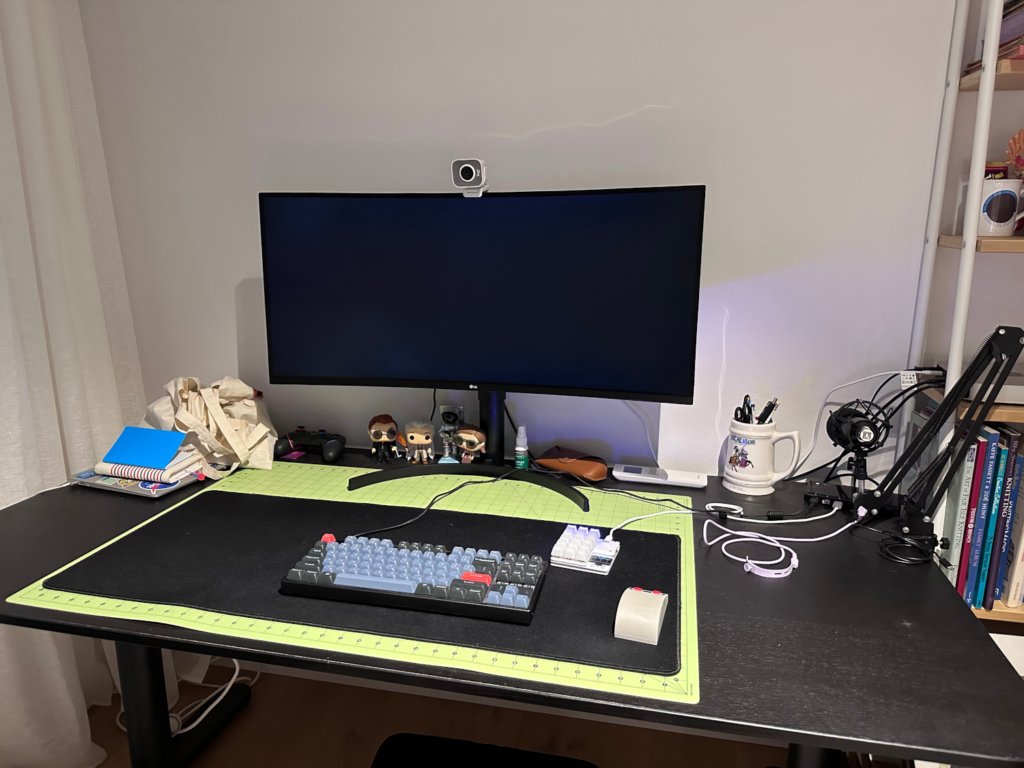
For the sake of completeness, I’ll show my desk as well. It’s got a large self-healing cutting mat, and on top of that I have a large gaming pad under my keyboard, mouse, and duckyPad. My Mac Mini sits on the bookshelves next to the desk, and I’ve got a USB dock in that corner where all my stuff is plugged in. When I want to use the desk as a cutting table, I can pretty quickly shove everything back in that corner and raise the desk up to a comfortable cutting height. Depending on how big a piece I’m cutting, I may not even need to move the monitor!
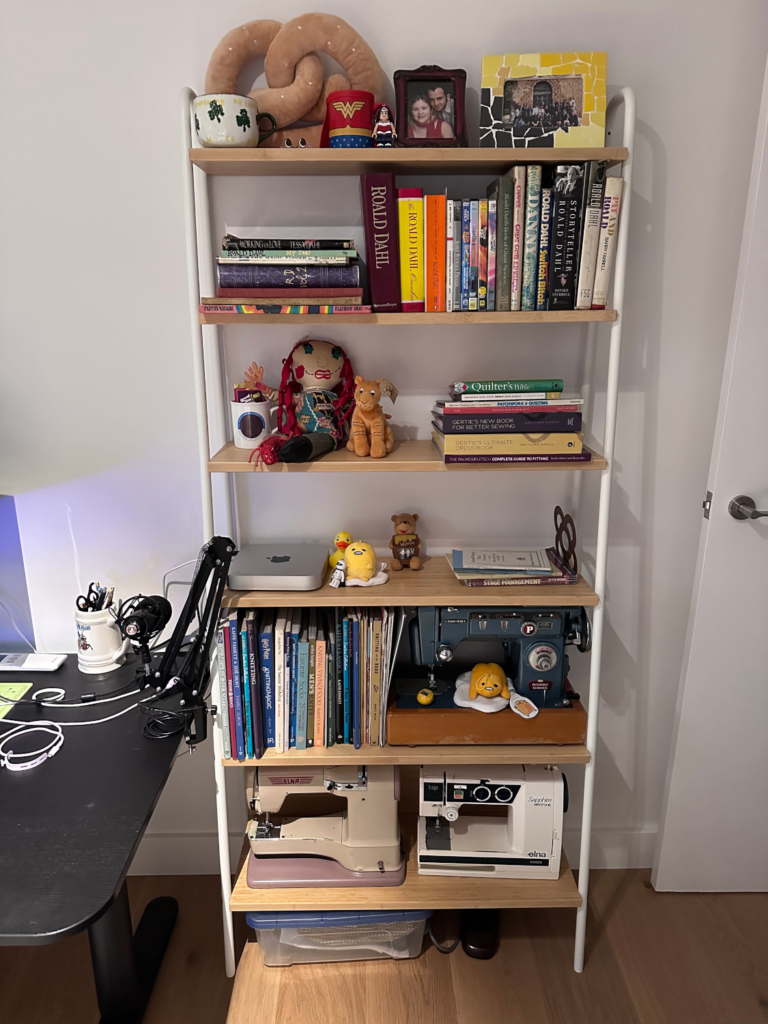
I also managed to fit in a Svenarum shelving unit alongside my desk. I especially like how it gets thinner towards the top, which helps feel like it’s not crowding the doorway too much. This allows me to show off my vintage sewing machines (the bottom two belonged to Rodd’s grandmother and mother), as well as my craft books and some of my Roald Dahl collection.
And here’s the finished office/craft room! In the Alex drawers, I’ve got various sewing supplies all stored on the right side (buttons, trims, zipper, tracing paper, etc). On the left is general office and crafting supplies. I’ve got two plastic floor protectors over the rug that allow me to roll my chair easily from the desk to the craft station. I’m really happy with how it’s turned out. Together with the closet, I’ve got ample storage for all my projects and everything I need is within arm’s reach.