 “Ehhh, monkey!”
Yeah, it’s yet another craft. For some reason the other day I decided I wanted to make the Snook a sock monkey. It was a really quick project and I finished it in just a couple hours. I found the original instructions, but I ended up using this page more. As you can see, it turned out all wonky. (His arms, for example, are clearly not lined up.) The Snook likes it though, and he’s named him “Johnny Vegas” (after the comedian that did the On Digital ads with the sock monkey in the UK).
Category: Crafts
Craft projects of mine
-
My First Sock Monkey
-
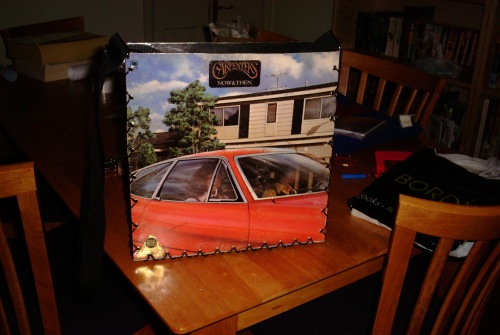
Carpenters Record Album Purse
I am so going to Hell. The big thing on the Glitter discussion boards lately has been album cover purses. Basically you buy an old record album, cut up the sleeve, and fashion a bag out of it. I’ve been keeping my eyes open for suitable albums ever since. Friday I hit the jackpot. It’s the Carpenters’ “Now and Then” album. Saturday I collected all the other supplies and today I made my bag. Is it morbid to carry a fashion accessory emblazoned with the picture of pop music’s most celebrated anorexic? Yeah, that’s what I thought.
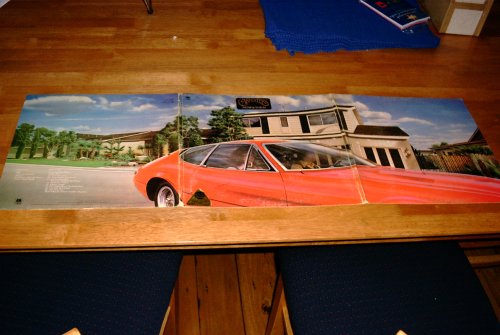
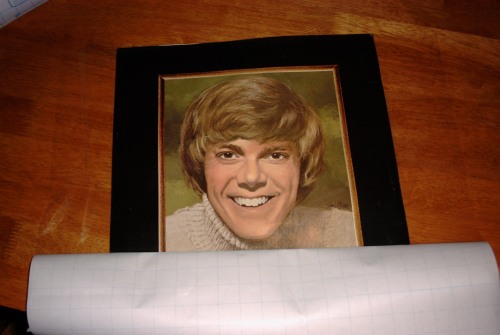
Okay, before you vinyl purists get all up in arms about the wanton destruction of this album, rest assured that it was a bargain basement, scratched-as-hell, one dollar piece of junk. (I plan to turn the record itself into a bowl, but more on that later.) Here’s what the front of the album looked like. As you can see, it was one of the big folded-type ones, not simply a cardboard sleeve. This was nice because it meant I had plenty of cover to work with. A lot of people make small handbag-type things, but I wanted a full-size messenger bag so I planned to use the whole thing.
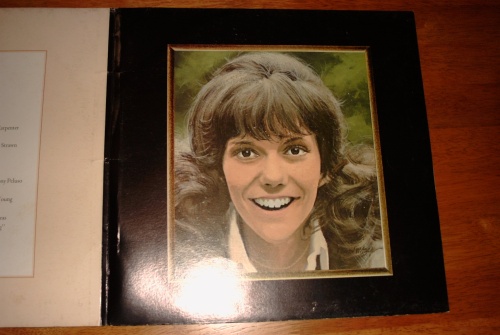
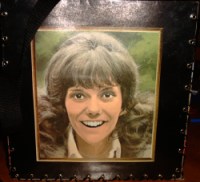
So the car image is nice, but it was the inside that sold me. Check out this surreal image of Karen Carpenter. It looks even weirder in real life. She’s all Photoshopped and color blocked. I like it.

And of course, on the opposite side we have Richard. Who looks like a vampire. He’s got really pointy eyeteeth!
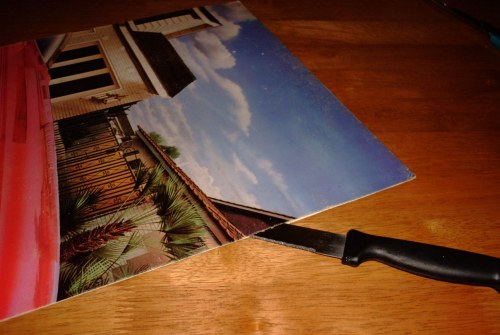
The first thing to do is cut all the pieces apart. I discovered that two of the trifold sections (the parts that weren’t the record sleeve) were actually glued along a couple sides. So I had to use a knife to carefully separate them. Once I had all six pieces (the other inside piece was the song list), I planned how I wanted the bag to look. I decided to use the front cover (the car) as the front of the bag, and have the side panels continue the image and sort of “wrap around”. Then for the back, I’d use Scary Karen. Inside, I backed the front with the song list, Karen with Dick, and the side panels with some remaining cardboard. I also used a double thickness for the bottom. (The point of doubling the sides up is just to make sure it’s sturdy enough not to fall apart.)
The next step is to laminate all the boards. I glued the double-thicknesses together and took them up to my local copy shop, but the woman there said they were too thick to go through her machine. So I went with my backup plan, which involved clear Contact paper (the kind kids use to cover their books). Basically I just wanted to waterproof and protect it. So here’s me carefully laminating Dick. I didn’t care so much about the pieces facing the inside, but I made sure that the outsides were perfect and air bubble-free.
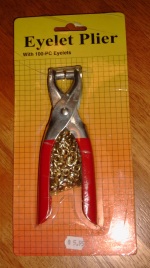
Okay, so to fasten all the sides together we need to insert “grommets”, which are little round metal eyelet thingies. I bought this package at my local hardware store. It even comes with a tool. (You push them through the hole from the right side and then bash the end down to keep it from pulling through.) Unfortunately this tool sucks. Don’t buy it. It broke within minutes and even when it worked it did a crappy job. So I went to the craft store and found another package that came with little metal bits that you pound with a hammer. These worked much, much better.
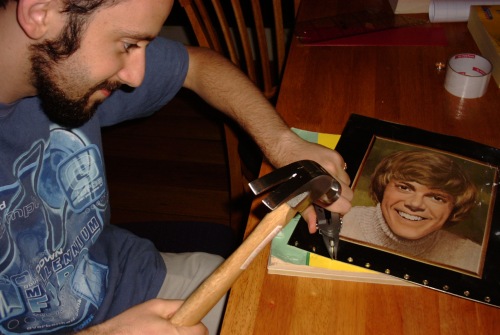
Here’s the Snook demonstrating the right way to pound some grommets. I spaced them so that they’d be staggered along each edge and therefore the lacing would cross and look cool. At least, that was the idea. I messed it up on the back side, but you can’t really tell. Anyway, punching holes and inserting the grommets is the worst part of the whole job. But if you get good grommets from the start, it’s much easier.
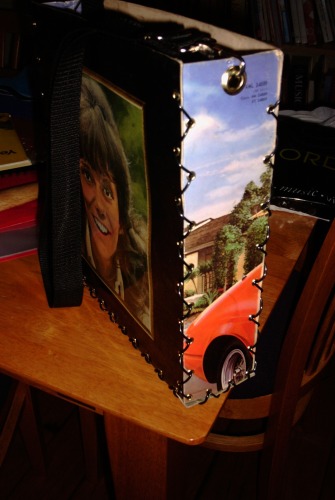
Here’s a side view so you can see the lacing that holds it together. I used some cheap (like twenty-five cents a meter) vinyl lacing that I found at my craft store. You could also use leather or ribbon or even fishing line. Whatever floats your boat. I went over every edge twice so that the lacing would be criss-crossed. It worked pretty well. Here you can also see that I’ve put one big grommet in the top of each side panel. This is where I hooked my handle, which was just a basic black nylon strap that I pulled off an old bag I had.
Here’s the completed bag from the front. Neat, huh?
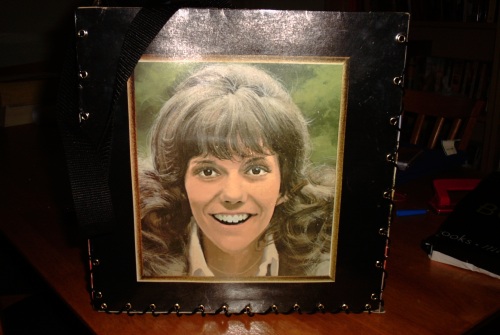
And here’s the back, with Scary Karen grinning at you.
That’s it! As you can see, this made for a really big bag. It’s as wide and tall as a record and the side panels (and thus the depth) are about one-fourth of that. It’s really more like a cereal box than a purse. I like it though. Now it just remains to be seen whether I’ll actually have the nerve to carry the thing… 🙂
-
Chicken Bib
 More craftiness… I just shipped a package of homemade Christmas presents off to Mom today, including this bib I knitted for my baby brother. Yes, those are chickens embroidered on the front. (Apparently Mom collects them now, so I’m trying to indulge her.) It turned out a bit… longer than I envisioned, but the basic shape is there. Cute, huh? After I practice up on a few more scarves, I think I’ll try my hand at a sweater.
 -
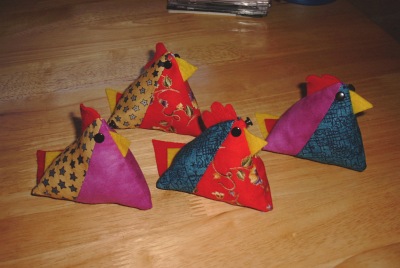
Funky Chicken Pincushion
 Cutest. Craft. Ever. I’ve had this Funky Chicken Pincushion pattern bookmarked for ages, and last night I finally decided to give it a try. They’re really easy to make. (The hardest part was getting the squares, uh, square.) I did them on the machine, but you could probably hand sew them too. I stuffed them with leftover quilt batting and sewed on buttons for eyes. Aren’t they so friggin’ cute? I have a ridiculous urge to make about fifty and sell them at the hippie market on the weekend. They’d make awesome Christmas presents.
Sidenote: I was just going to embroider the eyes until the Snook pointed out that there’s a button shop just a couple blocks from our house. I’m like, “How can anyone run a business that only sells buttons?” Curiousity piqued, I scampered off to find it. Turns out it’s called “All Buttons Great and Small”, and it really does just sell buttons. There are big ones and little ones and shiny ones and ones shaped like farm animals. I loved it. I wanted to possess all the buttons. Am I turning into Martha Stewart or what?
UPDATE: The link to the original website with the pattern doesn’t work, so I wrote up what I could remember from memory here. Please don’t e-mail me saying you can’t find it!
-
Gryffindor Scarf
 Speaking of knitting… It’s done! Yes, that’s me modeling my very first Harry Potter house scarf. (Don’t worry, Sis; it’ll be winging its way to you shortly.) It took me about two weeks to finish. It was knitted double-wide and then folded over and sewn (to avoid having a “wrong” side). That means it’s double-thick and warm as hell. It also ended up a little bit longer than I intentioned… It’s over six feet. (Though the ones in the film are clearly pretty long too.) Here I’m wearing it doubled over and tucked through the loop. Click here to see a larger version and another of me with it just tied.
Avid fans of CouchCam might have noticed that I recently started a second scarf. Here’s the surprise: It’s not intended for anyone yet! In other words, if you want one, I’ll make you one. You’ll have to cough up a little bit of cash though, and I can’t guarantee I’ll have it ready by Chrismtas (in fact, I definitely won’t), but if you want it, just drop me a line. I may even do more than one if there’s interest. (I can, of course, do colors for the other Hogwarts houses too.)


(The second one is darker because I had to stand farther away from the camera to get the whole length in.)
-
Thanksgiving Marble Magnets
 I spent the morning scouring the Internet for images to use for some Thanksgiving marble magnets. I’m going to print them out on a color laser printer and then put the magnets together this afternoon. In case any of you would like to do the same, I’ve provided my image sheet for you to use. Here’s the low-res version so you can see all the different designs. There are some cartoons, some stylized images, and even some Norman Rockwell scenes. If you want to use them, download the high-res version. It’s at 300 dpi, which should give you a nice crisp image when you print. They’re designed for 20 mm diameter magnets, so if you need them larger or smaller, you might need to change the resolution slightly. Have fun!
 -
My First Knitting
 Check it out. This is the very first thing I’ve knitted from a pattern. It’s a potholder! For such a simple-looking item, it was ridiculously complicated. I had to pull it apart and restart about ten times. (It didn’t help that whoever wrote the pattern was an idiot.) I’m pretty proud of it though. Now I’m on to bigger and better things. I used this great site (link courtesy of Megan) to generate a pattern for a striped Gryffindor scarf! If all goes well, some of you might even be getting these for Christmas this year! 🙂
 -
Marble Magnets

It worked! My cunning plan worked. Instead of using magazine pictures, I successfully put the Snook’s and my faces under the marbles. (Apologies for my crappy camera. They really do look pretty good.) I’d read that using Bubble Jet-printed images wouldn’t work, because the ink is water soluble and runs when you put the glue on it. I had a hunch that color laser printed photos would work better. And they did!
I tried to follow Megan’s instructions as closely as possible. For you Sydneysiders: I found the magnets (20 mm diameter) at the big Lincraft store in the Imperial Arcade on Pitt Street. They were randomly hanging in the aisle with all the clay. For glue, I got silicone window sealer from my local Mitre 10 hardware store. It came with a long plastic cone/applicator, but I just tossed that. The marbles, as you all know, were the difficult part. In the end I found them at Eastern Flair on King Street in Newtown. (I bought all the clear ones they had, though, so don’t bother trying them for a while.) I also heard that the “Reject Shop” on Oxford Street has them too, but I luckily never had to look there.
Okay, so once I had the equipment, I had to select my pictures. I knew I wanted our faces, so I went through my pictures trying to find clear shots of our heads with interesting expressions. Then I scanned them in at 300 dpi. I managed to get about four faces to each scan (since I didn’t need the rest of the photos and could overlap them a bit). Then using the Gimp (but Photoshop would do just as well), I isolated each face as its own image. Then I used the “oval” selection tool and set it to 20mm by 20mm (thus creating a circle the same size as my magnet). Then I just resized the image until the face fit just right inside the little circle. (Note: You need the high resolution so you get good sharpness and detail when you print. But since your screen can’t display that high, the circles will look way big. Relax; they’ll be the right size when you print.)
Okay, so then I copied and pasted each little face circle onto a blank image. (The idea is to cram as many on the page so you have to print as few sheets as possible.) I only did six for this first trial, but I duplicated them so I had twelve altogether on one sheet. Then I whacked this on a Zip disk and headed ’round the corner to the Copy Shop. Fifteen minutes and a buck-fifty later, I had my pictures.
After that, the rest was easy. I didn’t even bother with putting card down on the magnets first; the paper was nice and thick so I didn’t think it would bleed. None of the ink has run at all, which some people said they experienced using Bubble Jet-printed photos. The sealer still needs a day or two to fully set, but I’m going to declare the photo magnet experiment a success.
-
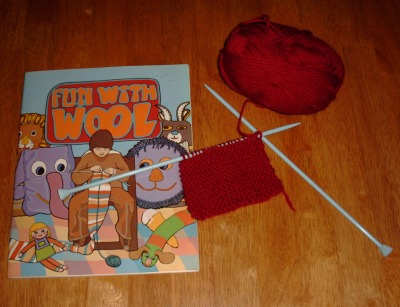
Learning to Knit
 Check out what I learned today – I can knit! Well, I can cast on and do a basic stitch anyway, thanks to the groovy book Ma Snook sent me. Now I’m itching to do more. I definitely need a new bag, and there are some extremely cute patterns available on the ‘Net. (I’m loving the first one and last one of those.) I also found some hats I might have to make for the folks back home for Christmas. These two look easy and stylish enough. And how cool would it be to make my sister a devil hat? She’d love that!
 -
Storm at Sea Quilt – In Progress
 As promised, here’s a picture of the current state of my Storm at Sea quilt. I’ve got a lot more rows to attach, but you can get the design starting to take shape. I love the way it gives the impression of curves and waves, despite being made up of all rigid geometric pieces. I’m pretty proud of it. Man, quilting this thing is going to be a beeyotch though.


