
So hot today. Saw this reflection of the Queen Victoria Building and Centrepoint Tower from York Street today waiting for the bus home…
Images and videos that I’ve taken on-the-go
So hot today. Saw this reflection of the Queen Victoria Building and Centrepoint Tower from York Street today waiting for the bus home…

What better way to test my new moblogging ability than with the ol’ standby: a picture of our cat! More details on my setup in a minute…
Later: Okay, so all the cool kids nowadays are using Flickr to upload photos to their sites. I like to be contrary, though, so I asked the Snook how difficult it would be to roll this ourselves. Within a few hours, he had it up and running. Basically, I take a photo with my Sony Ericsson T610 and MMS it to a special e-mail address. I’ll let the Snook explain how he worked the server-side mojo: “I wrote a PHP script using the Mail_Mime component from the Pear Repository which scans a message for text and image attachments, saves and resizes the image, and inserts a post into the database. I use qmail to feed incoming messages to the script.” So that’s it! This image and the short bit of accompanying text went straight from my phone to w-g. (This extra bit was added by hand afterwards.) Now I’m envisioning all sorts of fun uses for this in the future. Maybe Crazy Jesus Lady would let me put her on the site…?
Even later: I just realized I should probably translate for the non-nerds in the audience. By “moblog,” I mean “mobile web logging,” which is a completely stupid and made-up way of saying that I take pictures with my cell phone and send them to my website. Just in case you were confused.
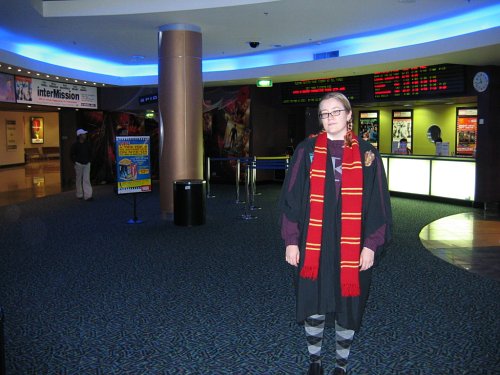
Well, that was AMAZING. I absolutely loved the film. But more on that in a minute. First, I need to confirm that yes, I did dress in costume. And yes, I was the only one. Not only that, but the theater was probably only 20% full anyway. So I was a big dork. But Snookums thinks I’m cool and I got a few great looks from some kids, so I feel it was a success.

First off, here I am in my Hogwarts school uniform. Details: The jumper is the Weasley sweater I made a few months back. The skirt is from portmans, and the socks were from a random stall in Paddy’s Markets.

Here I am demonstrating the proper way to “Swish and flick!” to Snookums. Yes, my wand is actually a 10mm wooden knitting needle.

I decided that schoolgirl braids were appropriate, complete with Gryffindor-colored bows. (You can really see some of the red streaks in my hair in that picture.) I wasn’t sure whether I should wear my glasses or not. They’re definitely more Potter-ish, but I didn’t want any loss of peripheral vision should we have to sit very close in the theater. I went with the glasses, and luckily it didn’t matter.

If you make fun of my chubby tummy, I’ll put the Cruciatus curse on you!

You know what this costume really needs?

Wizarding robes and a Gryffindor scarf! That’s my new scarf based on the Azkaban design. The robes are actually the Snook’s student robes. (He had to wear them every Monday dinner in college.)

Here’s a close-up of my Gryffindor badge. (You’ll recall that I made the badges last week.) I printed the badges on transfer paper and then ironed them on to some plain calico. Then I trimmed them really well and sewed them down on some black felt for stiffness. Then I trimmed the felt and basted it down on the robes.

Here’s my Dumbledore’s Army badge (from Order of the Phoenix). I accidentally placed the badges too high, I think. I didn’t realize that these robes are made to be worn hanging way back, so they could stand to move a few inches lower, possibly.

Woohoo! Bring on the movie! Bring on the cheering crowds!
Crap. The theater was nearly empty. No one! Where are the crowds? Where the throngs of Potter-fans? Am I the only person dedicated enough to take the day off and make my own costume to celebrate this cinematic event? It appears so.

I didn’t even get to hand out any of the way cool business cards I designed!

At least Dr. Amy Jones still loves me.
So I think I might have to go back to one of the weekend showings in order to give this outfit a proper airing. Any of you Sydney people interested in accompanying me? You don’t have to dress up! 🙂

After two long years in Australia, a member of my family has finally come to visit. My cousin Tony is here for the semester studying in Wollongong (just south of Sydney) and came up to see us this weekend. Here I am with him and his girlfriend Molly. We took them out for a traditional Newtown evening of cocktails, beers, and Japanese food. I managed to goad them into eating sushi and octopus! It was pretty darn fun.

I haven’t given you a knitting update in ages, have I? Yes, that’s me in a custom knit devil-horned hat. The pattern’s from Debbie Stoller’s book Stitch ‘N’ Bitch and I whipped it up in about six hours. (Pattern note for those playing at home: I used two balls of Heirloom 12-ply on 6mm needles.) I discovered some black wool in my stash so I might try the kitty-cat hat next. Now I just have to wait for it to get cold enough to wear!
Catching up on other projects… I also made a jumper/sweater for my iPod! My old case was getting grubby and I rarely use the belt clip anyway. There’s a pattern in Stitch ‘N’ Bitch but it requires sewing, so I just made up my own. (I started by knitting a flat rectangle about the size of the bottom of the iPod, and then picked up around the edges and knit in the round to the top. Then I cast off the front and continued knitting flat to make the flap. I even put a yarn-over in the right spot to leave a hole for the headphone jack!) I haven’t sewn any velcro on it yet, which is why I have to hold the flap closed here. Also note: I finally got my iPod in-ear headphones! As Ron suggested, they are a bit tinny. I only really notice it on the badly-ripped songs though. I’ve fiddled with the equalizer settings to boost the bass and that helps. But I’m back in the Cult of the White Wires!
Another recent finished object is the red scarf I’m sporting below. The wool is some handspun and hand-dyed stuff I bought at Camp Creative in January. The thickness varies from thread-thin to finger-thick. I just cast on eight stitches on my 10mm needles and knit til I ran out of wool. It went about six feet. I’m loving it. Oh, and my sister tells me that “skinny scarves are in” in the US, so unbeknownst to me I’m already in style for the winter!
Oh, and there’s a work in progress in that last picture too: my muscles. I’m on Week 3 of my weight training regimen and I’m feeling pretty darn buff!


Curse be damned; I knitted the Snook a sweater. This is my first seamless and patternless sweater and the first of my own design. The stripe pattern is from a woven scarf his mother gave him a few years back. (I just graphed it and worked it twice, once in reverse.) The sweater itself is green and the pattern’s in grey. It’s made of a thick Aran wool and it really absorbs the light, which makes it pretty hard to see here. It’s got a regular crew neck and raglan sleeves, which means the seamlines run up diagonally from the armpit to the neck (like a sweatshirt). My biggest problem was getting the cast-off collar loose enough to fit over his head! Here some more pictures of him in his favorite modeling poses:
The first is called “The Beach is That Way!”…

…and the second is “What Time is It?”. I make him do them whenever he tries something on, because it cracks my shit up.


It’s done! Today is the wedding of my friends Kenya and Sal, and this is the quilt I made for them. It’s a traditional American pattern called “Storm at Sea”. I started it just over a year ago (but I took a bit of break in the middle of the summer). The top was machine-pieced but I quilted the whole darn thing by hand. I also used a bias binding for the edge, which was a first for me. All in all I’m really proud of how it turned out. And isn’t the basket cute? I saw it in a shop yesterday and realized it was the perfect way to package the quilt.

Here’s a shot of the quilt pattern itself. As you can see, it’s all made up of triangles and squares but somehow they kinda fool the eye into seeing curves and waves.

The Snook is actually standing on a chair and holding the quilt up here (and hiding behind it) so you can get an idea of how big it is. It’s probably about queen-sized, I’d say.

I suck at embroidery, but it’s sorta tradition that you personalize the quilt for the receiver. Here’s my, uh, “rustic” attempt at adding their initials.
Like I said, I’m proud of it. And hey, that’s one more thing I can cross off my crafty backlog!
I’ve been obsessed with bags lately. (It offends my feminist pride to admit I carry a purse.) I keep accumulating them because I can never find the ideal one. I got a suede one recently that’s damn near perfect, but every time I carry the thing it rains. Anyhoo, last night on the train home I had a flash of inspiration – why not use one of my now giant (courtesy of the diet) pairs of corduroys to make a bag? The result is before you. It’s lined with a red bandanna and I appliqued felt hearts to the front. Isn’t it cute?


I’d seen several people on Glitter recommending the “chop off the legs and sew up the crotch” method of making a jeans purse. When I spread out my cords, though, I had to give up on that idea. I mean, they’re huge. I can’t believe my bum was that big. It wouldn’t be a purse; it’d be a duffel bag. So I decided to go halfway. I cut off the legs and then cut it in half vertically near the zipper. Then I spent a good half hour messing around with pins and basting to try and decide how to sew the thing up. Eventually I just said “screw it” and sewed a semi-straight line down the side. Then it came time for the bottom…
The bottom was the hardest part. See, jeans kinda “pooch” out more in the back to accommodate your bum. So I had more fabric on the back side than on the front. The solution, I eventually figured out, was to put a couple of darts (i.e. folds) in the back piece to make it work out. You can kinda see ’em on the picture of the back. Again, I just kinda eyeballed everything, but it came out looking much better than anticipated.
Next was the strap, which I made from one of the legs. I like a long strap, so I slit a leg lengthwise and sewed the lengths together to make one really long piece of fabric. Then it was just a matter of folding it together so the seams didn’t show and running a line of stitching along the edge. (I’m happy to report that my little Janome sewing machine handled layers of corduroy very well. My only problem was that occasionally it was a tight fit getting everything under the presser foot. There’s probably a way to lift it up higher though that I just don’t know of.) I sewed the straps to the inside of the waistband, trying out my zig-zag stitch for the first time. I figured there was no way to hide the sewing, so I might as well make it look intentional. 🙂
Looking inside the bag at this point, I realized I needed a lining. The front pocket was still hanging in there, and the seams and stuff just looked really messy. I had some bandannas in my fabric stash so I grabbed a red one and fashioned a pocket of similar size to my bag. (Because my bag is kinda trapezoidal in shape, I sewed the lining rectangular at first and then progressively angled in new seams at the top til the opening fit the waistband.) The I just stitched it in place inside the waistband.
Lastly I decided it needed a little decoration, so I pulled out a piece of felt and cut out some hearts. Then I just sewed them to the front panel (being sure not to go all the way through). They’re just tacked on, so they should be easy to remove if I want to change it in the future.
The whole time I was making this, I kept imagining that I’d ruined my pants (not that I could wear them anymore anyway) and that the end result would look ridiculous. But when the Snook got home and complimented me on it, I realized that it actually kinda works. I like the fact that it still has pockets and stuff for my mobile and train tickets. It’s yet another product for my eventual craft stand! 🙂

Last week I went to an “Introduction to Jewelry Making” workshop at the Bead Company near my house. I made the necklace, bracelet, and earrings pictured here. It was pretty much straight stringing; nothing as complicated as I’d already done with the flower necklace. But I learned how to use wire and crimps to make sturdier jewelry with nicer clasps. The necklace and earrings both use crystal-cut hematite and pink glass beads, while the bracelet is made up of funky cut glass and shiny silver spacers. I had a lot of fun at the Glebe Markets today checking out the price that similar stuff was going for. I saw earrings exactly like mine for $20! I can now make the same pair for $2. I’m never going to overpay people for stuff I can make myself again.

We recently cleaned up our office and uncovered the long-forgotten zen garden. Here’s what the Snook created. Any interpretations? Personally, I find it interesting that the rocks are “unbalanced” and seem bunched up on one side. Also note that he’s “buried” the rocks beneath layers of straight lines. So perhaps this “unbalanced” side is something that’s contained and buried deep within.
Or maybe he just likes making straight lines with the little rake. *shrug* I dunno.