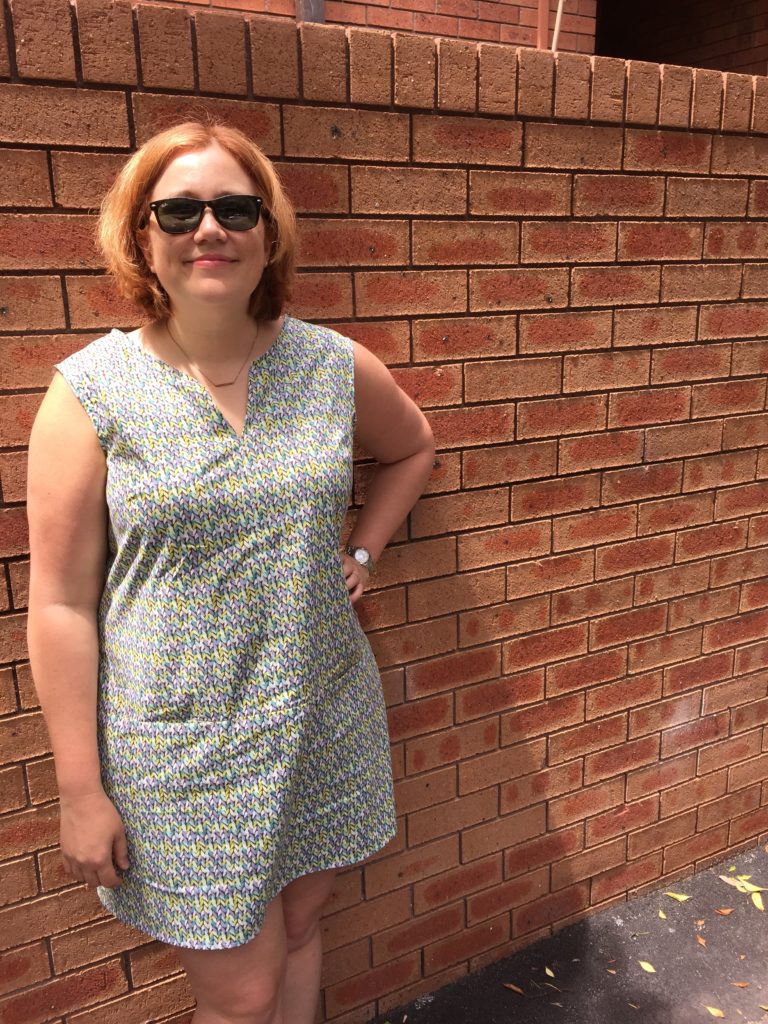
As you may have picked up on yesterday, I made yet another Colette Laurel dress for Frocktober! I used the same mods as the Big Data dress: sleeveless, notched neckline, and pockets. On this one, I moved the pockets outwards slightly as they felt too close together. I also cut the back in one piece rather than having a waist seam.
The fabric is called Breeze by Rosemarie Lavin for Windham Fabrics. It’s actually a quilting cotton that I picked up at Morris & Sons earlier in the year. I bought it on a lark, mostly because it’s printed to look like knitting! I thought I’d make a simple blouse out of it, so I only bought 2m of fabric. Unfortunately that was barely enough to make this dress, so I’ll have to wear shorts under it for modesty. Still – cute dress for a hot day!
I made a new dress last weekend! This is a sleeveless Colette Laurel that I modified to have pockets(!) and a notched neckline (using this free hack). I’ve made a few sleevelessLaurels before, and the main attractions (besides looking nice) are that they’re fast to make and don’t use very much fabric. I had about 2.5m of this fabric, but it’s a quilting cotton and thus very narrow (less than 45″ wide). It’s navy blue and covered with a stream of binary numbers in light blue and silver. (So cute!) It’s called “Binary Solo” from RJR Fabrics’ collection “Silver Circuits.” My Mom made a point of showing it to me at her shop back in Indiana, and I just had to have it!
I’m calling it my “Big Data Dress” because, as Juliet Houghland pointed out at YOW! Data recently, all stock images of “Big Data” are blue and involve binary. 😂 I wore it to Girl Geeks last night and it was a big hit!
Sewing notes: Based on my measurements, I cut a straight 18 (the largest size) on this pattern. It’s roomy, but given the style of the dress and the crispness of the cotton, that’s what I was aiming for. It’s very comfortable. There are bust darts on the front and diamond-shaped darts on the back that keep it from being a completely shapeless sack. The hack instructions were easy to follow, but I didn’t bother tracing the pieces onto new paper. I bought the pattern PDF, so I can just print another one, right? So I just cut the front and back in two and then taped on some extra for the seam allowance. I had been worried about getting the print to line up across that center front seam, but then I hit upon the obvious solution. Cut it on the fold as one piece, and then split it up the middle. Voila! Lines up nicely. I finished the neckline and armhole edges using bias tape that I made – as always – using Colette’s continuous method. (For reference, I used a 9″ x 9″ square and just managed to eke out all three openings.)
What I’d do differently next time: I’m not sure why the back piece needs the corresponding horizontal seam. Maybe it’s because Sarai made hers out of linen, so it’s more visible and looks weird if it’s not there? But my print is so busy that I could have easily left it out and saved myself some cutting and sewing time. I’d also move the pockets out a little bit further as the 2.5″ from center she suggests seems a bit close for me. Lastly, I’d probably consider putting some interfacing behind the neck notch. (I still might do that, actually.) I noticed when I was wearing it yesterday that one side wanted to flop forward and fold down occasionally, so a little bit of extra stiffness there couldn’t hurt.
Overall I’m very, very happy with this one! It’s cute, comfortable to wear, and a real conversation starter.
It’s time to get serious about my sewing, so I’ve made a resolution this year to not buy any new clothes (excluding undergarments, which are in the Too Hard basket for now). Towards that end, I’ve sewn two more new shirts so far in 2017 from Tessuti’s Georgie Top pattern.
Georgie #1: The first was this short-sleeved version in a vintage fabric remnant I had. (We did a burn test on it and it melts so I reckon it’s probably either nylon or polyester.) I cut the largest size and did an FBA – more on that in a sec – and finished with exposed bindings. For the bindings, since I had limited fabric I didn’t bother cutting them with the provided pattern pieces but instead used a square to make continuous binding via the Colette method. I really like the Tessuti method for doing the back neck keyhole opening. I don’t get their insistence on using tearaway Vilene to stabilise the neck though – it seems like stay-stitching would work just as well? Overall I’m really happy with the finish on this one. All this practice is really paying off! The only outright mistake I made on this project was cutting the sleeves upside-down, so the motif (which looks a little like an insect!) goes the wrong direction. It’s small enough though that (the Snook claims) you only notice when I point it out. 🙂
Okay, so the FBA. Based on my experience with other Tessuti patterns, I decided to do a Full Bust Adjustment on this one before I started. The problem is that I trusted the first result that Google gave me: this Craftsy tutorial. People, this tutorial is WRONG! But I didn’t realise it at the time. So I followed the instructions, not realising that step 7 had a massive error. Then when I went to sew up the side seams, guess what? The front was massively longer than the back. Which makes sense, as that stupid tutorial has you draw the new dart in such a way that you’re adding material to the side. I ended up having to rejig my bodice front on-the-fly and try to make it work, and I still ended up having to cut material off the bottom. So though I’m pleased with the finish on this one, I feel like the fit is slightly weird. The neckline is a little high for me (not really the fault of the FBA though), and there’s excess material on my upper chest. It’s wearable, but not exactly great.
Georgie #2: The second Georgie is this sleeveless version in a vintage cotton remnant. (It’s got little medals all over it!) I was inspired by Gertie’s keyhole blouse to try for a keyhole neckline detail on the front. The first thing I did was print a new bodice front, lower the neckline, and then do a proper FBA. Then I free-handed a U-shape at the center of the bodice front piece and cut it out of my fabric. Rather than using Vilene, I simply stay-stitched the neckline, keyhole, and sleeve openings before I started. I again made my own continuous bias tape via the Colette method. Binding the keyhole was tricky but doable, and I’m really pleased with how flat it turned out! When I bound the neckline, I initially left a gap of about an inch across the keyhole (so it was more of a U-shape than a teardrop). Then I tried it on, and I again had the problem of excess fabric in the upper chest. When I pinched the top of the U-together though (simulating a tuck), it magically disappeared. Huh! So I unpicked half the neckline binding and then redid it, joining the top of the U together into the teardrop. Very happy with that outcome! (If I make this again without a keyhole, I’ll adjust the bodice front to remove that wedge.) As for the sleeves, I did actually cut them and I intended to use them, but when I tried it on for my neckline alterations, I realised I liked it better sleeveless. I debated whether I needed to adjust the sleeve openings – I know that sleeveless garments tend to have larger armholes – but they looked fine. So I simply added an exposed bias binding to each armhole. So far I’m really happy with it!
Finally blogging these two Lady Skater dresses that I made at the start of Frocktober. This pattern’s been on my wish list for a long time. It’s pretty fast to sew up, especially if you have an overlocker. I made the pink one first, and I used a fine merino jersey that I bought at Tessuti’s on clearance a few years back. It has a subtle texture through it, I think created by elastane that has been woven in narrow stripes. It was a pain to work with though, because it was nowhere near square and it curled like crazy. Still, I made that first one in about a day. I could tell while I was sewing it that the waist was going to be too low, but I shrugged, told myself it was a wearable muslin, and kept going. (The fabric had been really cheap as it had a hole at the end that I had to cut around.) The end result doesn’t look too bad in the photo, but it’s practically a drop-waist on me. That waist seam is supposed to be at my natural waist (ie the skinniest point), which is a fair bit higher.
So for the black one, I shortened the bodice by about two inches. (You can see the difference in the photograph.) Better, but I still reckon I could go a bit higher next time. The fabric I used is really, really weird. I bought it at a remnant sale a long time ago, and I have no idea what it is. It feels quite heavy, almost like a rayon, with elastic shot through it. I feel like you easily could use it for leggings or even a bathing suit! But I made a dress out if it, because WHY NOT. It’s actually pretty comfortable to wear.
The pattern itself is clear and easy to follow. I did have a hell of a time with the clear elastic though. It sticks onto my machine and refuses to feed through, so I came up with the idea of putting some wax paper over it. That helped, but it was still annoying and fiddly. Applying the neck and sleeve bands wasn’t too hard, but I haven’t quite mastered getting the joins to line up nicely with the seams. I still find the overlocker very satisfying though! I just need to remember the Cardinal Rule – when it starts misbehaving, check that it hasn’t been threaded wrong. (Every damn time…)
I finished another dress! Back in July I was passing Sew Make Create and did a DOUBLE TAKE when I noticed they were having a fabric sale. I couldn’t resist. I ended up buying three pieces, one of which was an interesting stretchy denim with a pintuck detail (almost like stripes). Of course, as soon as I bought it I couldn’t figure out what the hell to do with it. I knew those vertical lines would be difficult to match up. Donna came through with the best suggestion: why not make another Hazel? (I’ve made twobefore.) I decided to fully line the top of this one with some red voile, and I used that for the pockets as well. I had a hell of a time with the strap placement and length though, and I’m still not 100% happy with them. (I think I unpicked them three or four times.) On the plus side, the denim was so stretchy that I was able to forgo the zipper entirely. But on the negative side, I didn’t use a walking foot so the top of the bodice got a bit stretched out and gapey. I eventually settled on topstitching a line around the top to create a casing that I was able to thread some thin elastic through. That’s enough to pull the top a bit tighter around my bust and armpits. Despite all the headaches, it ended up being a very cute, functional sundress!
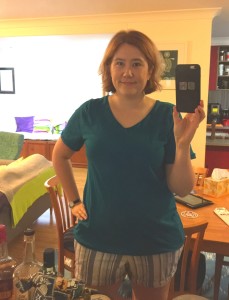
Sydney is in the midst of a spate of really hot Spring weather, and something’s triggered a terrible allergy attack. I spent most of the long weekend lying on the couch moaning. Amazingly, I did manage to get some sewing done in spite of my streaming eyes and nose, mostly because I’d wisely booked in some friends to come over for a “crafternoon.” Behold the Lark Tee. Yes, it’s a v-neck t-shirt. I put in a lot more time, effort, and money than I would have to simply buy a similar shirt from Target. But dammit, I made it! And it’s not too bad. The fabric is some beautiful teal jersey I bought at The Fabric Store a while back, and I spent a long time hand-basting a line down a single rib so I could make sure I wasn’t cutting off-grain. (That’s why cheaply made shirts tend to twist on you.) The cutting took a lot longer than the actual sewing, to be honest. I stitched most of it together on my overlocker, only using my normal machine for the neckline and hems. Many thanks to Donna for her advice and moral support on the day–though it didn’t help that she was wearing her own (much nicer) version!
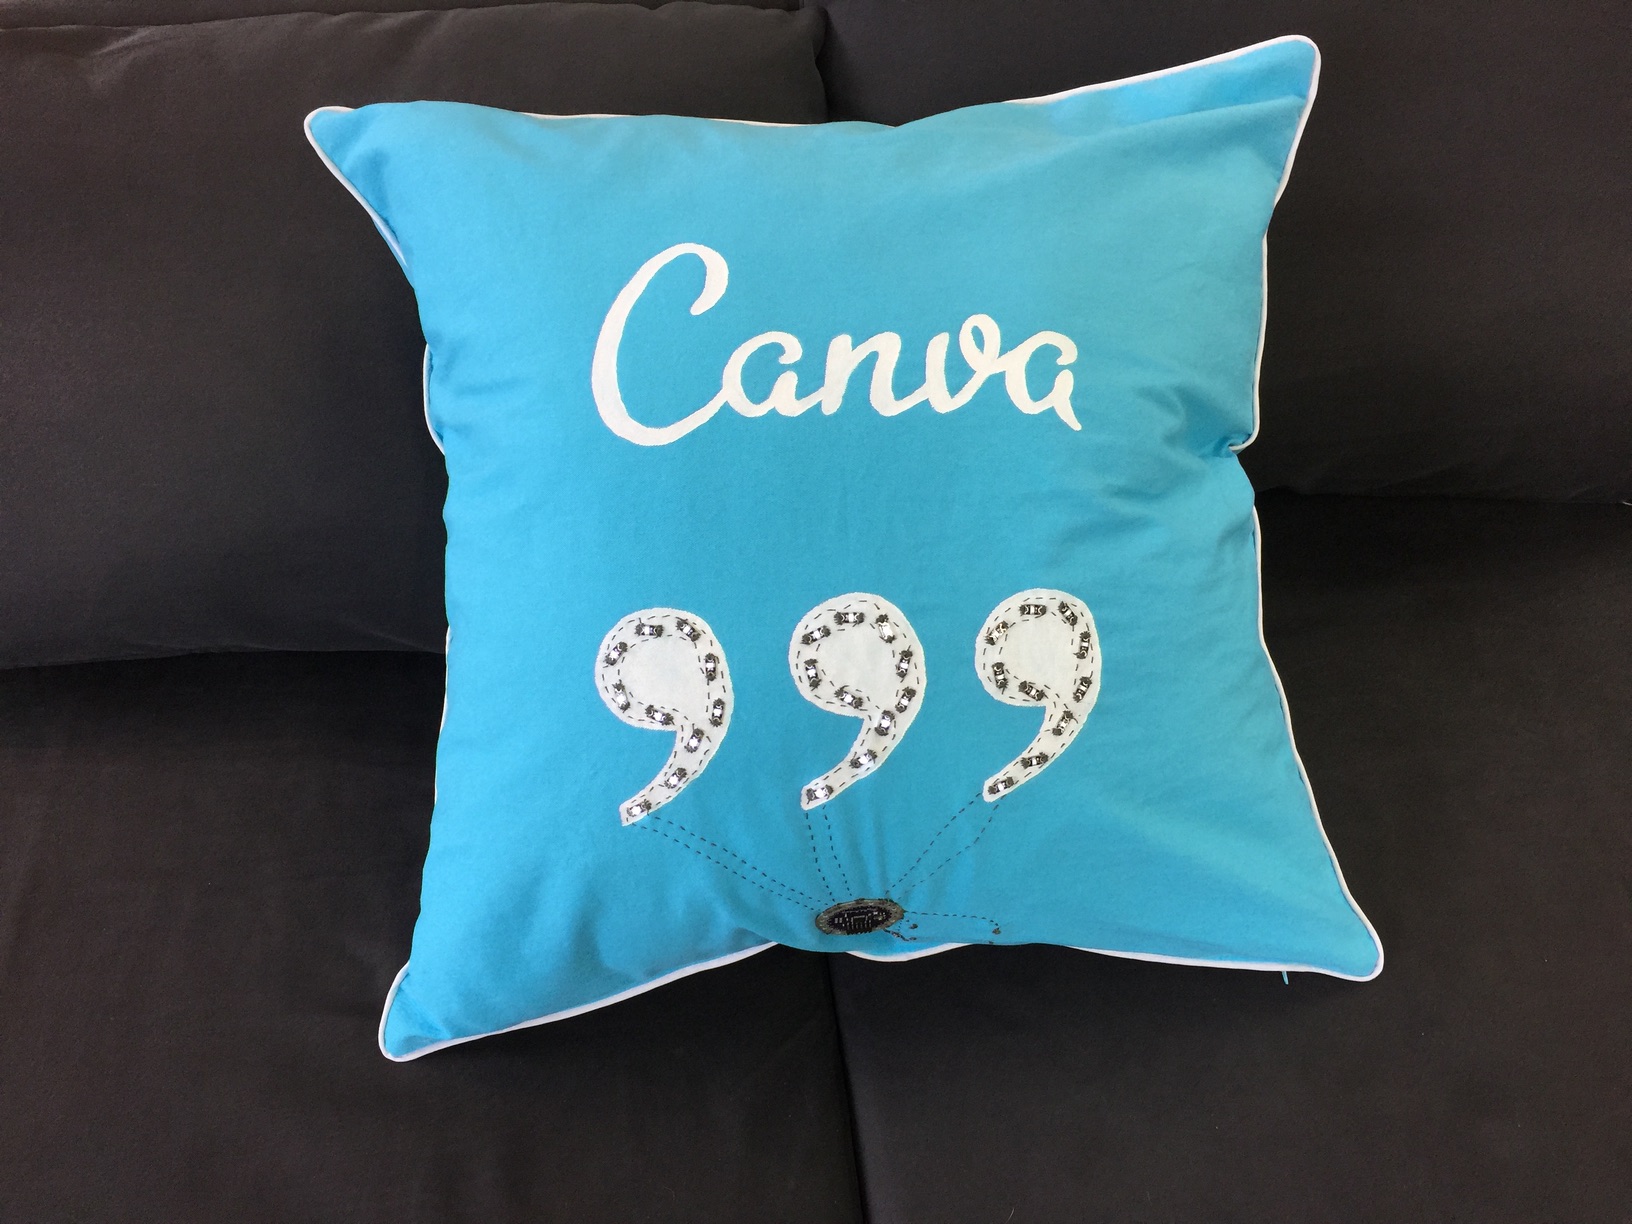
This past Thursday and Friday, Canva held its first ever Hackathon. At first I wasn’t quite sure what I was going to do for it. (I work with some really brilliant engineers, and my coding skills aren’t great.) But the sign-up sheet came out and it was clear that non-coding projects were encouraged. Then the organiser Chris Doble (jokingly?) suggested that “someone” could create cushions with commas on them. A-HA!
(The Three Commas thing is a running joke from the show Silicon Valley. As a start-up, we quote that show a lot. We even threw in some references as an Easter Egg in our Canva for Work videos.)
So I knew immediately what I would do: I’d sew up a cushion with the Canva logo and three commas, and then I’d use my LilyPad Arduino to make the commas light up. The end result turned out pretty spectacular, if I do say so myself.
I published this tutorial back in 2004, and it’s been pretty popular! I’ve now ported it over to my new site. You’re welcome to link to it, but please don’t reproduce without my permission.
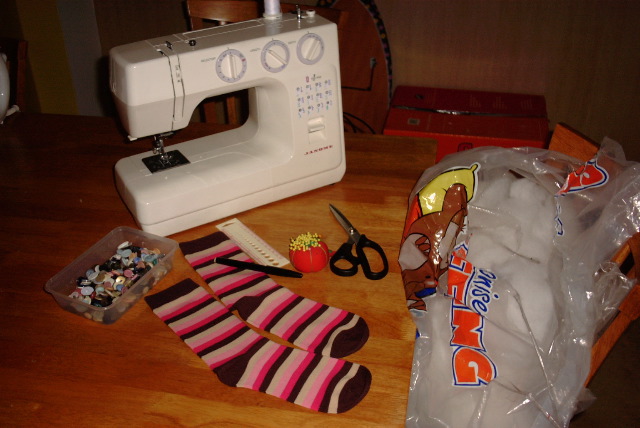
Everything you need to make a sock monkey: pair of socks, sewing machine, buttons (just two for the eyes), ruler (or straight edge of some kind), pen, scissors, stuffing, pins, needle, and thread. Ready to get started?
Before you start
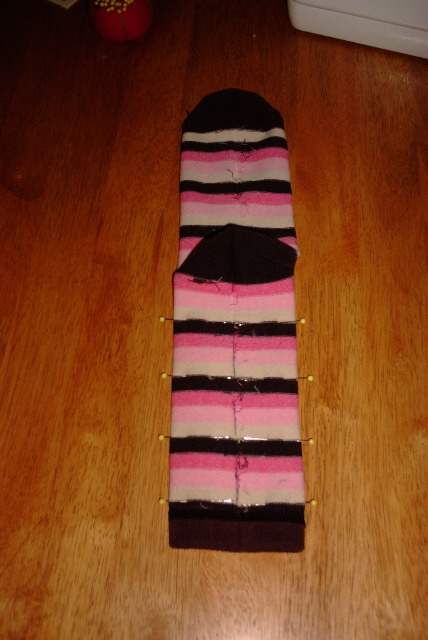
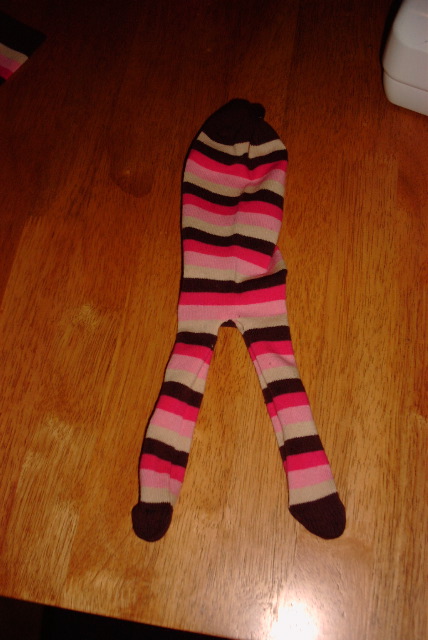
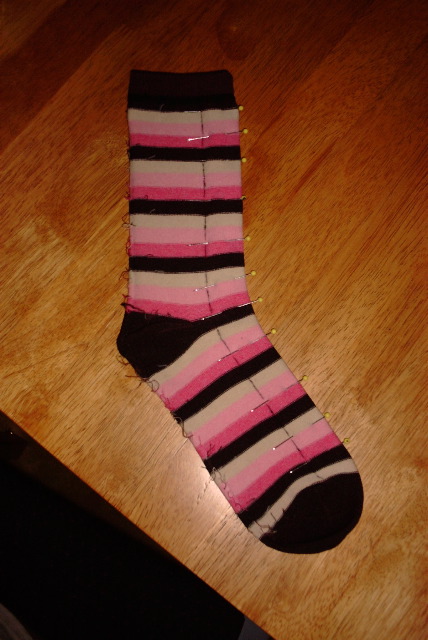
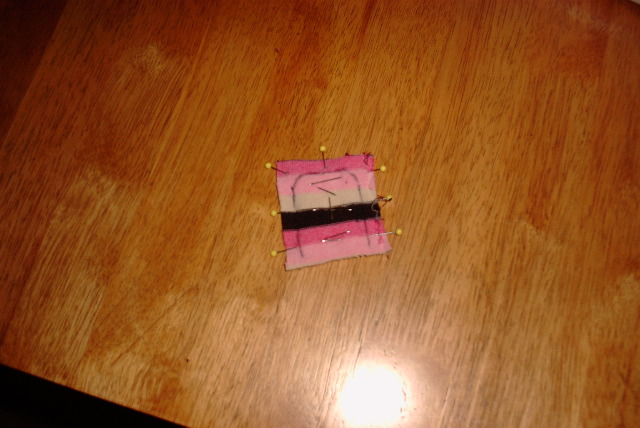
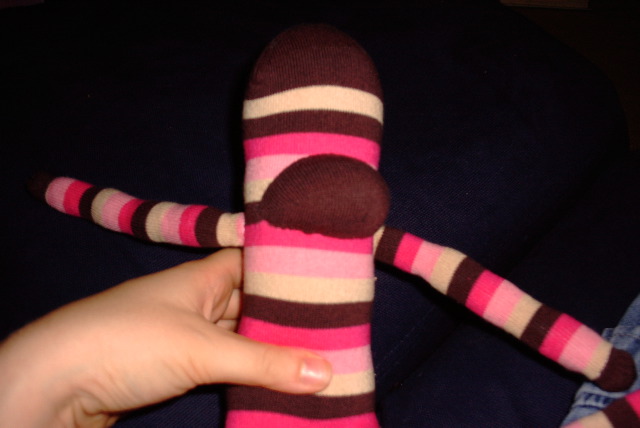
We start by making the body and legs of the monkey. First, turn one of the socks inside out and flatten it so that the heel is centered (as in the picture above). Use your pen and straight edge to draw a line down the center of the leg. You’re going to sew alongside this to create the monkey’s legs, starting about an inch or so from the heel (his bum). In my case, I’m going to start sewing at the first dark brown stripe below the heel. I’ve already put pins along the sides to hold the sock together. (This is particularly useful when you’ve got a design like stripes that’ll look bad if it doesn’t line up somewhat.)
Step 1 – Marking the legs
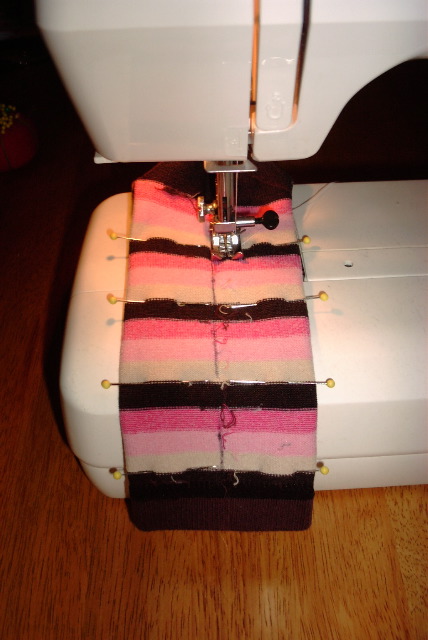
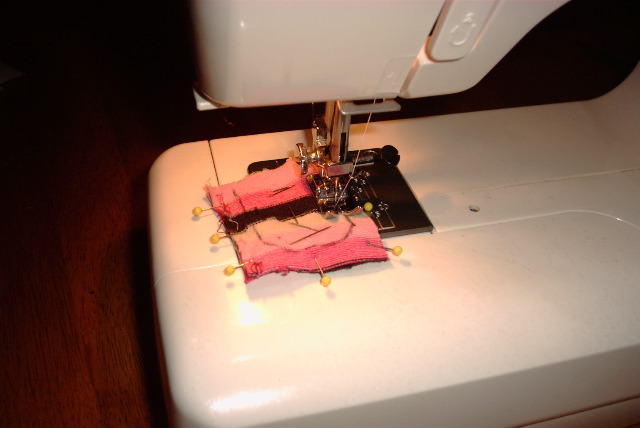
Here I’m beginning to sew the first leg. Note: You don’t sew on your pen line; you sew on either side of it (thus creating two legs). The width of your machine’s presser foot – about 1/4 inch – is just right. As I said, start at the top about an inch or so below the heel. Be sure to back up a little to secure your stitches. (For those in the know, you may want to use a ballpoint needle on your machine if you’ve got one. Otherwise, don’t worry about it.) Sew all the way down til you get to the sock’s cuff. Then stop every so often and turn the sock so you round off the foot. You can see this better on the next page. (And yes, I sew over my pins. I’m very naughty.)
Step 2 – Sewing the legs
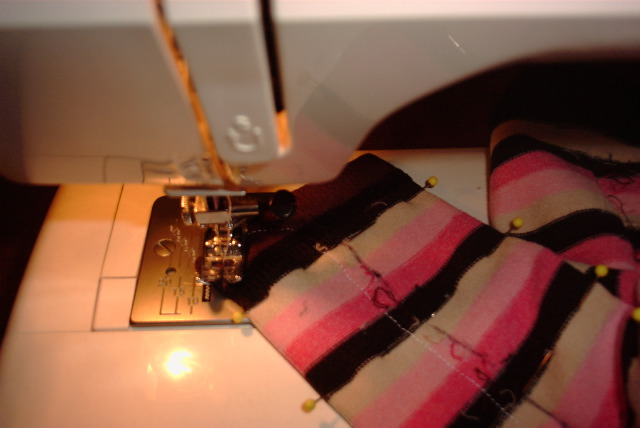
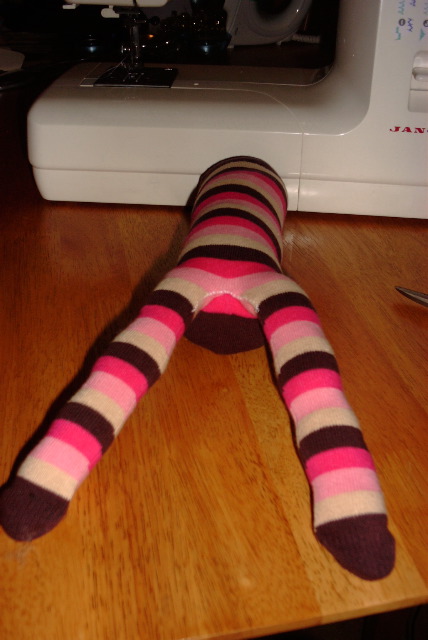
Here you can see my line of stitching down the sock and the way I’ve turned it to round off the foot. Don’t worry if you can’t get the curve perfect; mine turn out pretty angular actually. Once you’ve finished the foot, take a few backstitches to secure the seam and break the thread. Then go back to the heel and do the same thing again on the other side of your pen line. This next picture shows the end result pretty well.
Step 3 – Round off the foot
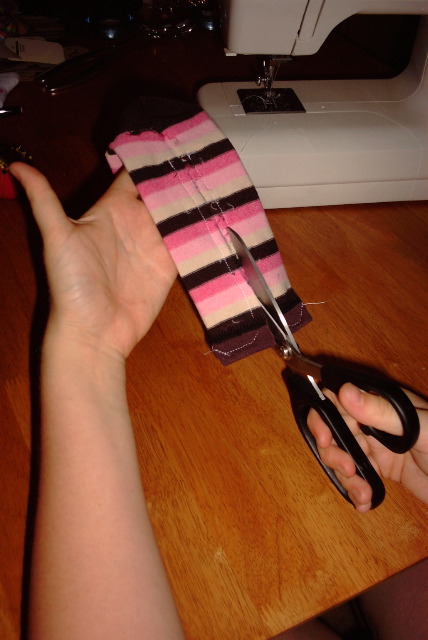
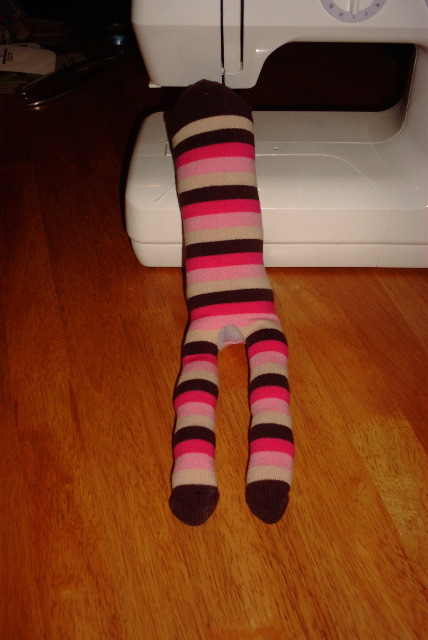
Here you can clearly see the seam lines delineating the legs, each ending in a rounded off foot. Now it’s time to separate them! Use your scissors and cut along your pen line up from the cuff towards the heel. Stop where you started sewing. You’ve now got an inside out monkey torso!
Step 4 – Separate the legs
Your inside-out monkey torso has a convenient hole in the crotch through which you can turn him rightside-out. Do this now. You can cut the hole a little bigger if you’re having trouble pulling him through, but try to keep it as small as possible. A chopstick or knitting needle can be helpful for pushing his legs out properly. Here he is, all ready to be stuffed!
Step 5 – Turn him inside out
And here he is in three dimensions! I’ve stuffed him with generic polyester stuffing I got at the craft store. (Note: I’ve tried stuffing monkeys with recycled quilt batting cut up into pieces, but they just come out too lumpy and weird-looking. I wouldn’t advise it.) Yes, you’re stuffing him through the crotch. I think pulling the stuffing into smaller pieces and pushing each one into place results in a nicer look than trying to wedge in big handfuls. Again, a chopstick is useful for pushing the stuffing down into skinny legs. Don’t be afraid to stuff him quite firmly. Nobody likes a floppy monkey!
Step 6 – Stuff the monkey
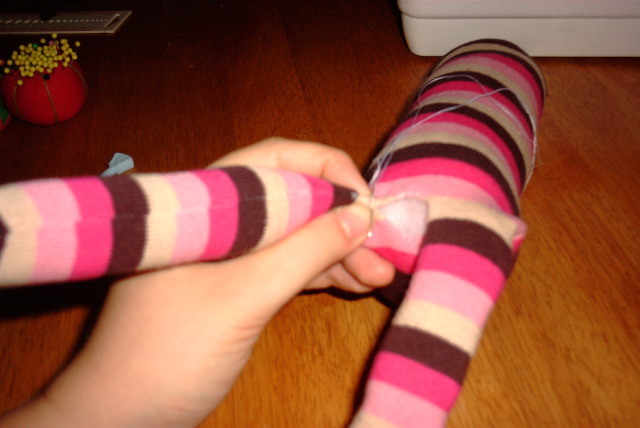
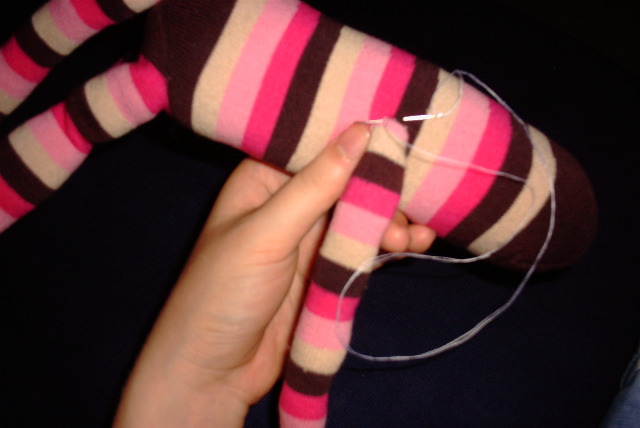
It’s finally time to sew up that monkey crotch. I just use plain white cotton thread and a sewing needle. Make a fairly large knot (otherwise it’ll pull through) and come up from the inside to secure it. You’re basically going to be pinching the raw edges together and tucking them to the inside. Then just take little stitches across the folded edges as best you can. It always gets a big difficult in the middle, when your sock inevitably stretches a little thin and you’ve got monkey legs flopping about, but just do your best. This really is a very forgiving project. I generally go all the way across the opening and then back again for extra strength. The next photo shows this process a little better.
Step 7 – Sew him up
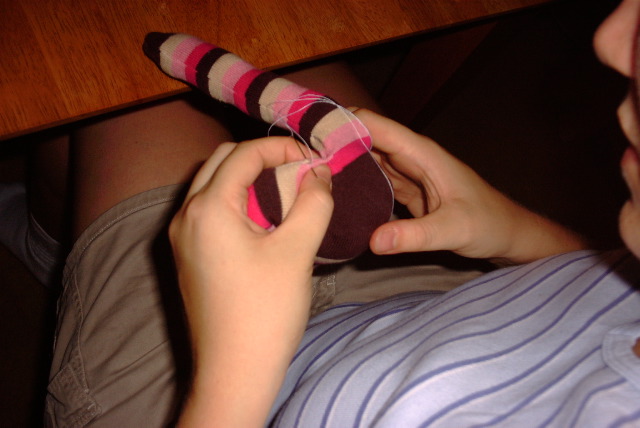
In this one I’ve got the monkey turned upside-down. You can clearly see that I’ve pinched the raw edges in together and I’m taking each stitch through both folded edges. It’s no use trying to use pins here; the monkey is too puffy and they’ll just get in your way. Try to keep your stitches small and tight and they won’t show so much on the finished toy. When I’m finished, I generally knot the thread two or three times close to the surface and then go back down the last hole and come out somewhere else. Gently pull the knot into the body, cut the thread, and let the tail disappear into the monkey.
Step 7 – Another view
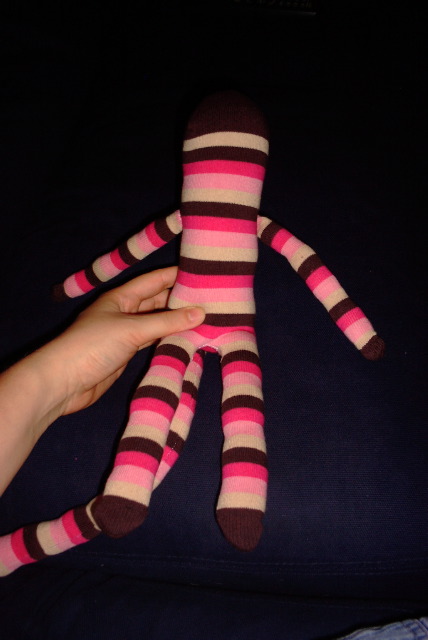
Finished monkey crotch! You’ve now got a faceless sock monkey torso with no arms. Scary, I know. It’s time to make him some limbs…
Step 7 – Finished
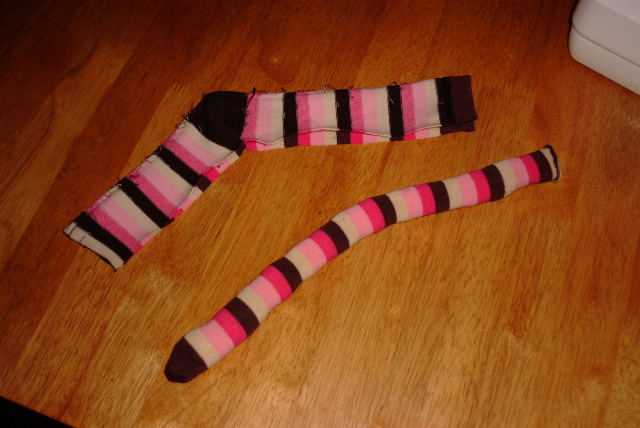
Now it’s time for the other sock. We’ll start by making the tail. Turn the sock inside-out and flatten it, but flatten this one in profile (as seen above). I’ve drawn a line from the toe to the cuff that’s one inch in from the edge. You can make the tail wider if you have a bigger sock as long as you don’t get too close to the heel. We’re eventually going to be cutting the heel out in one piece for the monkey’s face, so your tail width is limited by that. I’ve again secured the sock with pins to keep the stripes from shifting around too much.
Step 8 – Mark the tail
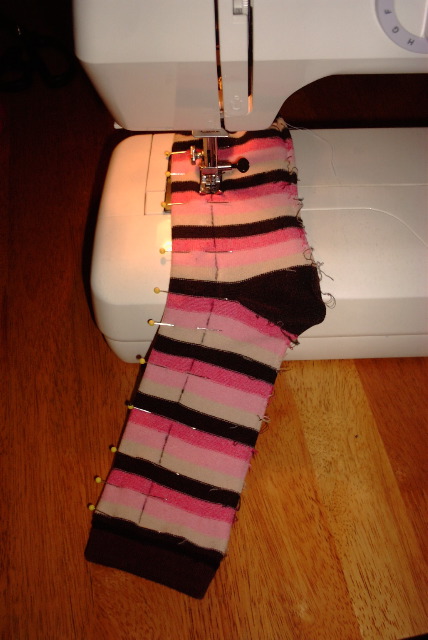
We sew the tail just like we did the legs. Start at the toe (but not in the toe itself; we’re just going to throw that away) and sew all the way down to the cuff, rounding off the end again. This time sew on the line.
Step 9 – Sew the tail
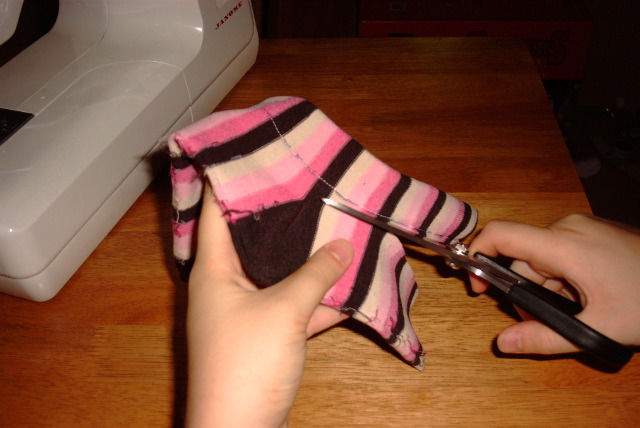
Cutting time! Start by cutting off the toe of the sock. You won’t need that anymore. Now we’re going to free the tail. Cut as shown along your sewn seam all the way to the cuff. (Again, I generally try to have a quarter-inch seam allowance, but you can get a little closer if you need to.)
Step 10 – Cut the tail
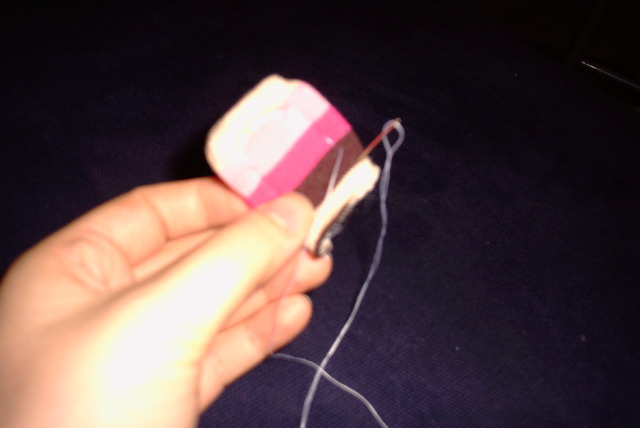
Turn your tail rightside-out and stuff it. You should end up with this lovely snakey thing and a random piece of sock. We come to that next…
Step 11 – Stuff the tail
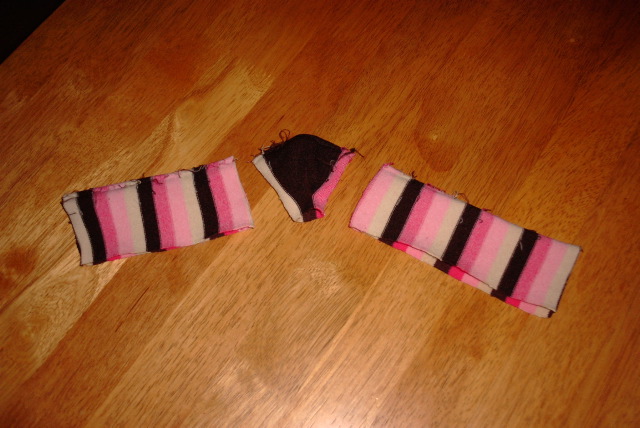
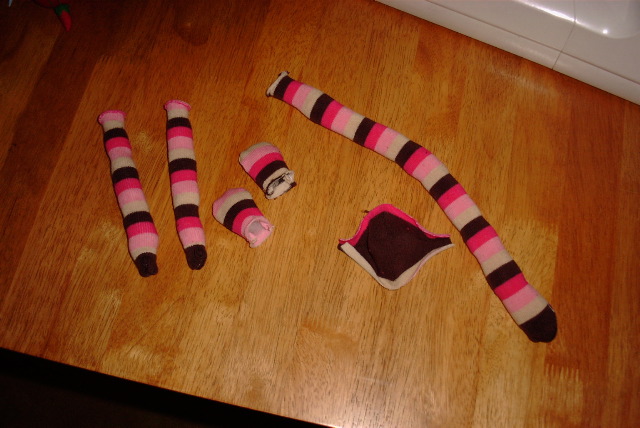
We’re going to cut the rest of the sock as shown into three pieces. The short rectangle on the left (from the foot part of the sock) will become the monkey’s ears. The heel in the middle becomes the monkey’s face. And the long rectangle on the right (from the leg of the sock) will become the monkey’s arms.
Step 12 – Cut remaining pieces
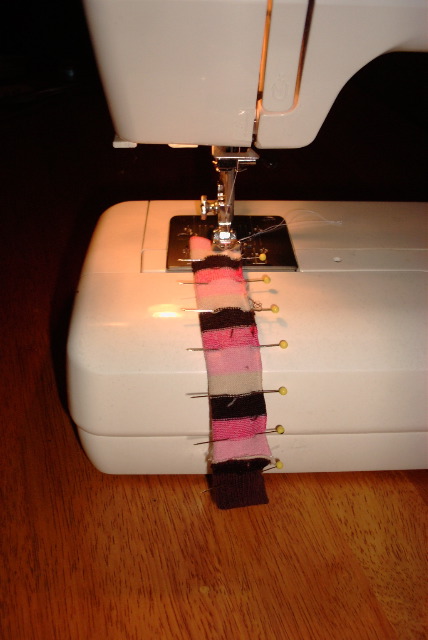
Start with the arm piece first. That’s the longer rectangle. We need to cut it up the middle length-wise to make two long skinny pieces. (Your sock already probably has a crease there.) Then fold one of these pieces in half, right sides together, and pin it along the raw edge. Then sew along this edge starting from the non-cuff end. (My seam allowance here is probably less than a quarter-inch, simply because I don’t want the arm to be any skinnier than necessary. Don’t get too close to the edge though or you’ll run into trouble. The raw edge has a tendency to curl and I often have to stop and readjust things below the presser foot.) Round off the cuff end for the hand just as you did the legs and tail. You’re basically just making yet another little tube. Once you’ve done one, make the other just the same.
Step 13 – Sew the arms
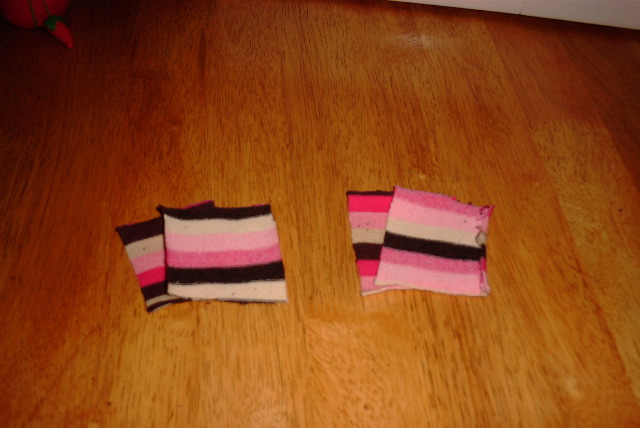
Now for the ears. Take your remaining bit of sock and cut it lengthwise as you did with the arms. Then cut each of those bits in half widthwise. We’re basically looking to get four little squares all the same size from this operation, as seen here.
Step 14 – Cut the ears
Take two of the matching squares and stack them with right-sides together. Then pin the heck out of them as shown. I don’t bother trying to make circular ears; these squarish ones look fine. Use your pen to draw on the ear shape. I generally just draw it with a quarter-inch seam allowance and round off the corners. (Once you’ve done a couple, you won’t even need to draw it.) As you can see, one side is left open. We’re now going to sew along the line.
Step 15 – Pin the ears
Here I am sewing along the ear line. Just go slowly and try to keep everything together as best you can. Once you’ve finished one, make the other just the same. You can trim off some of the excess seam allowance (like the square corners) when you’re finished.
Step 16 – Sew the ears
You should now have all the basic pieces of your sock monkey. Turn the arms right-side out and stuff them as you did the tail. Turn the ears as well and stuff them lightly. You’re now done with the sewing machine and everything else will be done by hand.
Step 17 – Stuff the parts
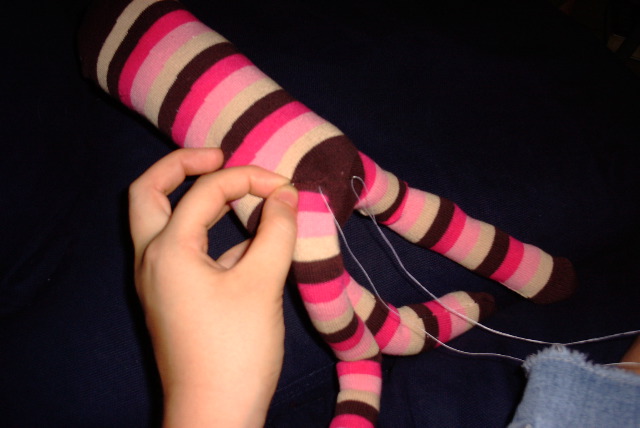
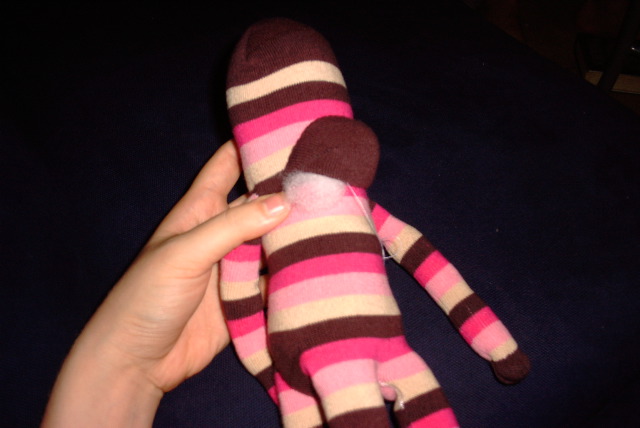
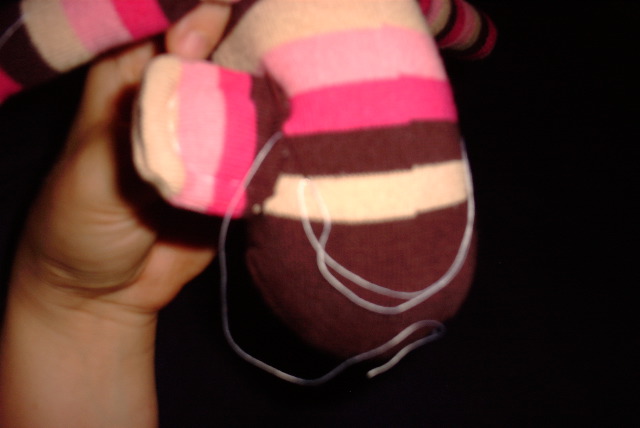
First, a word of warning. Don’t try to make this perfect. There’s no easy way to sew two tubes together at right angles. Just do your best and know you’ll get better with each one. The general idea here is just like it was with the crotch – fold raw edges inside and use small tight stitches to graft everything together. We start with the tail. I knot a length of thread and bring it up from inside the tail near the seam to secure it. Then fold the raw edges inside, pinch a bit of the tail to the body, and start tacking it down with stitches. Try not to stretch the tail “circle” out too far. I try to keep the long tail seam at the bottom to hide it (but sometimes the tail rotates a bit as you sew it). I generally go around the tail twice to make it as strong as possible. Then secure your thread and hide the loose end in the body.
Step 18 – Sew on the tail
Next the arms. Do these exactly like you did the tail. I generally position them about halfway up the body. (It’s useful to have stripey socks for this, because you can use the stripes to line up the arms perfectly.) Again, I tend to sew around each arm twice for strength.
Step 19 – Sew on his arms
Your monkey now has all his limbs! It’s time to give him a face.
Step 19 – Finished
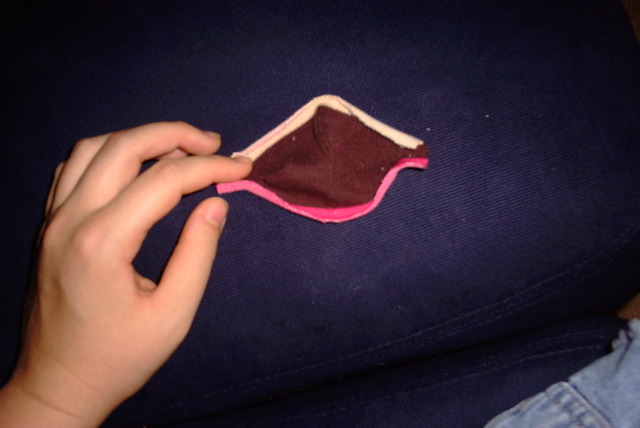
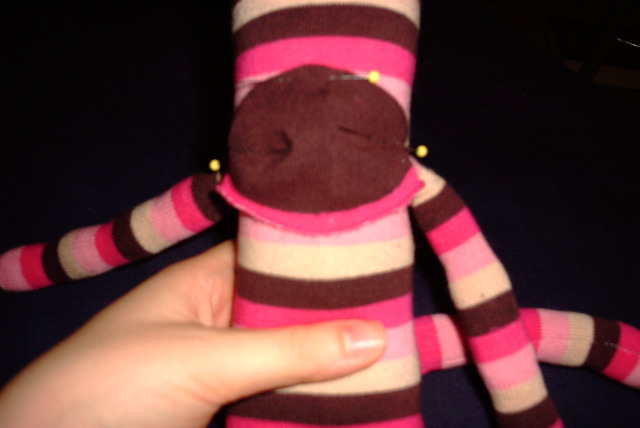
Take a look at the heel before we get started. It probably looks pretty big in comparison to your monkey’s head. That’s good. You see, the trick when you sew it on is not to sew it on flat. We want to leave room to stuff it and have it look three-dimensional. Just keep that in mind.
Step 20 – The face
I start by folding down the top edge of the face and centering it on the monkey’s head. Then I pin through that folded top edge to hold it. (It’s nice to have a heel that’s a different color from the rest of the sock because the color change makes for a good fold line.)
Step 20 – Pinning the face
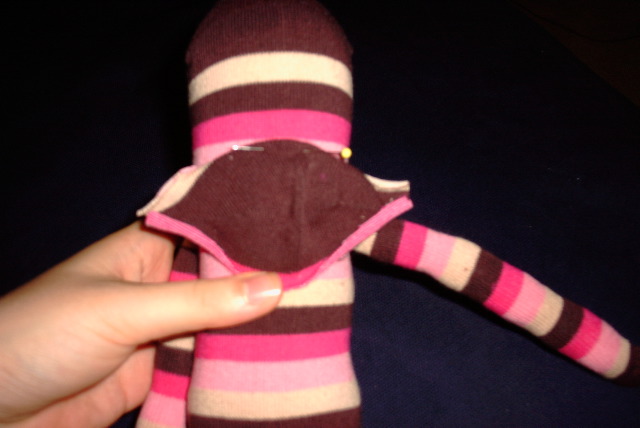
In this next blurry shot, you can see that I’ve folded and pinned the top edge at each corner as well. You can unpin it and move it if it looks off-center between the arms. Please note that we haven’t touched the bottom edge yet, and there’s still plenty of material bunched up in the center. Don’t try to stretch it flat. We just want our top edge to be a nice curve, almost a half-circle.
Step 20 – More pins
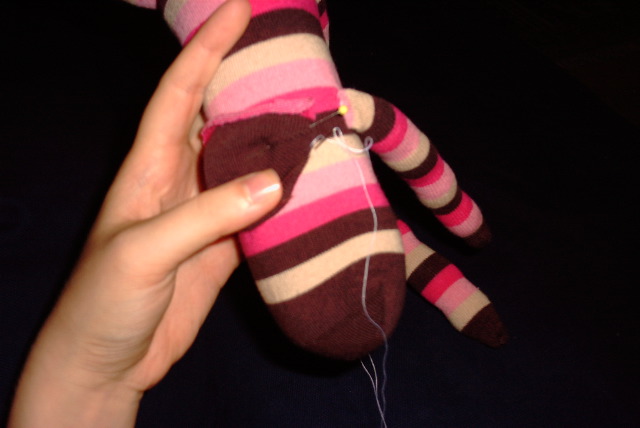
It’s time to start sewing the face. Starting at the left corner (as you’re looking at the monkey; he’s upside-down here) sew along the top just as you did on the arms and tail. You can hide your knot inside the face. Just take tiny stitches catching a bit of the folded face edge and the body behind it. Stop when you get to the opposite corner. Remove your pins.
Step 21 – Sew the face
Now for the bottom of the face. Fold the raw edge in and pin it down in the center as shown. Pin the bottom edge a little higher than your first instinct; we want to leave extra material in the middle to fill with stuffing. (You can see it bunched up here.) Continue sewing from the right corner down to the bottom center. Then stop, because it’s time to stuff!
Step 21 – More sewing
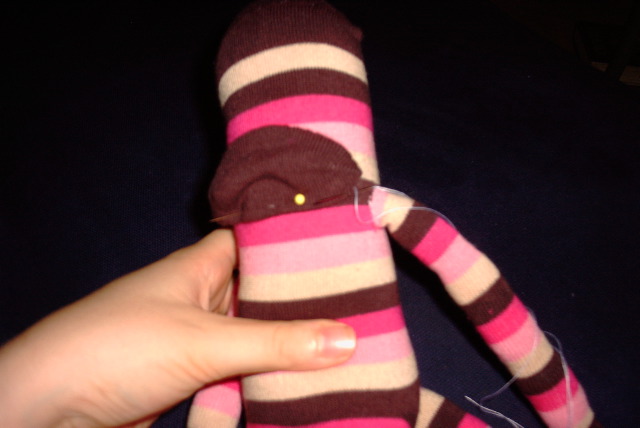
Here you can see me stuffing the face through the opening at the left corner. Just tear your stuffing into small pieces and shove them in. Don’t be afraid to stuff it quite firmly. If you’ve done it right, you should get a nice three-dimensional “lump”. Then just continue sewing around to close the gap. I don’t think it’s necessary to go around the face twice (as the monkey’s owner hopefully won’t be picking it up by the face like they would the arms and tail), but you might want to do it anyway. Secure your thread and hide the loose end in the body.
Step 22 – Stuff the face
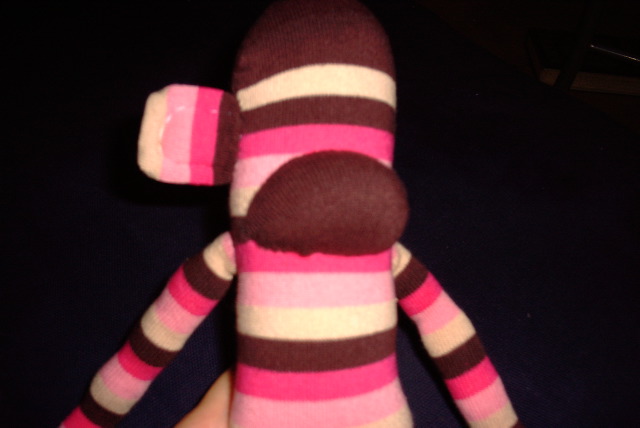
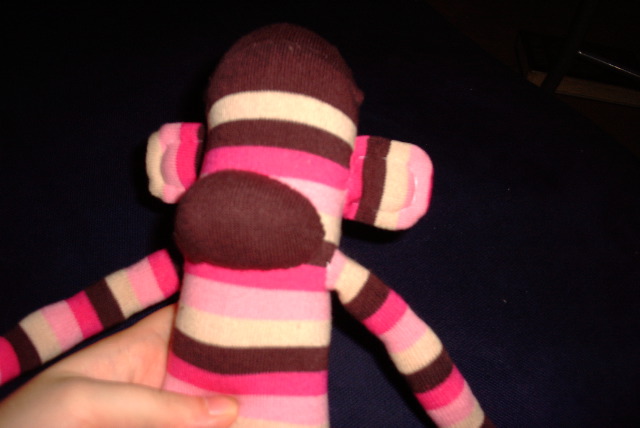
Here’s our sock monkey so far! Now we just need a few finishing touches… Ears, eyes, and a smile!
Step 22 – Finished face
Sorry this picture is so crap. Basically, what I’m doing here is my own monkey ear innovation. Before I attach the ear to the monkey, I sew a few big stiches along the edge to give a little ear rim definition. I just think it looks a little nicer. You don’t have to do it though.
Step 23 – Sew ear rim
This extremely blurry shot is supposed to be me sewing on one of the monkey ears. It’s done the same way as everything else, by tucking in the raw edge and tacking the folded edge down to the body. Ears are a little more tricky (in that they’re not a nice circle), but just go round them twice and don’t be afraid to pull them into place. I generally place them in line with the arms just below where the toe of the sock starts. (Again, stripes are nice here for aligning perfectly.) Don’t worry too much if they don’t match exactly. I always end up with one slightly farther back than the other but it’s part of the charm, right?
Step 24 – Sew on ears
Here’s the attached ear so you can see the placement and my little ear
rim stitches…
Step 24 – One ear finished
Now with both ears attached…
Step 24 – Both ears finished
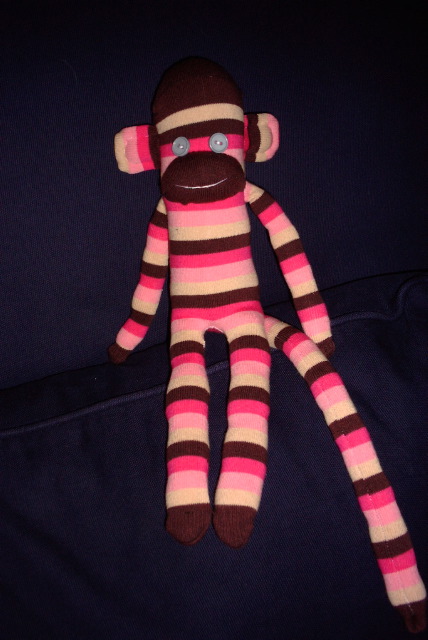
For eyes, I like to use matching buttons. (I’ve also used “googley” eyes in the past but I think they look a little scary.) My buttons came from the bargain bin at my local sewing shop. Just pick out two you like and tack the first one down. I knot this thread a few times and then pull it down into the body to start. Once you’ve secured the button, take the thread down into the body and bring it back up for the second eye. After you’ve secured that, you can bring the thread up in the face to complete the smile. You can choose any embroidery stitch you like. I tend to use a stem stitch, but a backstitch would work well too. It’s up to you! Or you can leave him without a mouth. When you’re done, knot the thread and hide it down in the body.
 As you may have picked up on yesterday, I made yet another Colette Laurel dress for Frocktober! I used the same mods as the Big Data dress: sleeveless, notched neckline, and pockets. On this one, I moved the pockets outwards slightly as they felt too close together. I also cut the back in one piece rather than having a waist seam.
 I made a new dress last weekend! This is a sleeveless
 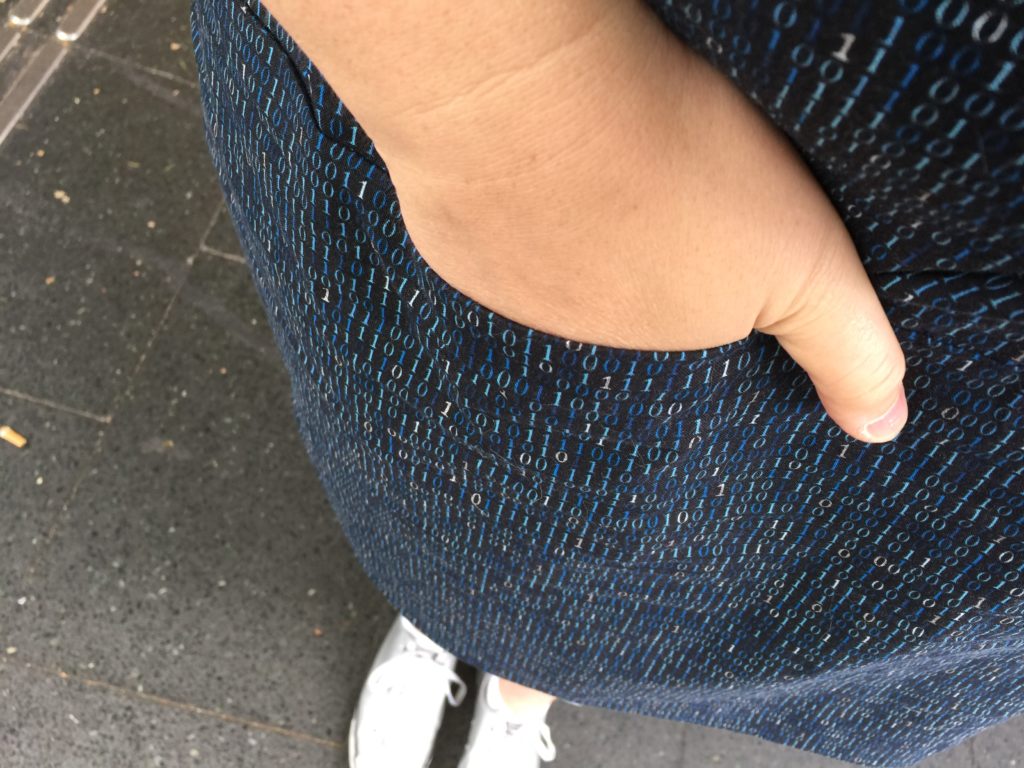 Sewing notes: Based on my measurements, I cut a straight 18 (the largest size) on this pattern. It’s roomy, but given the style of the dress and the crispness of the cotton, that’s what I was aiming for. It’s very comfortable. There are bust darts on the front and diamond-shaped darts on the back that keep it from being a completely shapeless sack. The
 Georgie #1: The first was this short-sleeved version in a vintage fabric remnant I had. (We did a burn test on it and it melts so I reckon it’s probably either nylon or polyester.) I cut the largest size and did an FBA – more on that in a sec – and finished with exposed bindings. For the bindings, since I had limited fabric I didn’t bother cutting them with the provided pattern pieces but instead used a square to make continuous binding via the
 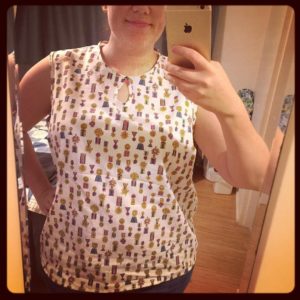 Georgie #2: The second Georgie is this sleeveless version in a vintage cotton remnant. (It’s got
 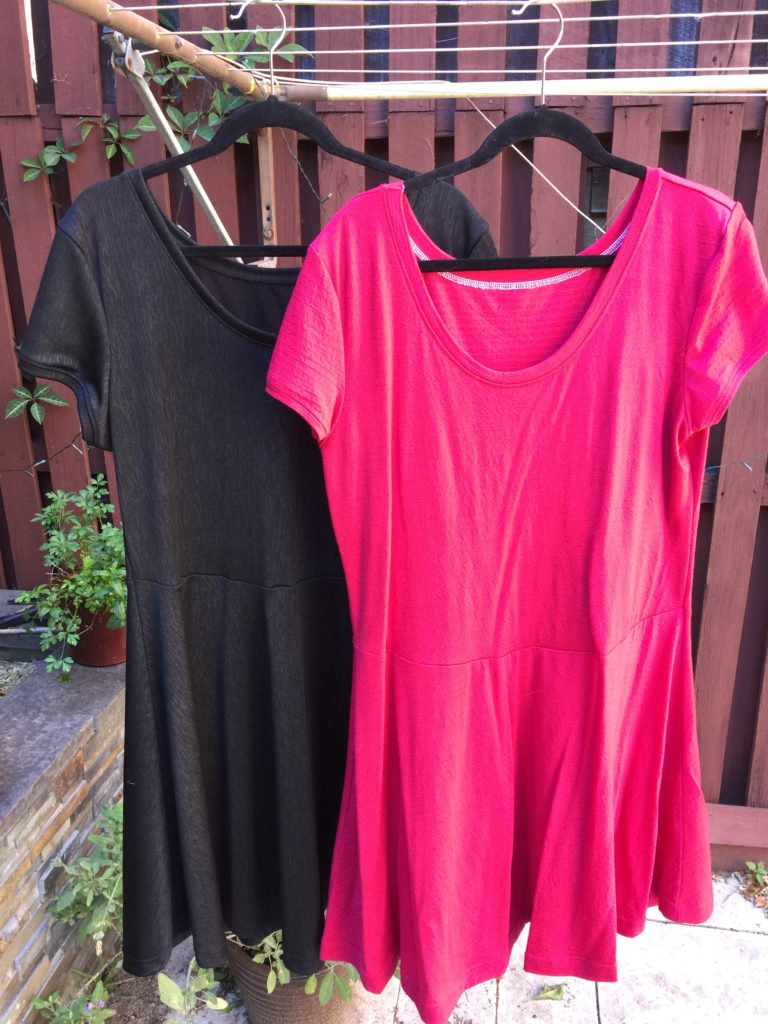 Finally blogging these two
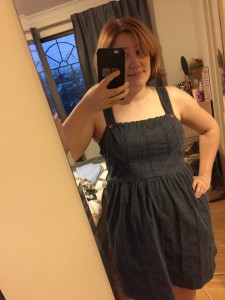
 Sydney is in the midst of a spate of really hot Spring weather, and something’s triggered a terrible allergy attack. I spent most of the long weekend lying on the couch moaning. Amazingly, I did manage to get some sewing done in spite of my streaming eyes and nose, mostly because I’d wisely booked in some friends to come over for a “crafternoon.” Behold the
