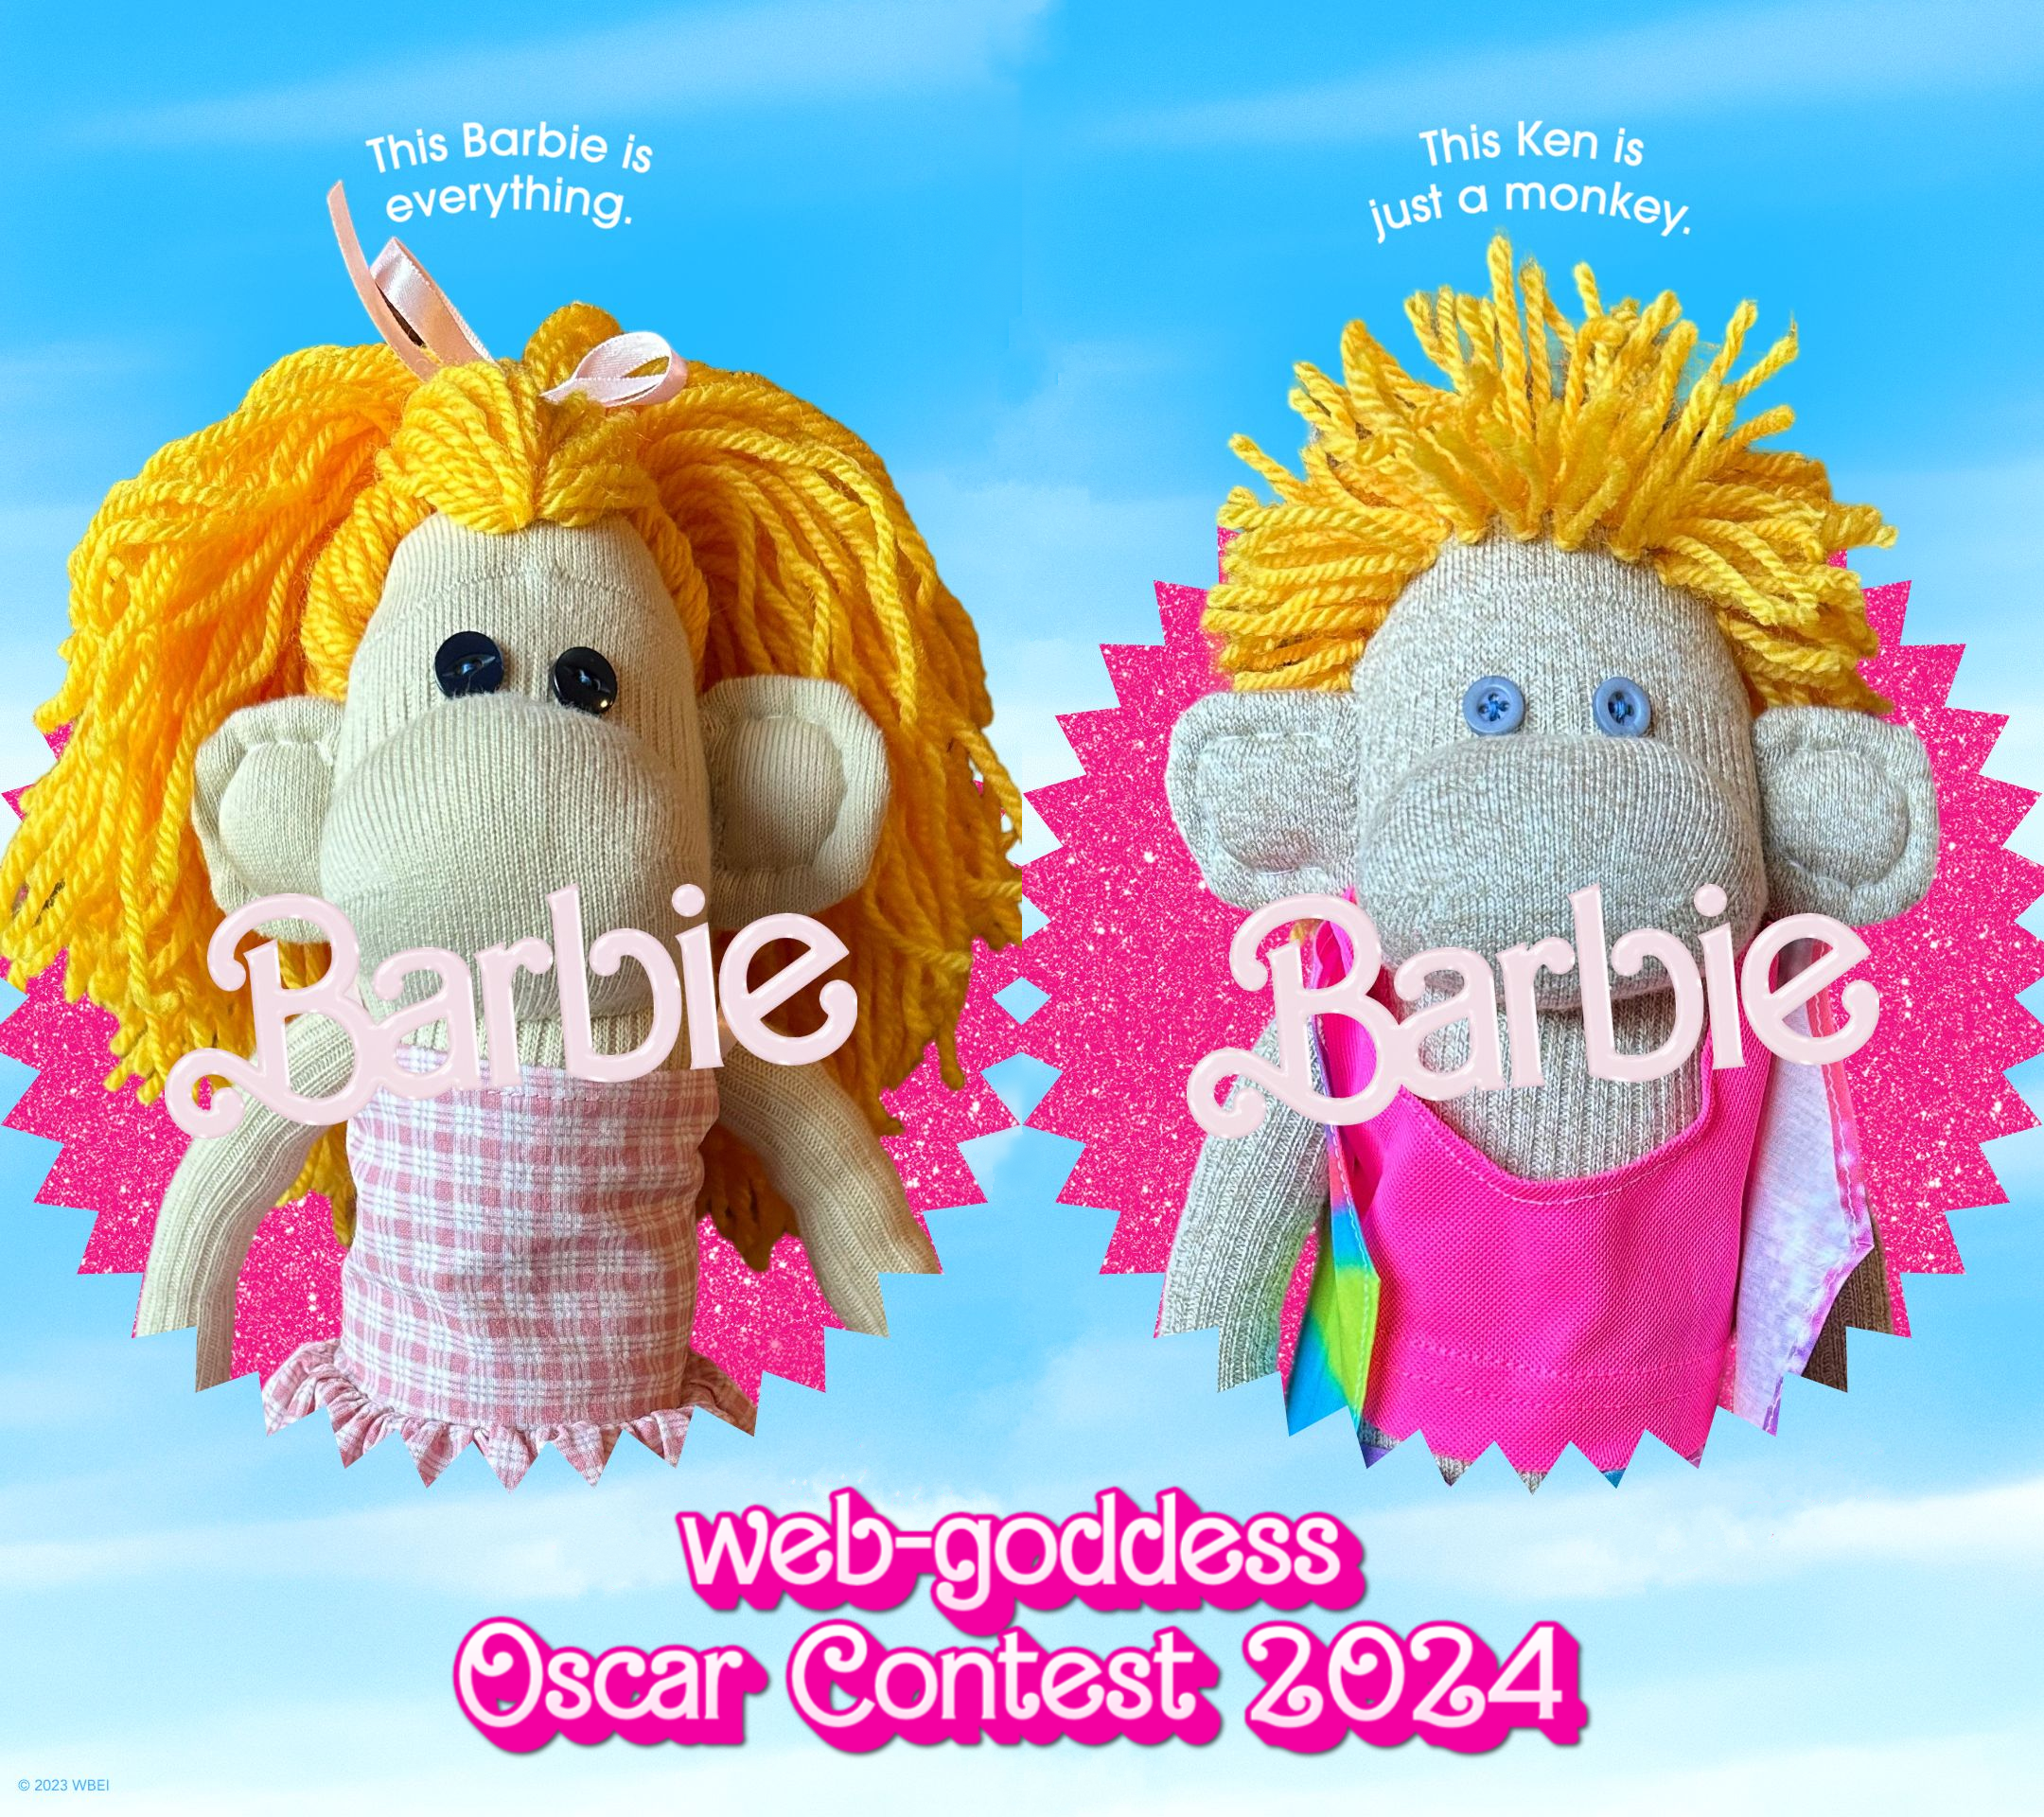
You didn’t think I forgot about the Oscars, did you? With one week to go, I’m happy to announce the fifteenth (semi-)annual Web-Goddess Oscar Contest has officially launched! 🎉
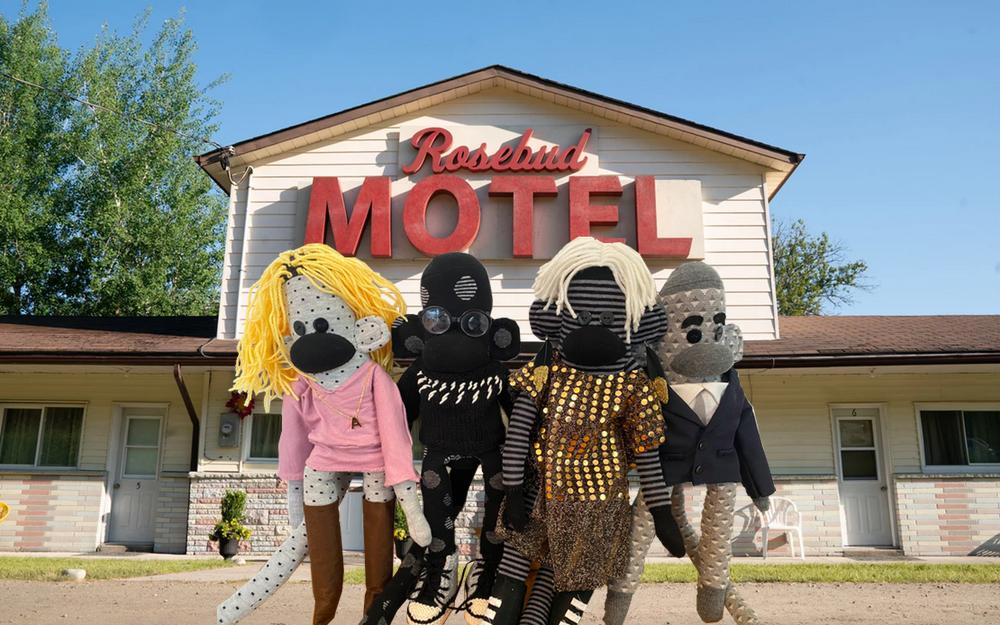
Time to put on Dua Lipa so you can dance the night away with Barbie and Ken…
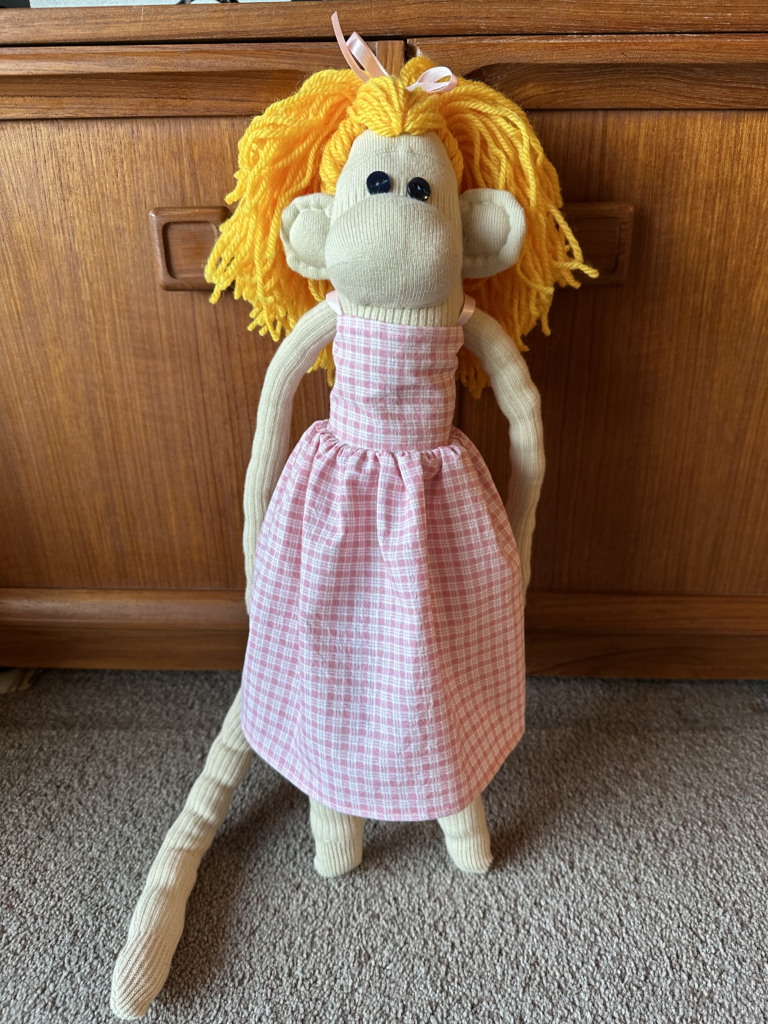
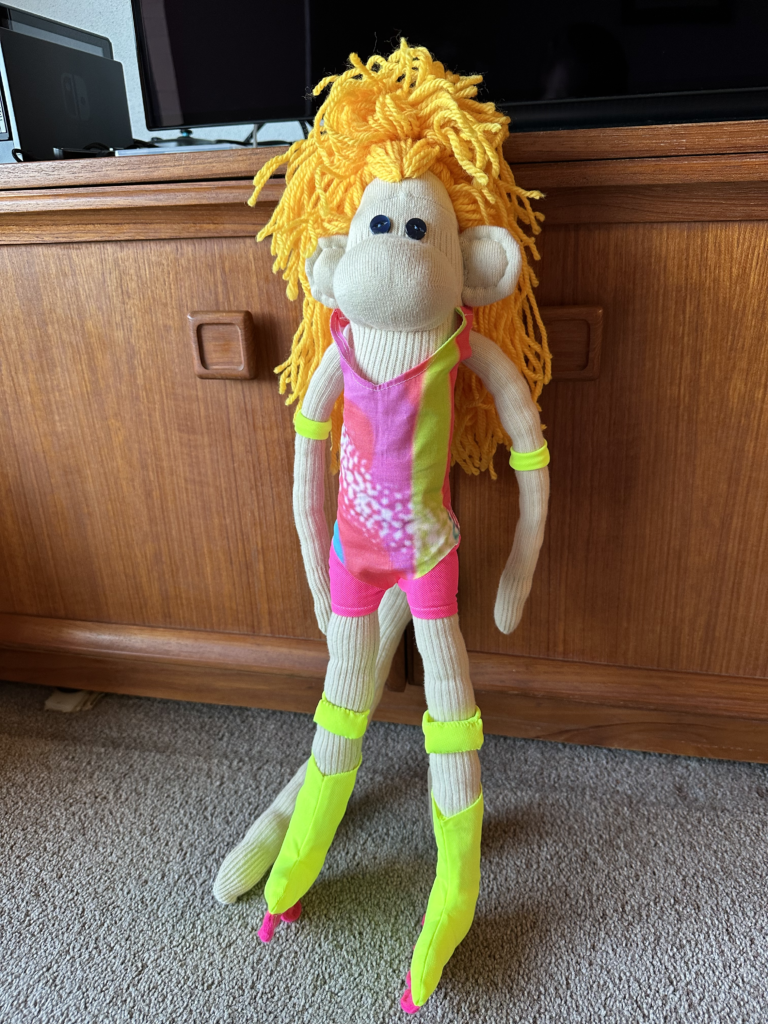
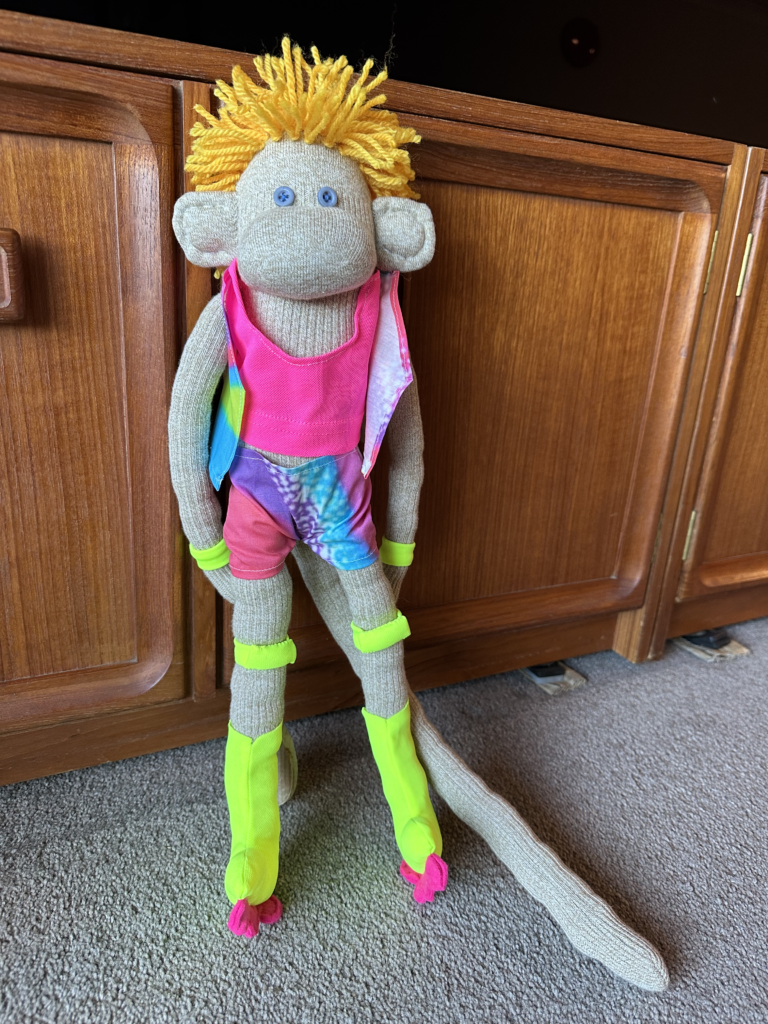
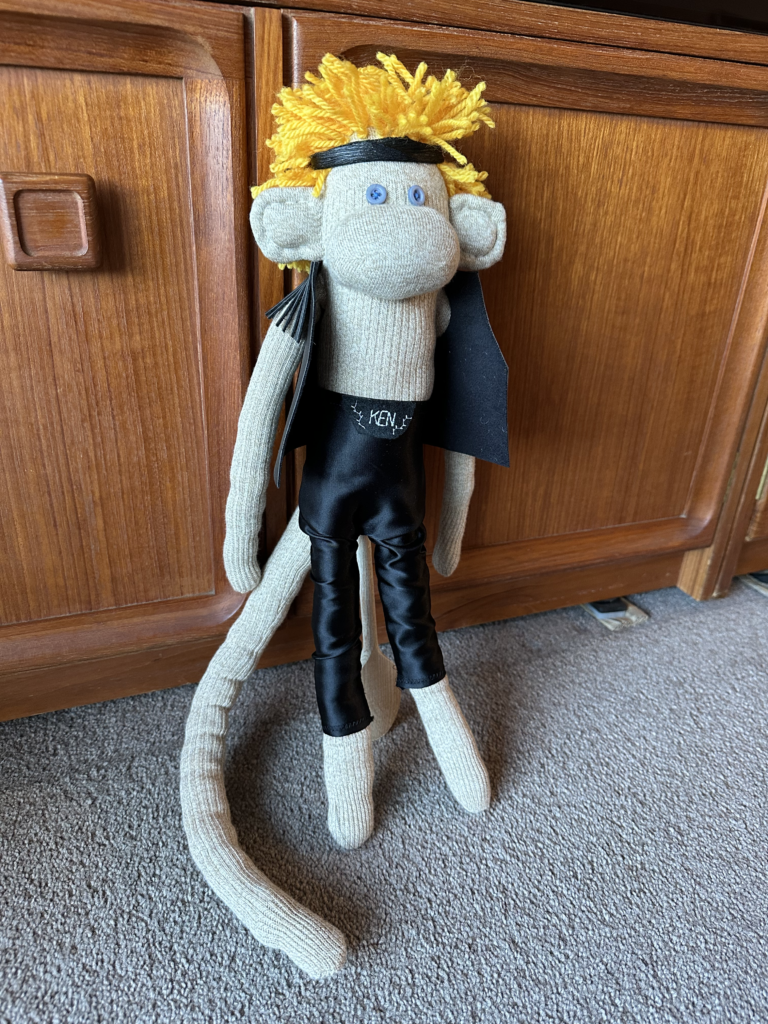
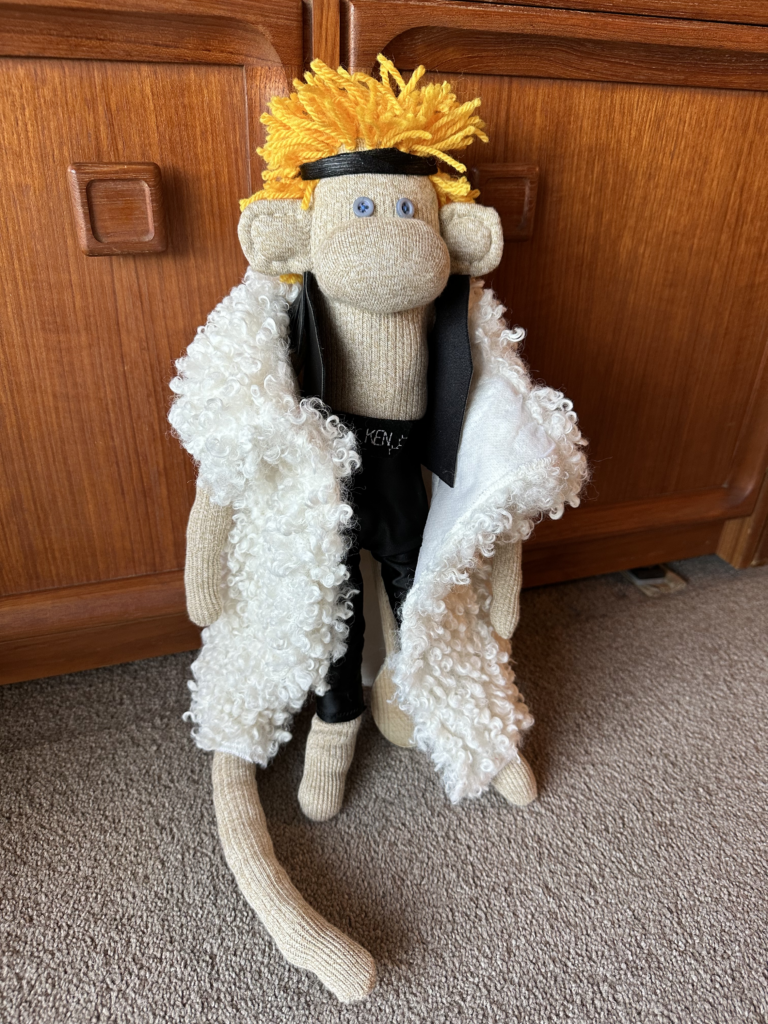
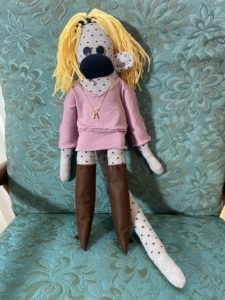
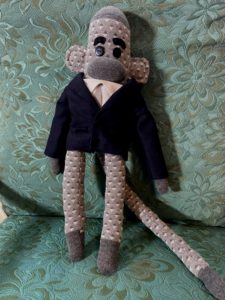
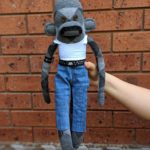
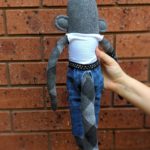
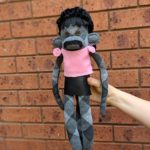
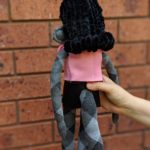
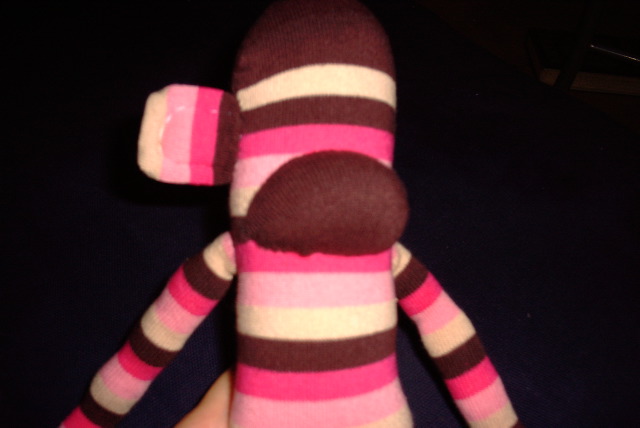
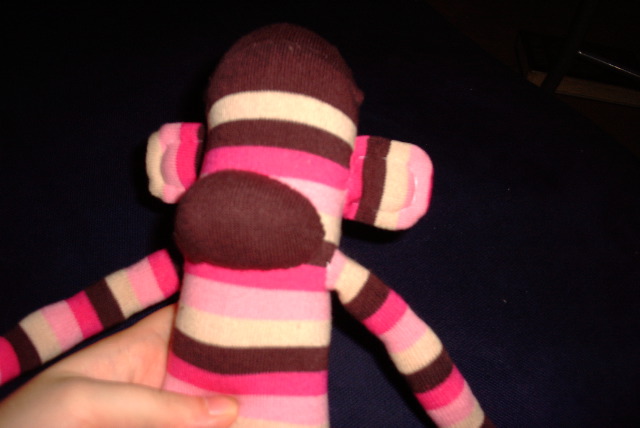
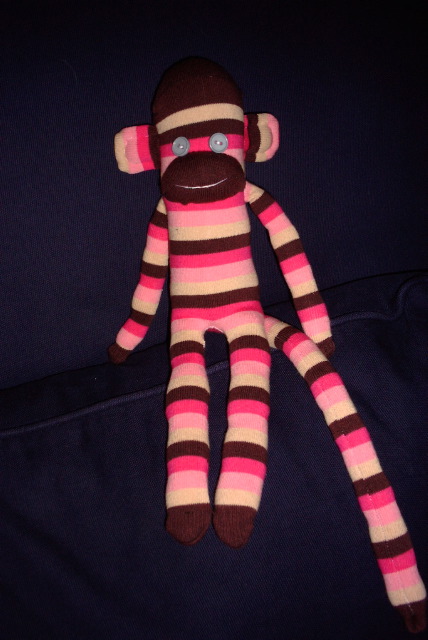
This year you get two monkeys, each of which have two outfits. Barbie has her iconic pink gingham outfit from the start of the movie, as well as her Venice Beach rollerblading kit. Ken has his rollerblading kit too, as well as his Mojo Dojo outfit complete with custom fanny pack and fringed vest. And if you’re going to do a patriarchy, of course you need a fur.
Contest results: Congrats to Shilpa Anand, who got 12/13 predictions correct and tied with 3 other people for the top spot. It then went to the In Memoriam tiebreaker, where Shilpa managed to guess the EXACT number – 51. CONGRATULATIONS SHILPA!
More monkey construction info: The monkeys each have blue button eyes and (lots of) yarn hair. For the rollerblading outfits, why yes, that is the exact psychedelic neon print from their movie outfits, thank you for noticing! I found it on Spoonflower and had a fat quarter printed, which was more than enough. For the neon pink and yellow fabric, I bought some cheap high-vis shirts at Kmart and cut them up. Ken’s vest is made of fake leather from an old handbag, and his mohair coat is a Kmart cushion that I disassembled.
Web-Goddess Oscar Contest Sock Monkey History
Twenty-one years ago (😱), I thought it would be fun to run a contest and give away a sock monkey. I then kept that up for 10 years running, and you can see the history of my creations below. These days I only do it when the inspiration strikes…
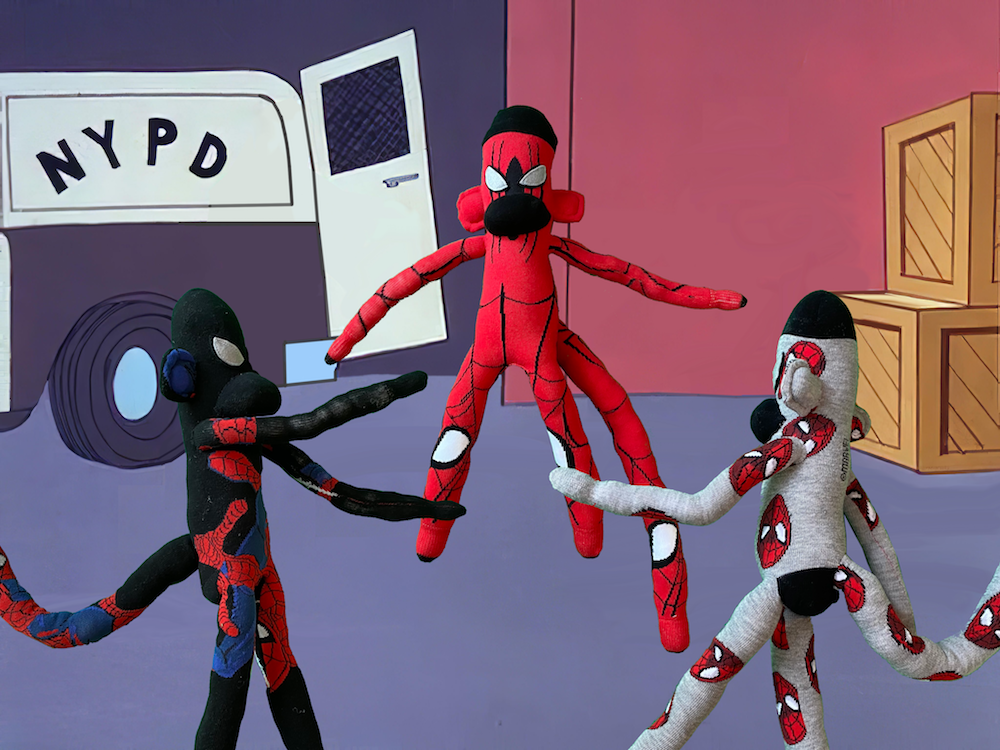
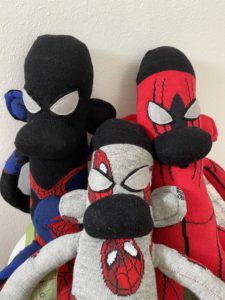
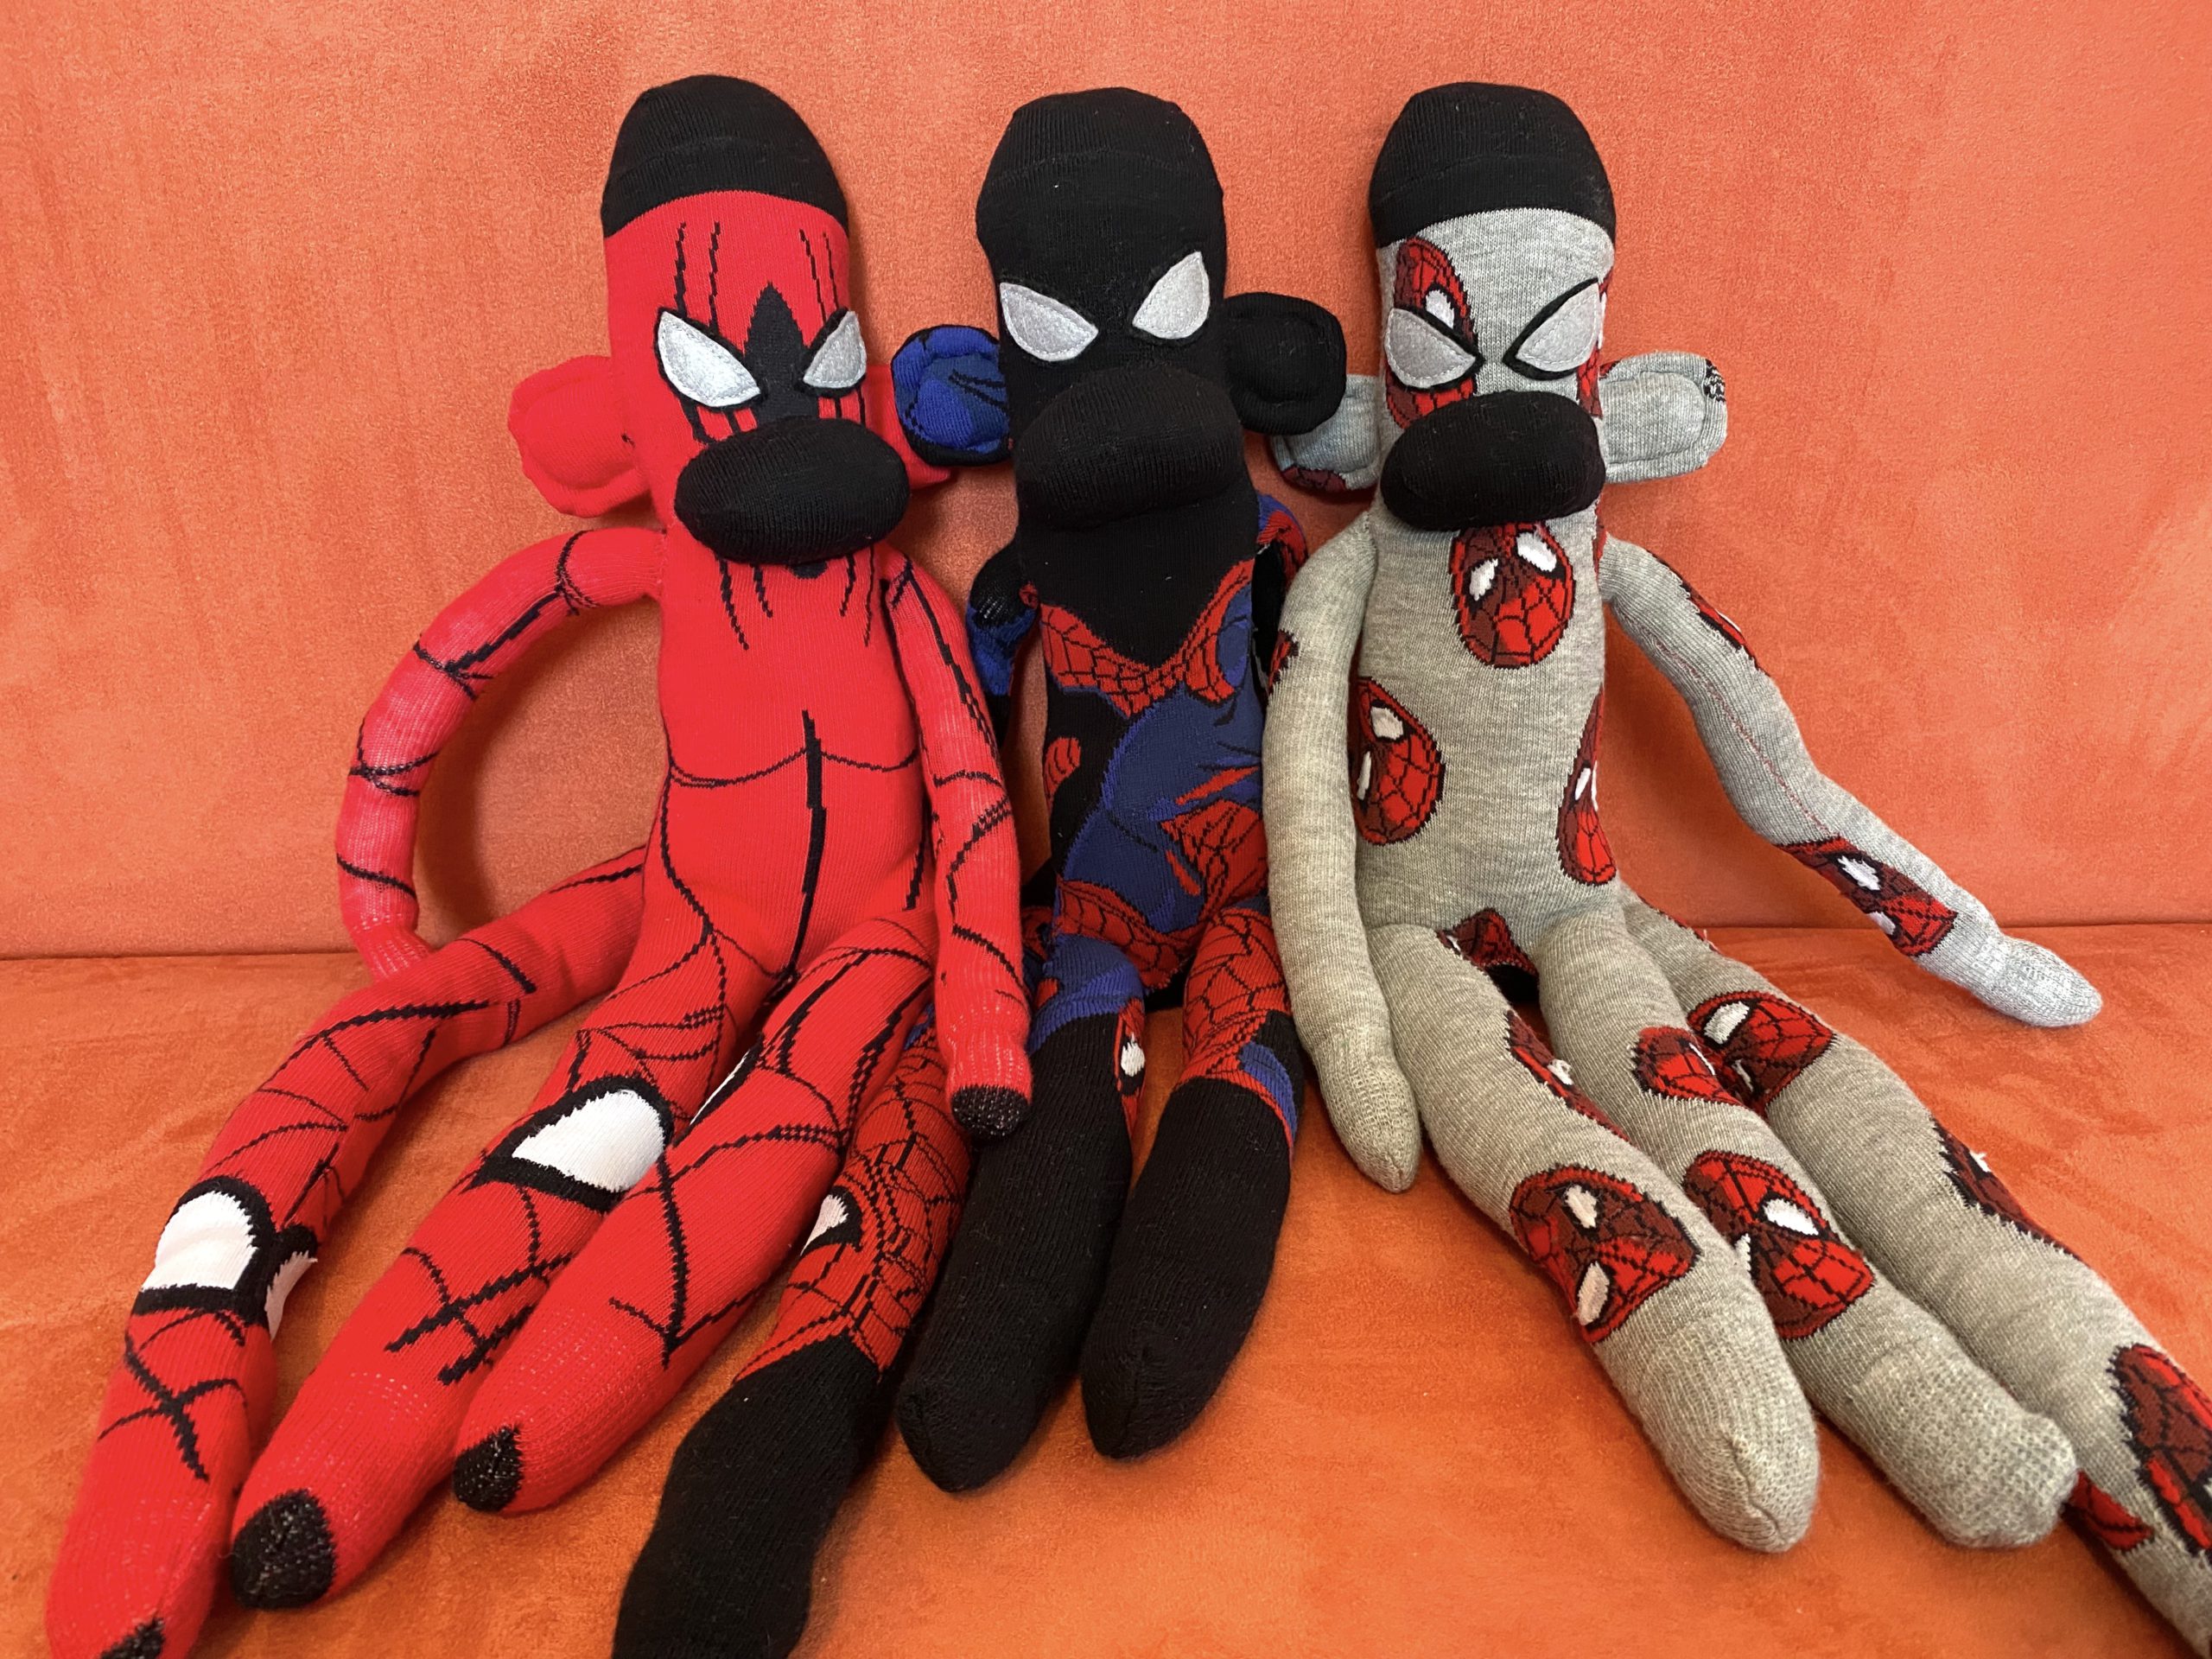
The fourteenth (semi-)annual Web-Goddess Oscar Contest has officially launched! 🎉 And this year you can win your very own set of Spider-Monkeys so you can act out scenes from No Way Home (or the meme!)
Each is crafted from a pair of Spider-Man socks, with felt eyes appliquéd. See? They’re very similar, but all slightly different. You can call them Peter 1, Peter 2, and Peter 3 if you like. (They’re a bit simpler than my original idea, but it turns out that the only person that wants a dirty, sexually repressed, toxically masculine Benedict Cumbermonkey is me.)
Entries are now closed!
The 2022 Academy Awards happen on Sunday, March 27th (California time), which is like 2am here. So I’ll cut off entries a few hours beforehand when I go to bed, and you’ll have to wait until I get up in the morning to find out who won!
Web-Goddess Oscar Contest Sock Monkey History
Nineteen years ago, I thought it would be fun to run a contest and give away a sock monkey. I then kept that up for 10 years running, and you can see the history of my creations below. These days I only do it when the inspiration strikes…
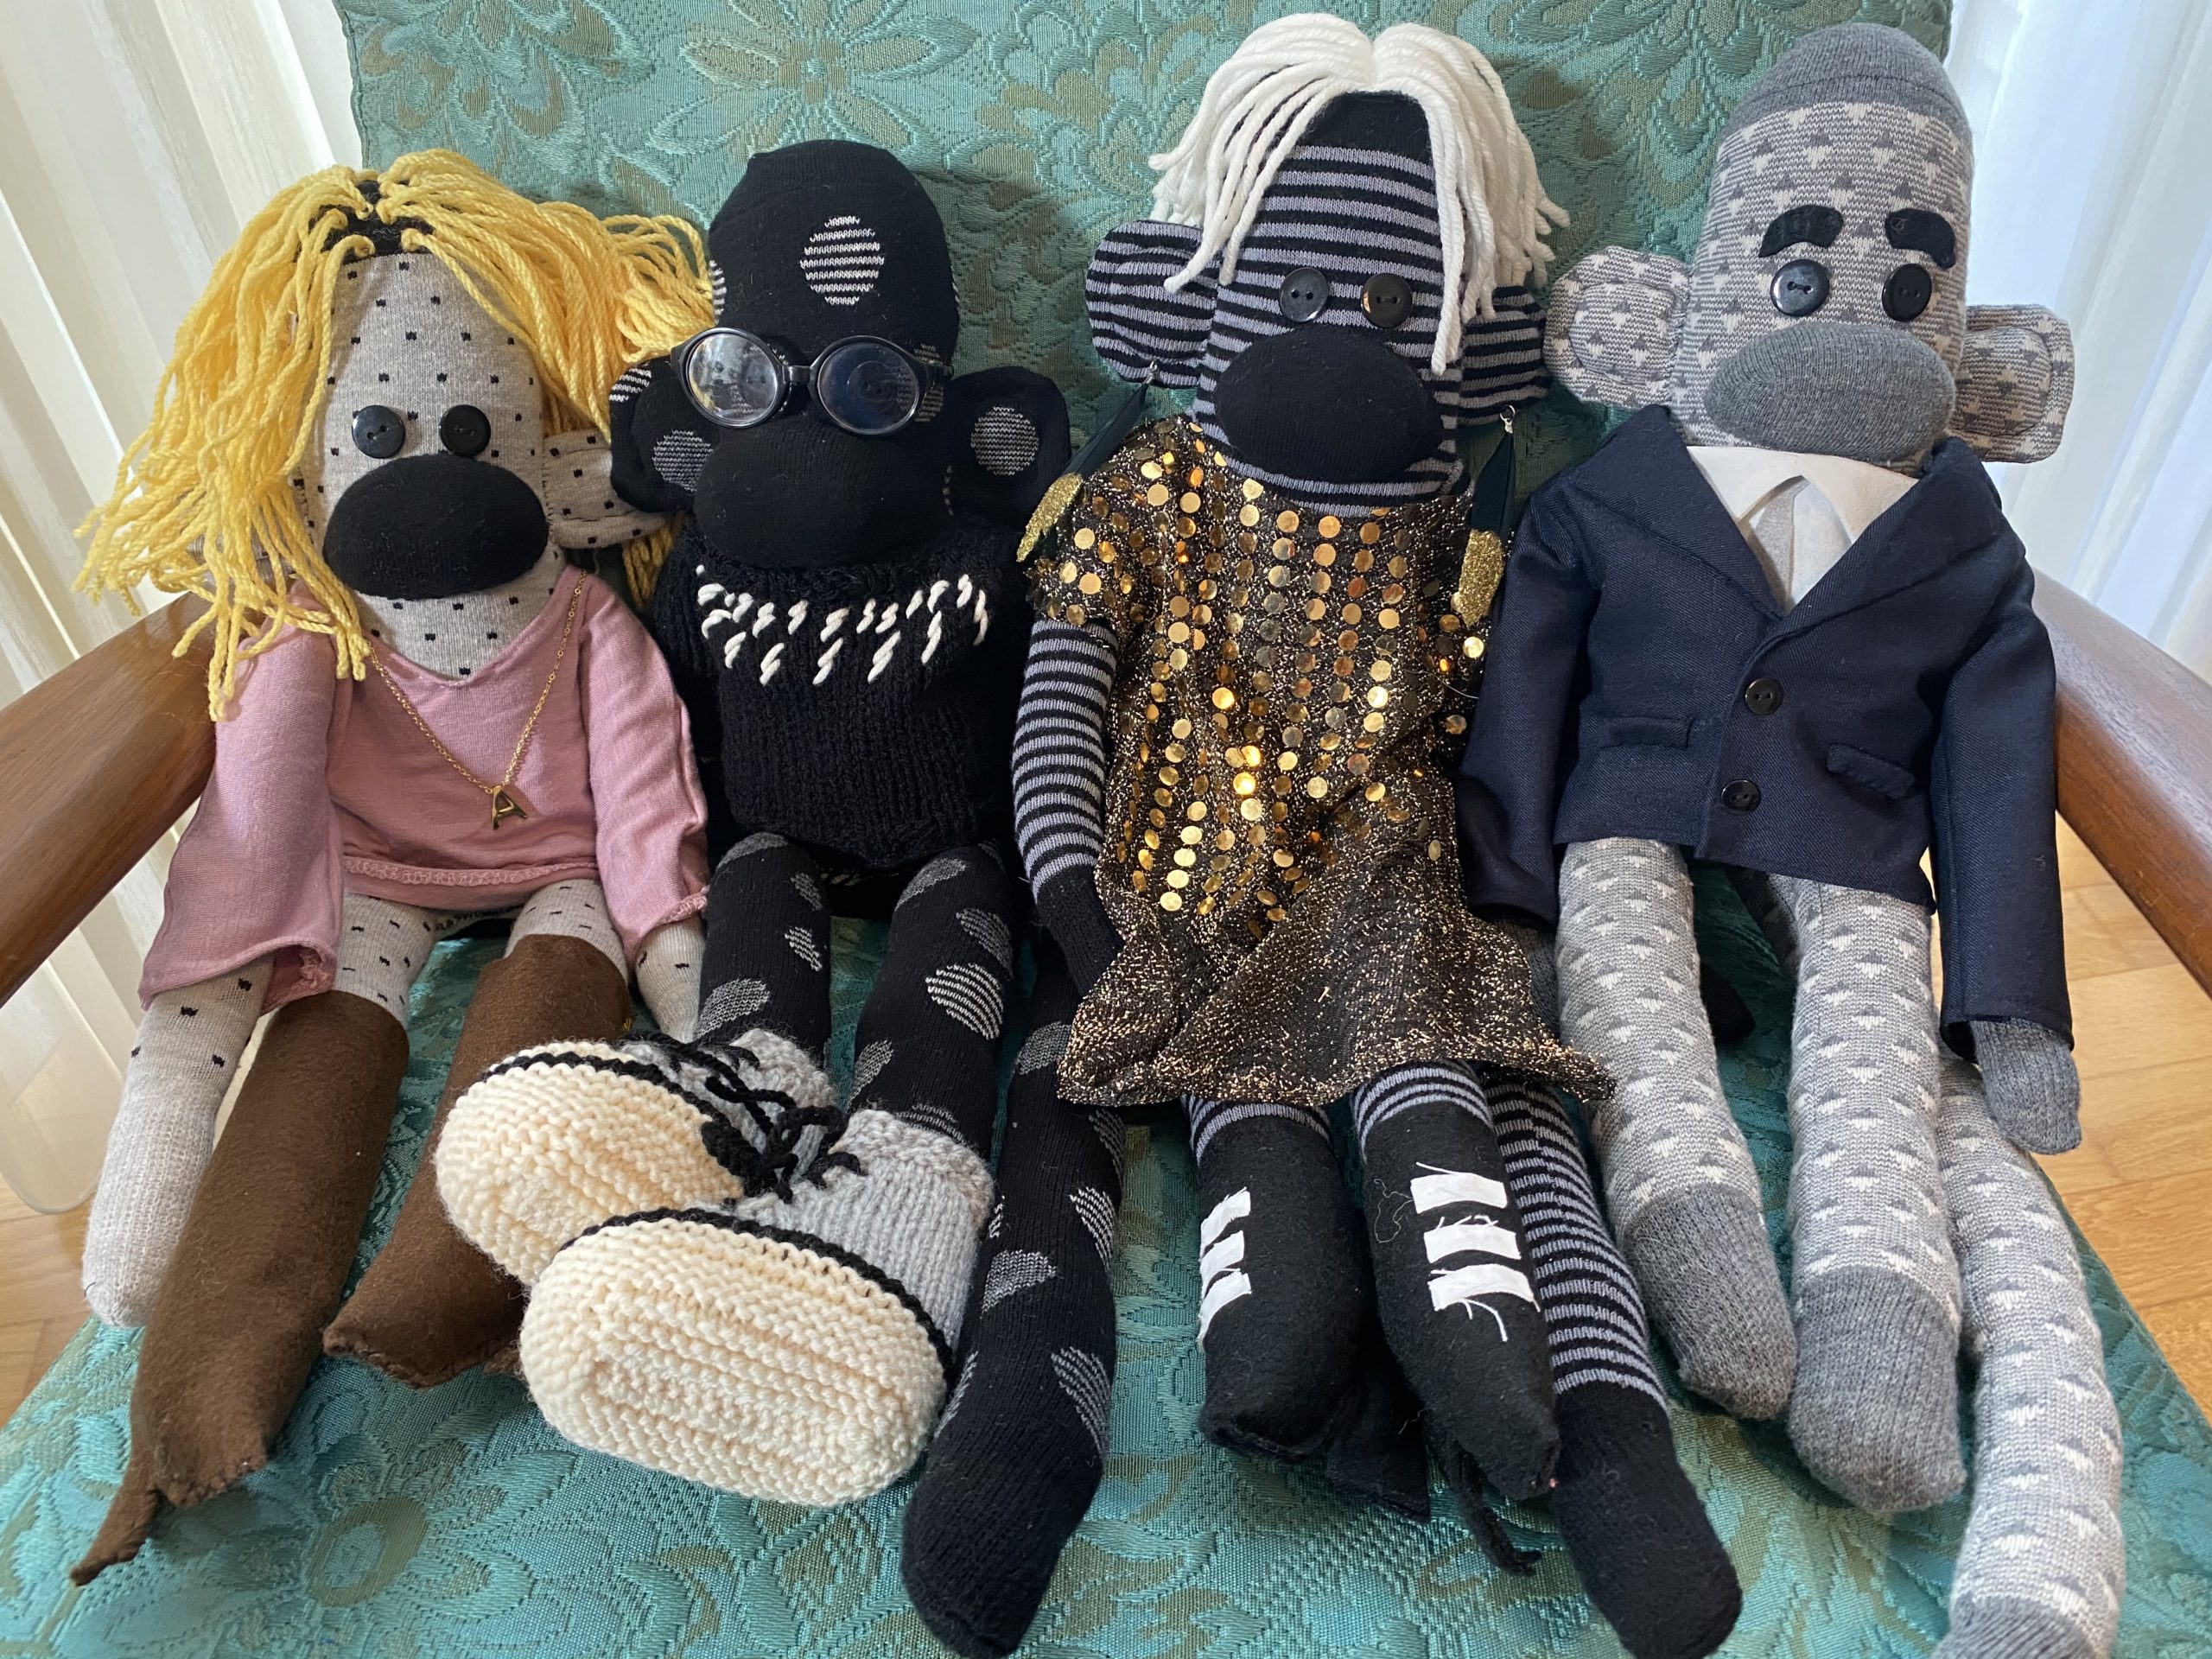
The thirteenth (semi-)annual Web-Goddess Oscar Contest has officially launched! 🎉 And this year you can win everyone’s favourite family – the Roses of Schitt’s Creek.
No, I know they don’t have anything to do with movies. But honestly, I didn’t see many of the nominated films last year, and Schitt’s Creek brought me the most joy of pretty much any media. So that’s what I went with, and that’s what you win if you predict the most Oscar winners!
Go here to read the rules and ENTER! Contest has now closed!
More details on the monkeys:
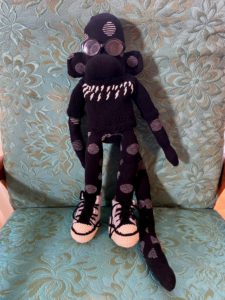
David Rose’s outfit features a custom knit black sweater with embroidered white lightning bolts, as well as custom knit designer sneakers. The sneakers were based off the Little Converse pattern, while the sweater was made up entirely by me. He’s also wearing a pair of black framed spectacles (intended for an American Girl doll!).
Alexis Rose’s outfit is based off her iconic “A Little Bit Alexis” performance, including a dusty pink minidress and knee-high boots. She’s also got her iconic A necklace.
Johnny Rose is wearing a bespoke tailored suit, sewn by me from a pattern intended for American Girl dolls. (No joke – I paid $10 for it. 😳) He’s also got felt eyebrows for the perfect Eugene Levy touch.
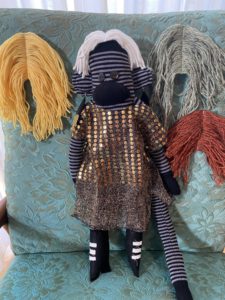
Moira Rose is wearing an avant garde tunic dress made by me from sheer sequinned fabric and designer high heeled boots. She also has matching feather glitter earrings. And what would Moira be without her girls? You get four different wigs (attached with Velcro) to complete the whole wig wall scene.
If you want Steve, Patrick, or any of the other Schitt’s Creek residents to recreate the scene, that’s all on you. 😂
So go ahead and enter! The 2021 Academy Awards happen on Sunday, April 25th (California time), which is like 2am here. So I’ll cut off entries a few hours beforehand when I go to bed, and you’ll have to wait until I get up in the morning to find out who won!
Web-Goddess Oscar Contest Sock Monkey History
Eighteen years ago (good grief!), I thought it would be fun to run a contest and give away a sock monkey. I then kept that up for 10 years running, and you can see the history of my creations below. These days I only do it when the inspiration strikes…
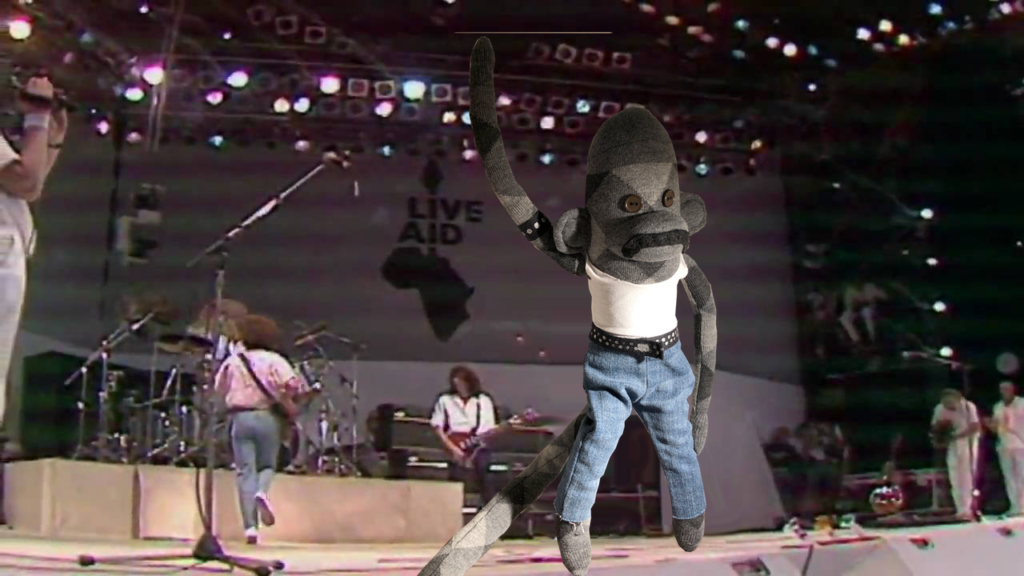
A month or so ago, Christopher commented on Facebook how much he missed my annual sock monkey Oscar Contest. I admitted that I’d thought of reviving it, but I hadn’t had any inspiration for a good monkey… and then it hit me! FREDDIE MONKCURY.
Freddie Monkcury at Live Aid
I had a monkey mostly put together from a few years ago, so he took shape fairly quickly. I found a very basic pattern for doll pants in the right size and used material from an old pair of jeans. His “I Want to Break Free” outfit was a little harder. The “leather” for his skirt is actually polyurethane from a $5 bag I found at Kmart. His bouffant wig started out as sculptural felt that I then handsewed black chenille pipe cleaners onto. (I also fashioned a very basic vacuum cleaner too!)
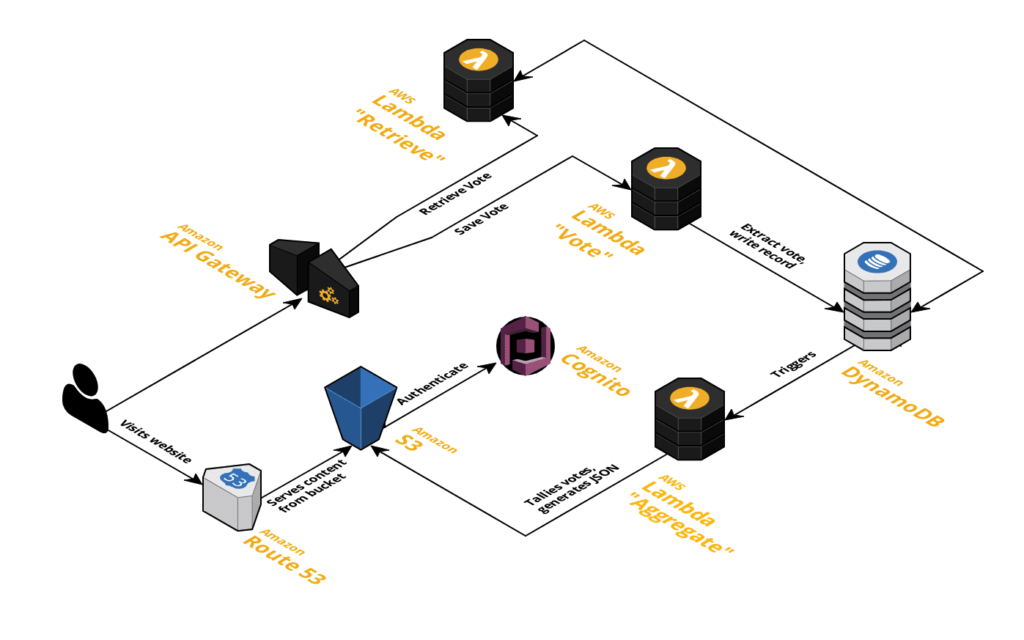
Application Architecture
For the first 11 years, the Contest consisted of a custom PHP and MySQL application that I’d built. For this year, I decided to challenge myself to completely rebuild it on Amazon Web Services (which is where I work!). Here’s how the architecture ended up:
The next step was to customise it! After I changed the images and CSS to my own branding, the next thing to change was the data saved to the database – I changed it to a form with all the Oscar categories and nominees. Next, I wanted users to be able to review and update their votes, so I added another Lambda function that retrieves a logged-in user’s votes so the form can be populated correctly. I then added a third Lambda function that scans the complete database, processes the votes, and publishes an aggregate JSON file to S3. (This is triggered whenever the DynamoDB table is updated.) For actually displaying the prediction graphs, I used ChartJS.
I think that covers everything! Many thanks to the Snook (my rubber duck and eternal programming mentor) as well as David, Jody, and Amy for their help with testing.
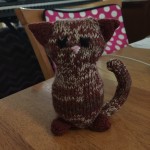
For the Canva 2015 Kris Kringle gift exchange, I got a colleague who is mathematician and engineer. I tried stalking him on social media, but he doesn’t post very much. I knew that he’s into dark European films and quantum physics, so my genius idea was to knit him Shrödinger’s Cat!
The box
Inside
Live kitty
Dead kitty
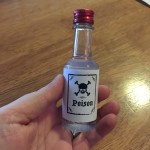
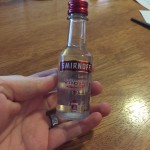
Poison
(Vodka)
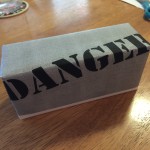
Radioactive material
DANGER!
(Kinder eggs)
You can find more details about the knitted cat over on Ravelry. Obviously, he’s alive on one side and dead on the other! To complete the experiment, I included a bottle of “poison” (ie vodka) and a container full of “radioactive material” (ie Kinder eggs). I packed it all into a cardboard box that I spraypainted silver (since it’s supposed to be steel) and decorated with “PROPERTY OF E. SHRÖDINGER” and “CAUTION: LIVE(?) ANIMALS” labels.
I’m very happy to report that the recipient was delighted with it. 🙂
I published this tutorial back in 2004, and it’s been pretty popular! I’ve now ported it over to my new site. You’re welcome to link to it, but please don’t reproduce without my permission.
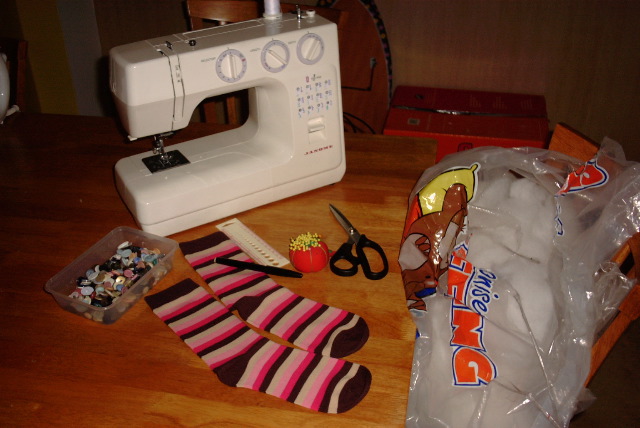
Everything you need to make a sock monkey: pair of socks, sewing machine, buttons (just two for the eyes), ruler (or straight edge of some kind), pen, scissors, stuffing, pins, needle, and thread. Ready to get started?
Before you start
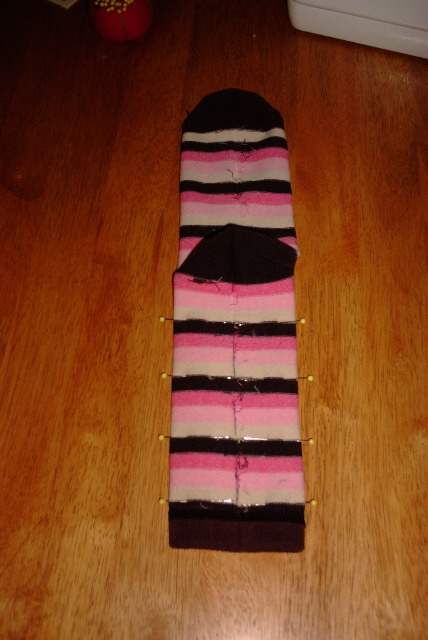
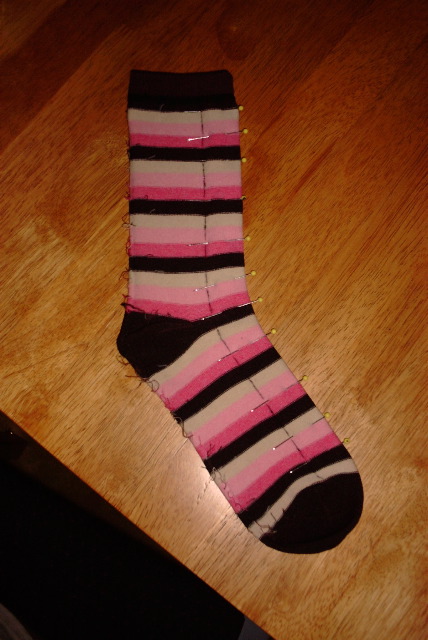
We start by making the body and legs of the monkey. First, turn one of the socks inside out and flatten it so that the heel is centered (as in the picture above). Use your pen and straight edge to draw a line down the center of the leg. You’re going to sew alongside this to create the monkey’s legs, starting about an inch or so from the heel (his bum). In my case, I’m going to start sewing at the first dark brown stripe below the heel. I’ve already put pins along the sides to hold the sock together. (This is particularly useful when you’ve got a design like stripes that’ll look bad if it doesn’t line up somewhat.)
Step 1 – Marking the legs
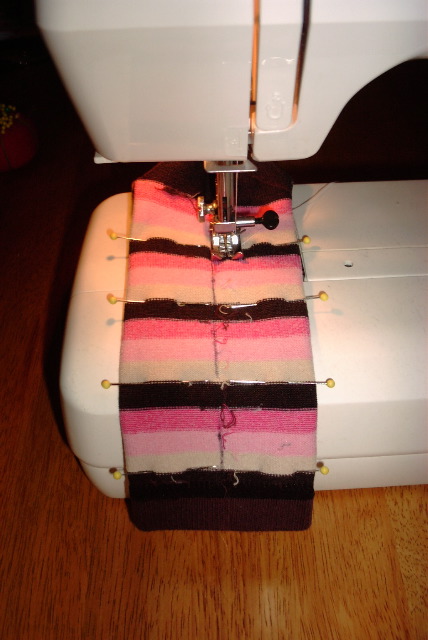
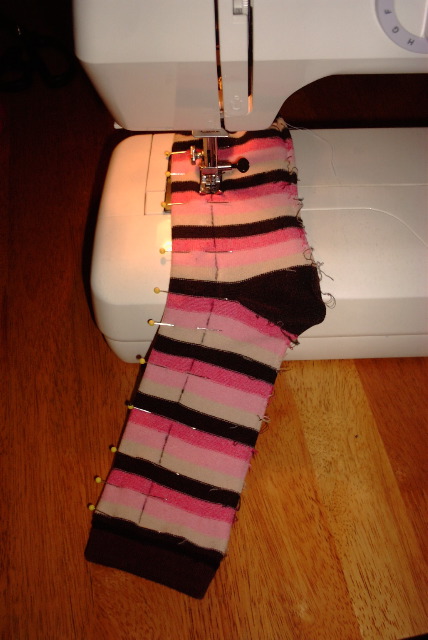
Here I’m beginning to sew the first leg. Note: You don’t sew on your pen line; you sew on either side of it (thus creating two legs). The width of your machine’s presser foot – about 1/4 inch – is just right. As I said, start at the top about an inch or so below the heel. Be sure to back up a little to secure your stitches. (For those in the know, you may want to use a ballpoint needle on your machine if you’ve got one. Otherwise, don’t worry about it.) Sew all the way down til you get to the sock’s cuff. Then stop every so often and turn the sock so you round off the foot. You can see this better on the next page. (And yes, I sew over my pins. I’m very naughty.)
Step 2 – Sewing the legs
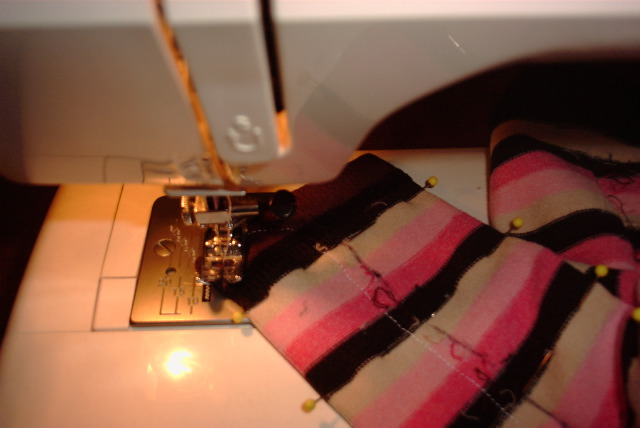
Here you can see my line of stitching down the sock and the way I’ve turned it to round off the foot. Don’t worry if you can’t get the curve perfect; mine turn out pretty angular actually. Once you’ve finished the foot, take a few backstitches to secure the seam and break the thread. Then go back to the heel and do the same thing again on the other side of your pen line. This next picture shows the end result pretty well.
Step 3 – Round off the foot
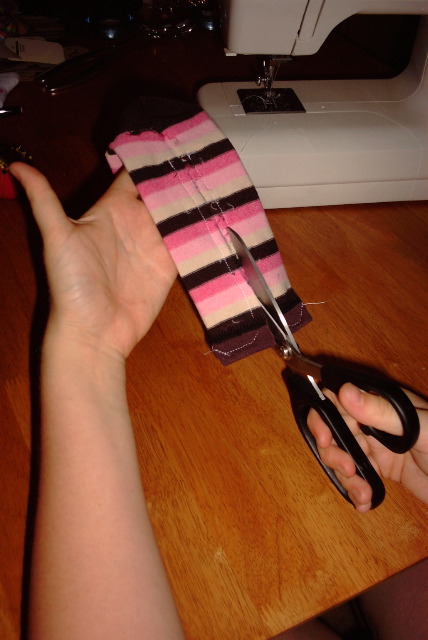
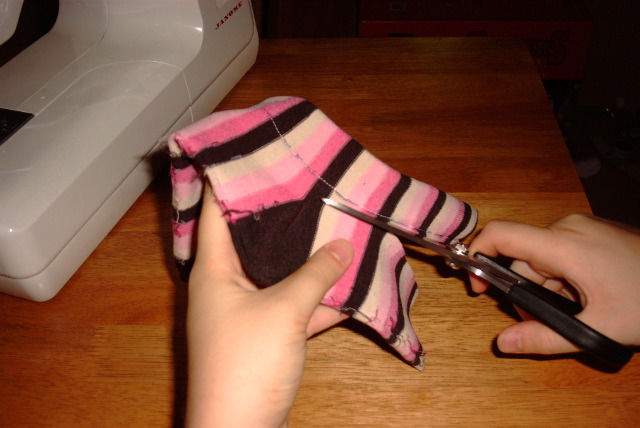
Here you can clearly see the seam lines delineating the legs, each ending in a rounded off foot. Now it’s time to separate them! Use your scissors and cut along your pen line up from the cuff towards the heel. Stop where you started sewing. You’ve now got an inside out monkey torso!
Step 4 – Separate the legs
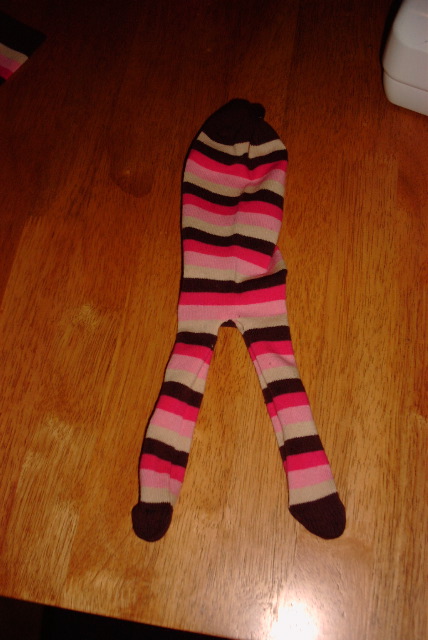
Your inside-out monkey torso has a convenient hole in the crotch through which you can turn him rightside-out. Do this now. You can cut the hole a little bigger if you’re having trouble pulling him through, but try to keep it as small as possible. A chopstick or knitting needle can be helpful for pushing his legs out properly. Here he is, all ready to be stuffed!
Step 5 – Turn him inside out
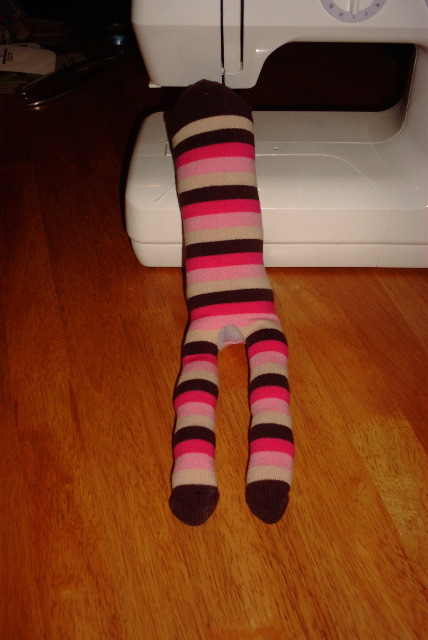
And here he is in three dimensions! I’ve stuffed him with generic polyester stuffing I got at the craft store. (Note: I’ve tried stuffing monkeys with recycled quilt batting cut up into pieces, but they just come out too lumpy and weird-looking. I wouldn’t advise it.) Yes, you’re stuffing him through the crotch. I think pulling the stuffing into smaller pieces and pushing each one into place results in a nicer look than trying to wedge in big handfuls. Again, a chopstick is useful for pushing the stuffing down into skinny legs. Don’t be afraid to stuff him quite firmly. Nobody likes a floppy monkey!
Step 6 – Stuff the monkey
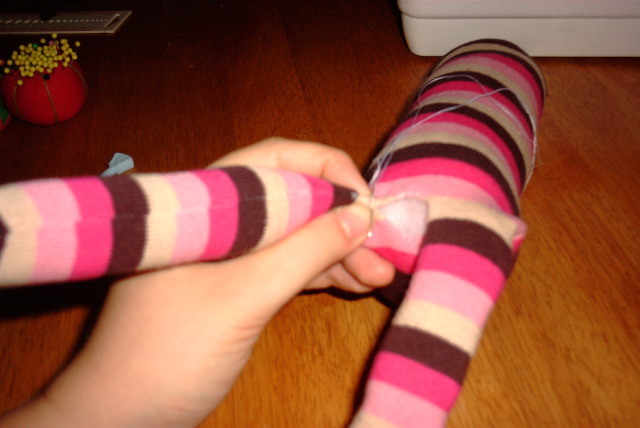
It’s finally time to sew up that monkey crotch. I just use plain white cotton thread and a sewing needle. Make a fairly large knot (otherwise it’ll pull through) and come up from the inside to secure it. You’re basically going to be pinching the raw edges together and tucking them to the inside. Then just take little stitches across the folded edges as best you can. It always gets a big difficult in the middle, when your sock inevitably stretches a little thin and you’ve got monkey legs flopping about, but just do your best. This really is a very forgiving project. I generally go all the way across the opening and then back again for extra strength. The next photo shows this process a little better.
Step 7 – Sew him up
In this one I’ve got the monkey turned upside-down. You can clearly see that I’ve pinched the raw edges in together and I’m taking each stitch through both folded edges. It’s no use trying to use pins here; the monkey is too puffy and they’ll just get in your way. Try to keep your stitches small and tight and they won’t show so much on the finished toy. When I’m finished, I generally knot the thread two or three times close to the surface and then go back down the last hole and come out somewhere else. Gently pull the knot into the body, cut the thread, and let the tail disappear into the monkey.
Step 7 – Another view
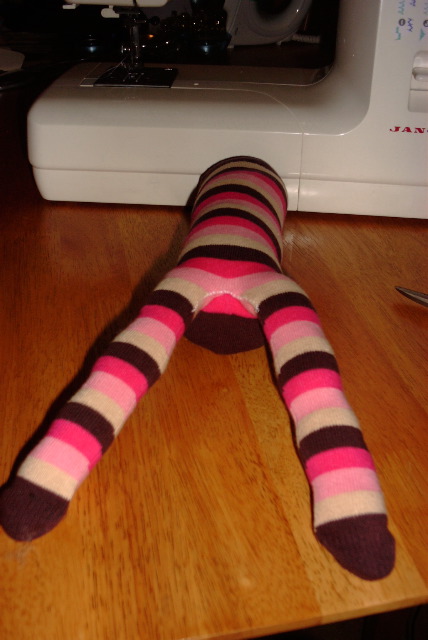
Finished monkey crotch! You’ve now got a faceless sock monkey torso with no arms. Scary, I know. It’s time to make him some limbs…
Step 7 – Finished
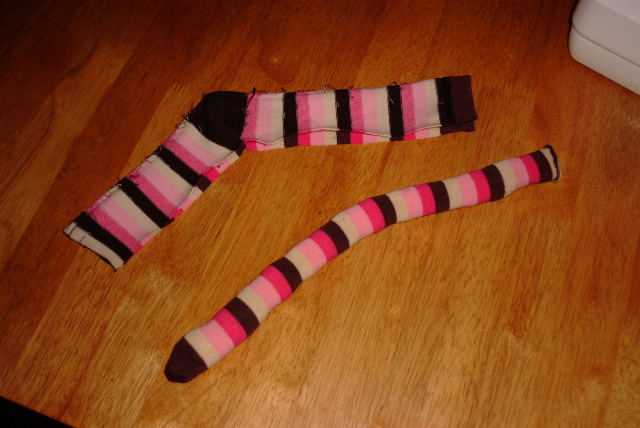
Now it’s time for the other sock. We’ll start by making the tail. Turn the sock inside-out and flatten it, but flatten this one in profile (as seen above). I’ve drawn a line from the toe to the cuff that’s one inch in from the edge. You can make the tail wider if you have a bigger sock as long as you don’t get too close to the heel. We’re eventually going to be cutting the heel out in one piece for the monkey’s face, so your tail width is limited by that. I’ve again secured the sock with pins to keep the stripes from shifting around too much.
Step 8 – Mark the tail
We sew the tail just like we did the legs. Start at the toe (but not in the toe itself; we’re just going to throw that away) and sew all the way down to the cuff, rounding off the end again. This time sew on the line.
Step 9 – Sew the tail
Cutting time! Start by cutting off the toe of the sock. You won’t need that anymore. Now we’re going to free the tail. Cut as shown along your sewn seam all the way to the cuff. (Again, I generally try to have a quarter-inch seam allowance, but you can get a little closer if you need to.)
Step 10 – Cut the tail
Turn your tail rightside-out and stuff it. You should end up with this lovely snakey thing and a random piece of sock. We come to that next…
Step 11 – Stuff the tail
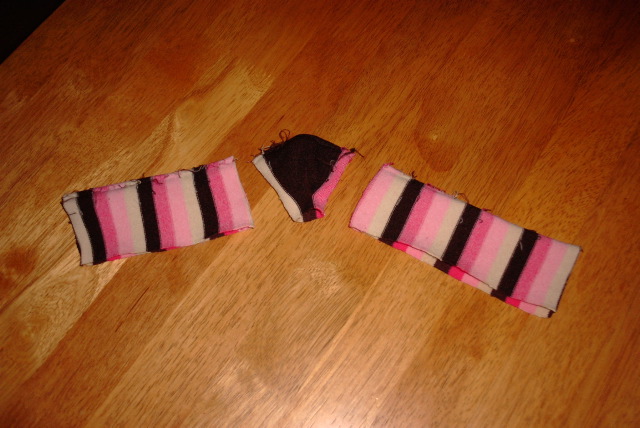
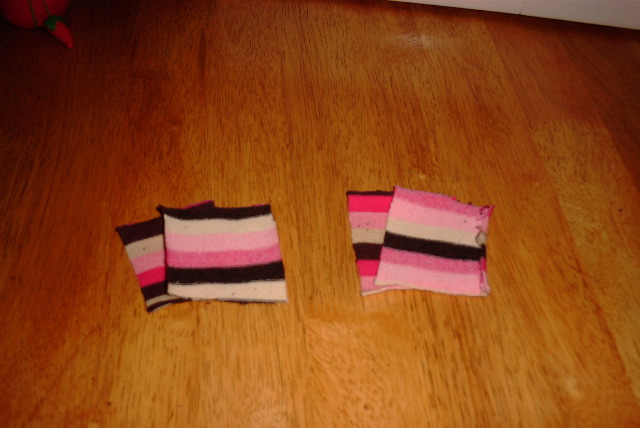
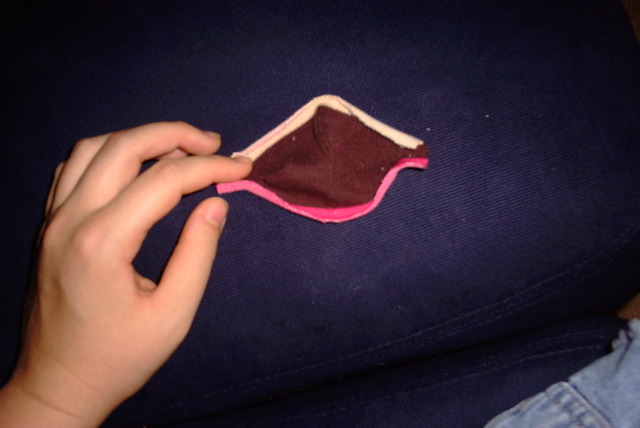
We’re going to cut the rest of the sock as shown into three pieces. The short rectangle on the left (from the foot part of the sock) will become the monkey’s ears. The heel in the middle becomes the monkey’s face. And the long rectangle on the right (from the leg of the sock) will become the monkey’s arms.
Step 12 – Cut remaining pieces
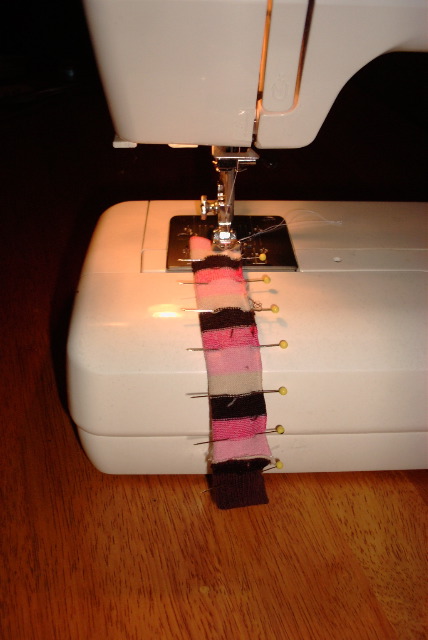
Start with the arm piece first. That’s the longer rectangle. We need to cut it up the middle length-wise to make two long skinny pieces. (Your sock already probably has a crease there.) Then fold one of these pieces in half, right sides together, and pin it along the raw edge. Then sew along this edge starting from the non-cuff end. (My seam allowance here is probably less than a quarter-inch, simply because I don’t want the arm to be any skinnier than necessary. Don’t get too close to the edge though or you’ll run into trouble. The raw edge has a tendency to curl and I often have to stop and readjust things below the presser foot.) Round off the cuff end for the hand just as you did the legs and tail. You’re basically just making yet another little tube. Once you’ve done one, make the other just the same.
Step 13 – Sew the arms
Now for the ears. Take your remaining bit of sock and cut it lengthwise as you did with the arms. Then cut each of those bits in half widthwise. We’re basically looking to get four little squares all the same size from this operation, as seen here.
Step 14 – Cut the ears
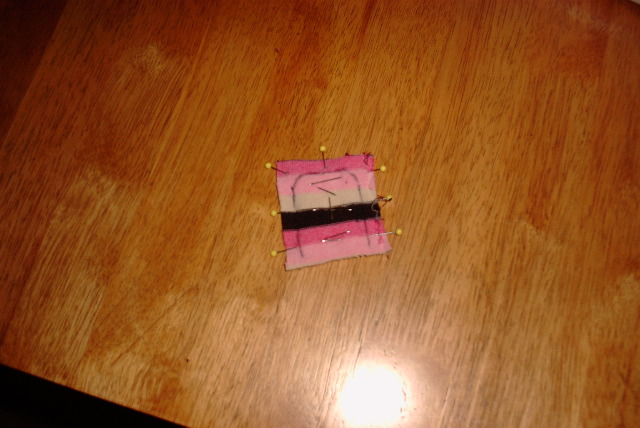
Take two of the matching squares and stack them with right-sides together. Then pin the heck out of them as shown. I don’t bother trying to make circular ears; these squarish ones look fine. Use your pen to draw on the ear shape. I generally just draw it with a quarter-inch seam allowance and round off the corners. (Once you’ve done a couple, you won’t even need to draw it.) As you can see, one side is left open. We’re now going to sew along the line.
Step 15 – Pin the ears
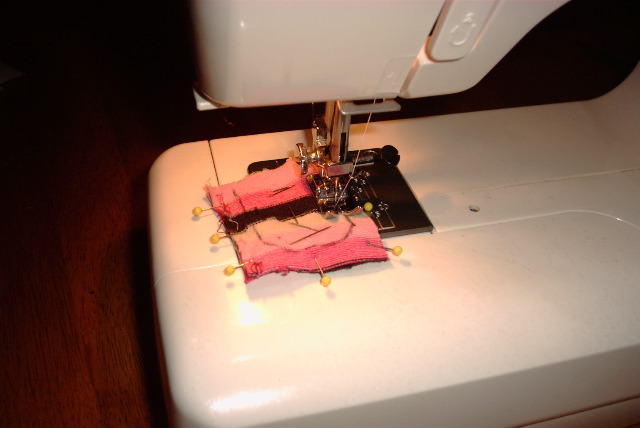
Here I am sewing along the ear line. Just go slowly and try to keep everything together as best you can. Once you’ve finished one, make the other just the same. You can trim off some of the excess seam allowance (like the square corners) when you’re finished.
Step 16 – Sew the ears
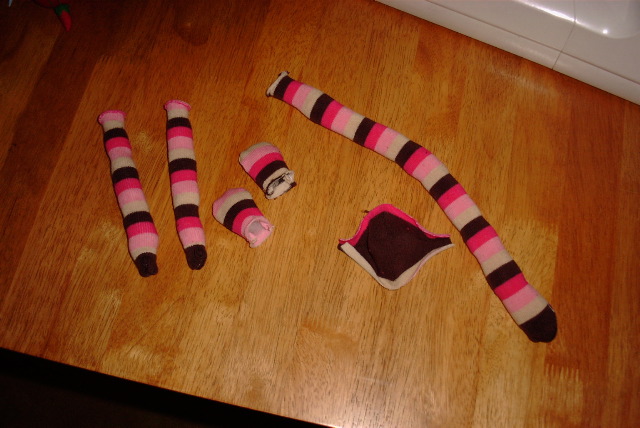
You should now have all the basic pieces of your sock monkey. Turn the arms right-side out and stuff them as you did the tail. Turn the ears as well and stuff them lightly. You’re now done with the sewing machine and everything else will be done by hand.
Step 17 – Stuff the parts
First, a word of warning. Don’t try to make this perfect. There’s no easy way to sew two tubes together at right angles. Just do your best and know you’ll get better with each one. The general idea here is just like it was with the crotch – fold raw edges inside and use small tight stitches to graft everything together. We start with the tail. I knot a length of thread and bring it up from inside the tail near the seam to secure it. Then fold the raw edges inside, pinch a bit of the tail to the body, and start tacking it down with stitches. Try not to stretch the tail “circle” out too far. I try to keep the long tail seam at the bottom to hide it (but sometimes the tail rotates a bit as you sew it). I generally go around the tail twice to make it as strong as possible. Then secure your thread and hide the loose end in the body.
Step 18 – Sew on the tail
Next the arms. Do these exactly like you did the tail. I generally position them about halfway up the body. (It’s useful to have stripey socks for this, because you can use the stripes to line up the arms perfectly.) Again, I tend to sew around each arm twice for strength.
Step 19 – Sew on his arms
Your monkey now has all his limbs! It’s time to give him a face.
Step 19 – Finished
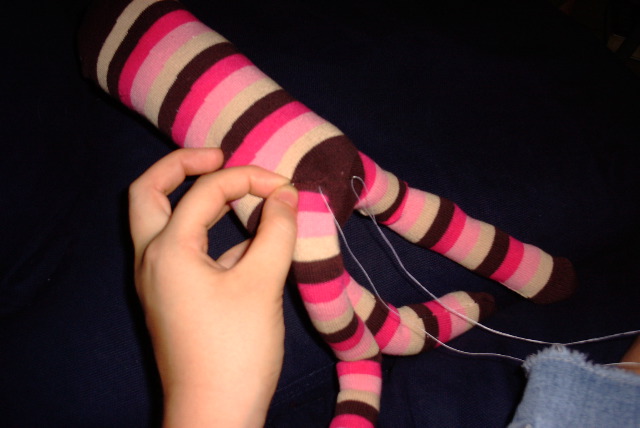
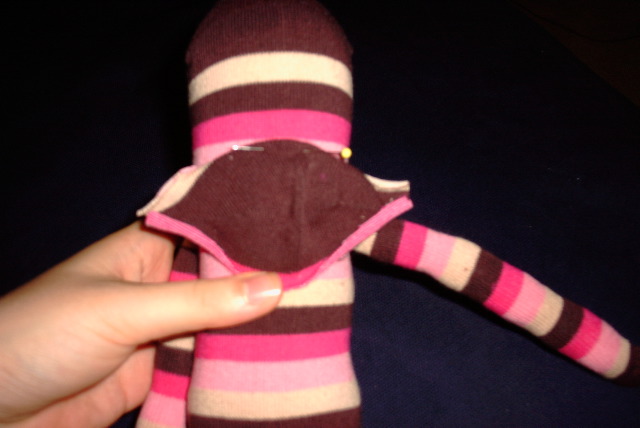
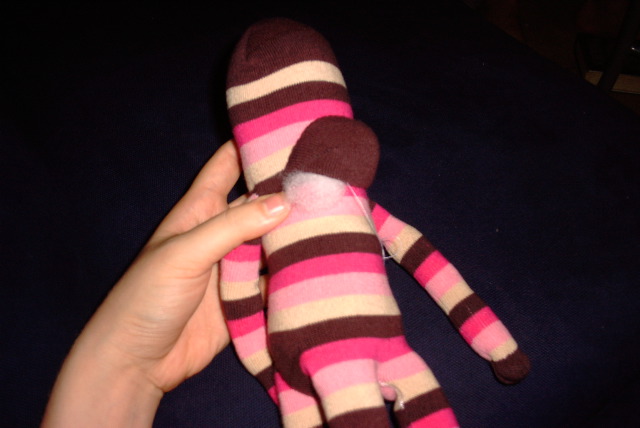
Take a look at the heel before we get started. It probably looks pretty big in comparison to your monkey’s head. That’s good. You see, the trick when you sew it on is not to sew it on flat. We want to leave room to stuff it and have it look three-dimensional. Just keep that in mind.
Step 20 – The face
I start by folding down the top edge of the face and centering it on the monkey’s head. Then I pin through that folded top edge to hold it. (It’s nice to have a heel that’s a different color from the rest of the sock because the color change makes for a good fold line.)
Step 20 – Pinning the face
In this next blurry shot, you can see that I’ve folded and pinned the top edge at each corner as well. You can unpin it and move it if it looks off-center between the arms. Please note that we haven’t touched the bottom edge yet, and there’s still plenty of material bunched up in the center. Don’t try to stretch it flat. We just want our top edge to be a nice curve, almost a half-circle.
Step 20 – More pins
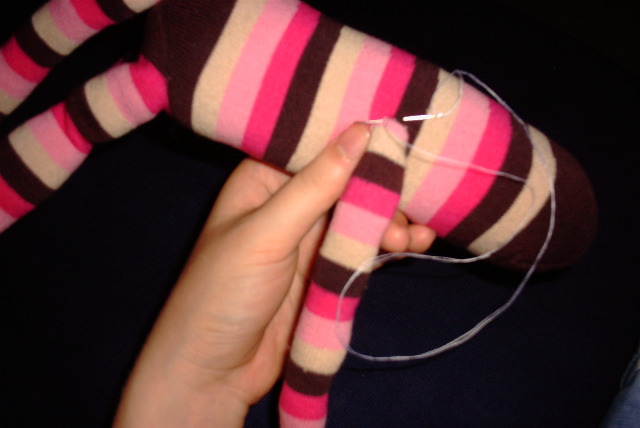
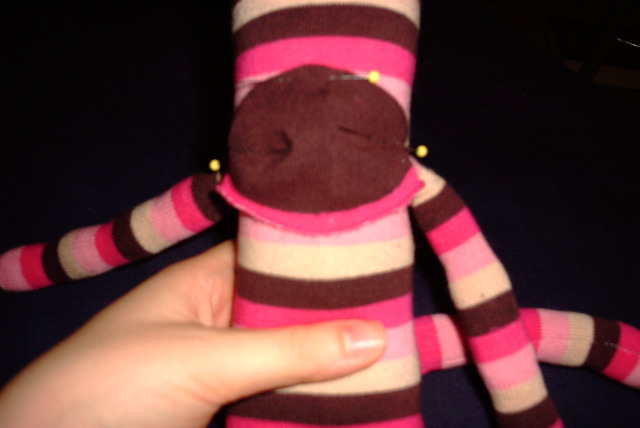
It’s time to start sewing the face. Starting at the left corner (as you’re looking at the monkey; he’s upside-down here) sew along the top just as you did on the arms and tail. You can hide your knot inside the face. Just take tiny stitches catching a bit of the folded face edge and the body behind it. Stop when you get to the opposite corner. Remove your pins.
Step 21 – Sew the face
Now for the bottom of the face. Fold the raw edge in and pin it down in the center as shown. Pin the bottom edge a little higher than your first instinct; we want to leave extra material in the middle to fill with stuffing. (You can see it bunched up here.) Continue sewing from the right corner down to the bottom center. Then stop, because it’s time to stuff!
Step 21 – More sewing
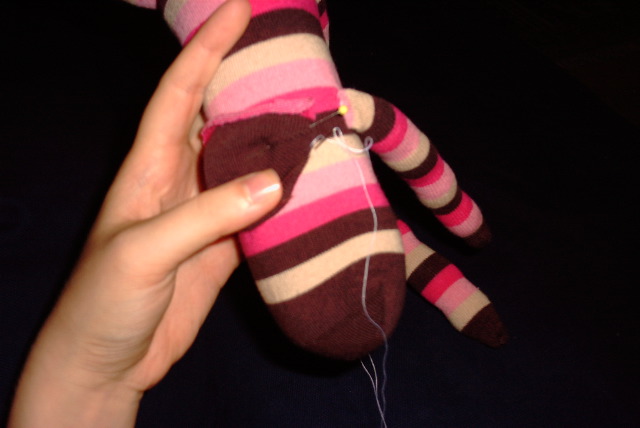
Here you can see me stuffing the face through the opening at the left corner. Just tear your stuffing into small pieces and shove them in. Don’t be afraid to stuff it quite firmly. If you’ve done it right, you should get a nice three-dimensional “lump”. Then just continue sewing around to close the gap. I don’t think it’s necessary to go around the face twice (as the monkey’s owner hopefully won’t be picking it up by the face like they would the arms and tail), but you might want to do it anyway. Secure your thread and hide the loose end in the body.
Step 22 – Stuff the face
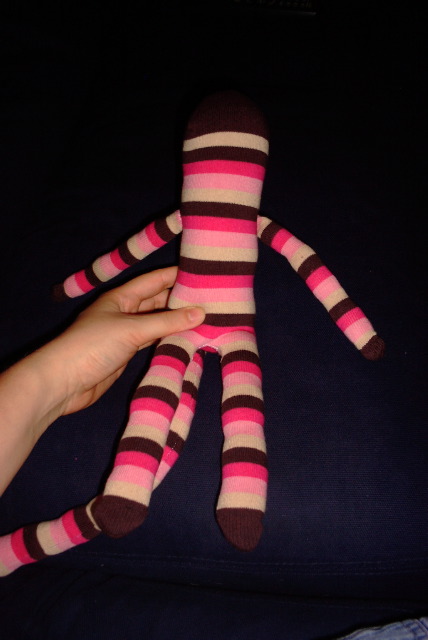
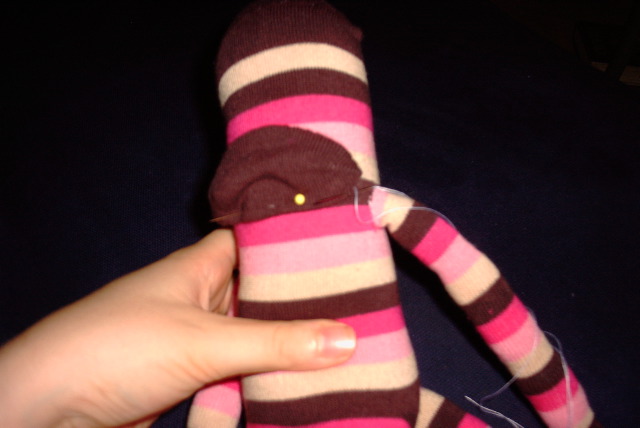
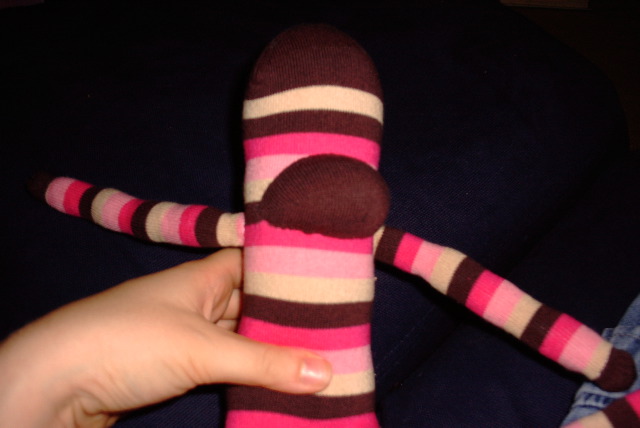
Here’s our sock monkey so far! Now we just need a few finishing touches… Ears, eyes, and a smile!
Step 22 – Finished face
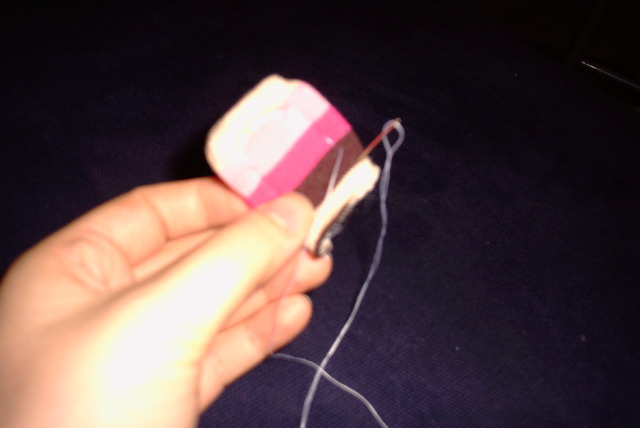
Sorry this picture is so crap. Basically, what I’m doing here is my own monkey ear innovation. Before I attach the ear to the monkey, I sew a few big stiches along the edge to give a little ear rim definition. I just think it looks a little nicer. You don’t have to do it though.
Step 23 – Sew ear rim
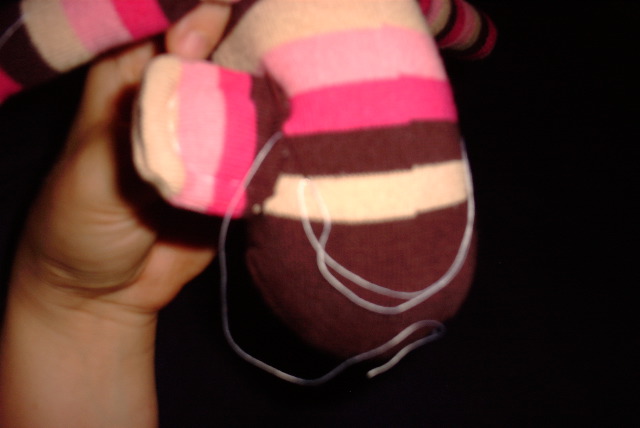
This extremely blurry shot is supposed to be me sewing on one of the monkey ears. It’s done the same way as everything else, by tucking in the raw edge and tacking the folded edge down to the body. Ears are a little more tricky (in that they’re not a nice circle), but just go round them twice and don’t be afraid to pull them into place. I generally place them in line with the arms just below where the toe of the sock starts. (Again, stripes are nice here for aligning perfectly.) Don’t worry too much if they don’t match exactly. I always end up with one slightly farther back than the other but it’s part of the charm, right?
Step 24 – Sew on ears
Here’s the attached ear so you can see the placement and my little ear
rim stitches…
Step 24 – One ear finished
Now with both ears attached…
Step 24 – Both ears finished
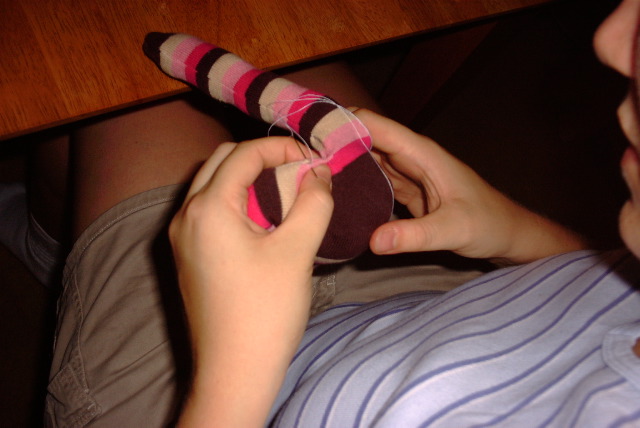
For eyes, I like to use matching buttons. (I’ve also used “googley” eyes in the past but I think they look a little scary.) My buttons came from the bargain bin at my local sewing shop. Just pick out two you like and tack the first one down. I knot this thread a few times and then pull it down into the body to start. Once you’ve secured the button, take the thread down into the body and bring it back up for the second eye. After you’ve secured that, you can bring the thread up in the face to complete the smile. You can choose any embroidery stitch you like. I tend to use a stem stitch, but a backstitch would work well too. It’s up to you! Or you can leave him without a mouth. When you’re done, knot the thread and hide it down in the body.
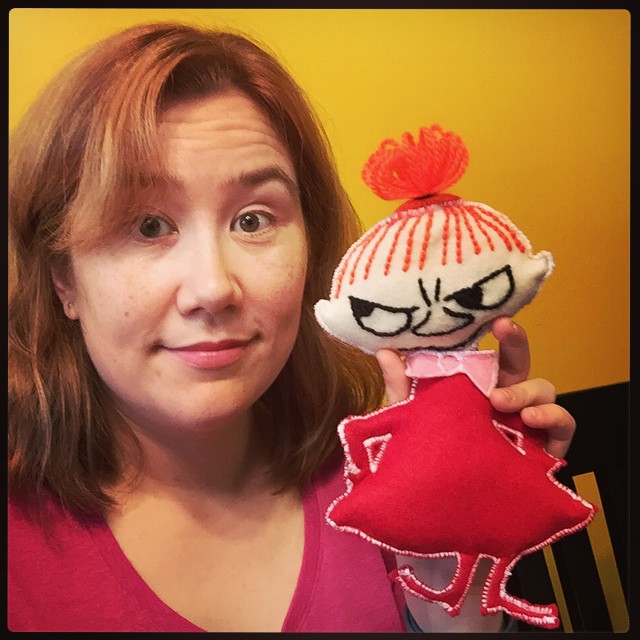
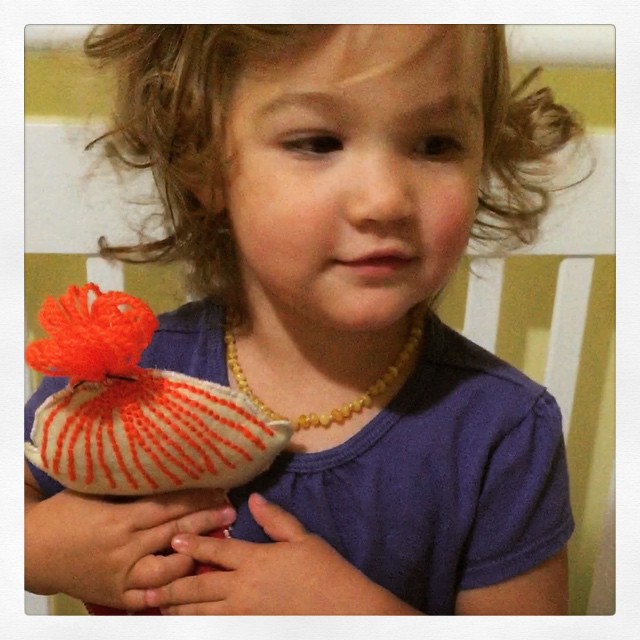
I wanted to make a special present for my niece Cali, so I thought that I’d whip up a “Little My” softie. Little My is from the Moomin books, and she’s Cali’s favourite character. (I know because I sent her this Uniqlo t-shirt and she LOVED it.) So I started by downloading a line drawing and printing it out. I decided that I was only going to make a simple “two-dimensional” toy rather than try to translate her into full 3-D. I traced the drawing onto some felt and cut out the pieces. The trickiest bit was embroidering her face.
I used some acrylic yarn for the embroidery. Her features were done in black with a split stitch, and I used orange yarn to backstitch her hair (leaving long strands at the top to form her top-knot). Rather than bother with turning things inside-out, I just used a tight zig-zag stitch around the pieces (with wrong sides together) to sew the her head and body pieces together. For her hair, I actually tucked the long ends back down into her head before sewing her scalp so it couldn’t be pulled undone. It worked really well! I stuffed the head and body parts through the neck opening and then joined the two halves there. Then I zig-zagged across the neck to join and covered the resulting mess up with a cut-out pink bow-tie (tacked on by hand). I also zig-zagged around the arm openings (where her hands are on her hips) and then snipped out the inside bits. I had planned to use black felt for her hands and boots, but honestly I couldn’t be bothered at that point.
The first thing my niece Indie said was, “Her head’s going to fall off I think!” Which may well happen. The whole thing was a bit of a bodge and I doubt it’ll hold up very well – the felt was starting to pill within a day – but I’ve decided to just treat it as a prototype. Cali absolutely loved it, and that’s all that matters! I’m thinking of redoing it in fleece and trying to make her a bit more three-dimensional next time…
I was just updating my Crafts page and realised that I’d neglected to document the creation of Hobbes. This was my Christmas gift to my nephew Penn. He recently discovered Calvin & Hobbes books, so I thought he would love his very own Hobbes. I’d seen and bookmarked the Instructables tutorial a long time ago. The hardest part was finding the fleece! I was calling all over Sydney with no luck. Then Issy sent me a message that she’d found some in a remnant bag she’d just bought! She brought it over and TOTALLY SAVED CHRISTMAS. Anyhoo, I used the sewing machine for most of the basic tube construction. Then it was all hand sewing: assembling the tubes, sewing on the stripes, and sewing on his face. It took ages, and I had quite a blister on my finger! (I never did get the hang of using a thimble.) It was all worth it when Penn opened it on Christmas morning though. Within 24 hours I had to do emergency surgery on a split that had opened in his tail, but that’s what Aunts do, right? Tigers are meant to Have Adventures, not sit on a shelf. We should also have such a best friend!


 <
<

