I’ve been thinking a lot about link rot lately, and how many of the links I have shared on my blog over the years are now dead. I also have a lot of old posts that are missing titles, categories, and tags. Therefore I’ve taken a cue from Terence Eden and I’ve started a project to “tend to my digital garden” every day. I installed the On This Day plugin, and now I have an archive page that shows all the posts from this day across all the years of this site. Every day I’m going to do my best to click through those posts, checking for broken links and updating them as best I can. I’ve already had to resort to the Internet Archive several times, but here’s one bit of good news – the Sydney Morning Herald still maintains links going back 20+ years! That was a happy surprise.
Category: Computers
-
Twitter Import via Apple Shortcut
 I have successfully imported my entire Twitter history to this blog! Each day’s tweets are grouped into a single post, published on the correct day. You can see all of the tweets here. I started with a JSON file with 3.4 million(!) lines and 52,813 tweets, and ended up with 4,941 WordPress posts (equivalent to 13.5 years) and just over 10,000 images. The full import took me over 40 hours to run. 😳
So how did I do it? I quit Twitter back in 2022 after the Nazi bought it and downloaded all my data at that time. After I did my recent Instagram import using an Apple Shortcut and the WordPress API, I wondered if the same method could be used for my tweet data. Turns out it can! I’ll describe what I did in case you want to do the same.
Caveats: This script only covers importing public tweets (not DMs or anything else), and I didn’t bother with any Likes or Retweet data for each one. I also skipped over .mp4 video files. (I’ve got around 200 and I’m still figuring out how to handle.)
Step 1 – Download your Twitter archive
I can’t actually walk you through this step, as my account is long gone. Hopefully yours is too, and you downloaded your data.
Once I unzipped the file, I found a pretty simple directory structure.
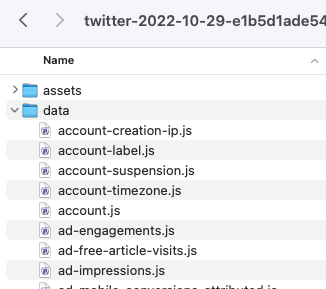
There’s a LOT of random information in there. For my import, I only needed two things: data/tweets.js for the details of the tweets, and data/tweets_media for the images.

Step 2 – Prepare the JSON
I needed to do a bit more work to prepare this JSON for import than I did with Instagram. First, I renamed tweets.js to tweets.json. When I opened it, I immediately noticed this at the very top:
window.YTD.tweets.part0 = [
  {
    "tweet" : {
      "edit_info" : {
        "initial" : {
          "editTweetIds" : [
            "1585904318913331200"
          ],
See that “window.YTD.tweets.part0 =” bit? That’s not valid JSON, so I deleted it so the file starts with just [ on the first line. Then I was good to go.
I then took a subset of the JSON and started experimenting with parsing it and importing. I noticed a couple problems right away. The first is how the tweet dates are handled:
"created_at" : "Fri Oct 28 08:00:28 +0000 2022",
WordPress isn’t going to like that. I knew I’d have to somehow turn that text into a date format that WordPress could consume.
The next problem is that each tweet was a standalone item in the JSON. To group them by days, I’d need to loop through and compare each tweet’s date with the one before, or else import each tweet as a standalone post. As a reminder, there were more than 52,000 tweets in my file. Yeah, that sucks. Definitely didn’t want to do that.
The last problem was with media. The Instagram JSON had a simple URI that pointed me exactly to the files for each post, but Twitter doesn’t have that. Eventually I worked out that you’re meant to search the tweets_media folder for images that start with the unique tweet ID. No, really, that’s what you’re meant to do. So I’d need to deal with that.
After discussing it with my husband Rodd, he reckoned that he could use jq to reformat the JSON, fixing the dates and ordering and grouping the tweets by day. (jq is a command line tool that lets you query and manipulate JSON data easily.) After a bit of hacking, he ended up with this little jq program:
jq -c '
[
  .[].tweet # Pull out a list of all the tweet objects
  | . + {"created_ts": (.created_at|strptime("%a %b %d %H:%M:%S %z %Y")|mktime)} # Parse created_at to an epoch timestamp and add it as `created_ts`.
  | . + {"created_date": (.created_ts|strftime("%Y-%m-%d"))} # Also add the date in YYYY-mm-dd form as `created_date` so we can collate by it later.
]
| reduce .[] as $x (null; .[$x|.created_date] += [$x]) # Use `reduce` to collate into a dictionary mapping created_date to a list of tweet objects.
| to_entries # Turn that dictionary into an array of objects like {key:<date>, value:[<tweet>, ...]}
| sort_by(.key) # Sort them by date
| .[] | { # Convert to a stream of objects like {date: <date>, tweets: [<tweet>, ...]}
  "date": (.key),
  "tweets": (.value|sort_by(.created_ts)) # Make sure the tweets within each day are sorted chronologically too.
}
' > tweets_line_per_day.json
That resulted in a new file called tweets_line_per_day.json that looked like this:

Each line is a single day, with an array of all the tweets from that day in order of posting. Because this was still a huge file, I asked him to break it into 50 chunks so I could process just a bit at a time. I also wanted the file extension to be .txt, as that’s what Shortcuts needs.
split --additional-suffix=.txt --suffix-length=2 --numeric-suffixes -n l/50 tweets_line_per_day.json tweet_days_
That resulted in 50 files, each named tweet_days_00.txt, etc. For the final manipulation, Shortcuts wants the stream of objects in an array, so he needed to use jq “slurp mode.” This also had the benefit of expanding the objects out from a single line per day into a pretty, human-readable format.
for FILE in tweet_days_??.txt; do jq -s . < $FILE > $(basename $FILE .txt)_a.txt; done
The end result of all that was a set of 50 files, each named tweet_days_00_a.txt, etc, suitable for parsing by an Apple Shortcut. They each looked like this:

Much better! This, I can work with. I copied these into my Twitter archive directory so I had everything in one place.
Step 3 – Create a media list
Rather than search through all the images in the media file, I created a simple text file that the Shortcut could quickly search as part of its flow. To do this, I opened a terminal window and navigated to the tweets_media folder.
ls > ../tweets_media.txt
That created a simple text file with all the named files in that folder. I also created two more blank files called permalinks.txt and errors.txt that I would use for tracking my progress through the import. I made sure all 3 files were in the top level of my Twitter archive directory.
Step 4 – Set up the Shortcut
You can download the Shortcut I created here. I’ll walk you through it bit by bit.
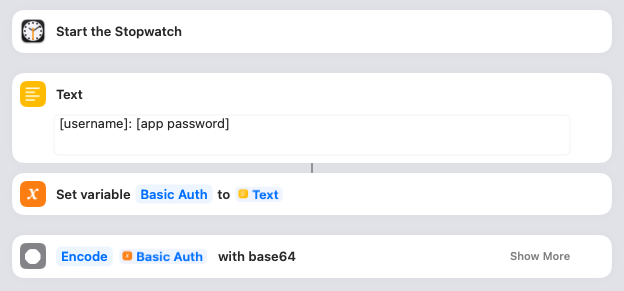
I wanted to keep track of how long the import took, so the first thing I did was Start the Stopwatch. You can omit that if you like, or keep it in. More importantly, this is where you give the Shortcut the details it needs to access your WordPress blog. You’ll need to create an Application Password and then put the username and password into the Text box as shown. The Shortcut saves that in a variable and then encodes it.
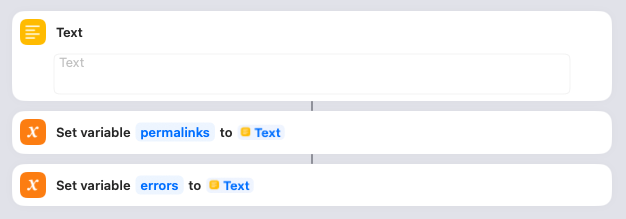
In order to show a list of all the posts that have been created at the end of the import (as well as any errors that have occurred), I create blank variables to collect them. Nothing for you to do here.

Next you need to decide what the title of each post will be. I’ve gone with “Shared today on Twitter,” but you might want to change that. The Shortcut saves that in a variable.
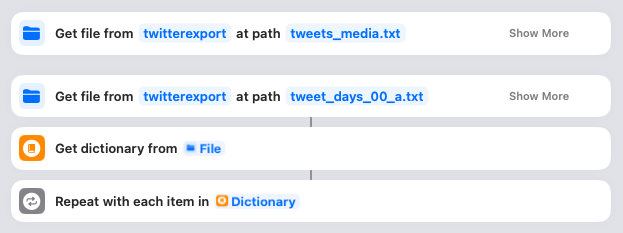
This is where it all starts to happen! You need to click on both of those “twitterexport” links and ensure they point to your downloaded Twitter archive directory. When you run the Shortcut, it’ll first look in that folder for the “tweets_media.txt” (the list of all media files) and read that into memory. Then it’ll look for the “tweet_days_00_a.txt” file and parse it, with each day becoming an item in the Dictionary. The Shortcut then loops through each of these days.
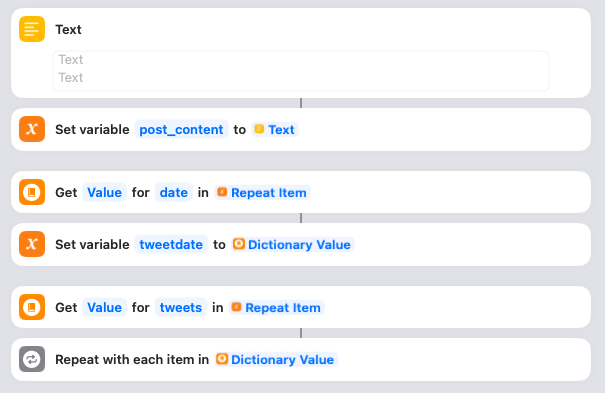
For each day, the Shortcut starts by setting a variable called post_content to blank. It also gets the date from the JSON and sets it in a variable called tweetdate. Then it grabs all the tweets for that day in preparation for looping through them. Nothing to do here.
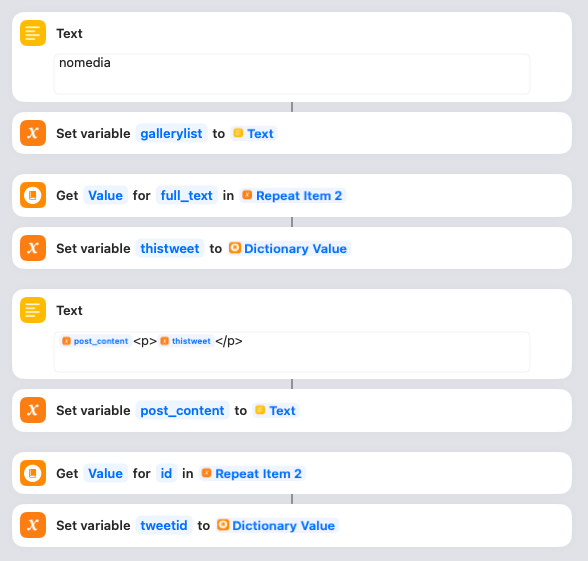
For each tweet, the Shortcut does a few things. First it sets a variable called gallerylist to “nomedia”. This variable is used to track whether there are any images for a post. Next it gets the actual text of the tweet and saves it in a variable called thistweet. Next it uses thistweet to update the post_content variable. I’ve simply wrapped each tweet in paragraph tags, but you can tweak this if you want. Lastly it gets the unique ID for the tweet and saves that in a variable called tweetid.
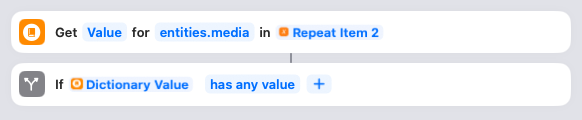
Now the Shortcut checks to see if there are any media items associated with the tweet. If not, it can skip the next section. If there are media items…
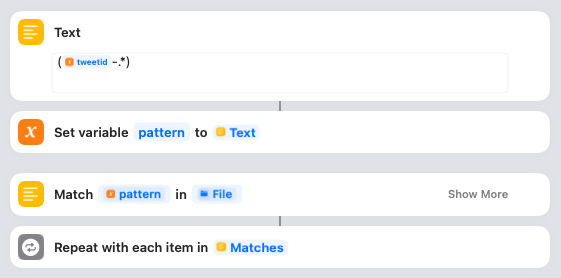
…then the Shortcut is going to search for them using regular expressions. First it defines a variable called pattern that is going to look for the tweetid followed by a hyphen and then any other characters. Then it matches that pattern to the tweets_media.txt file we read in towards to the start of the Shortcut. If it finds any matching media, it will loop through them one by one.
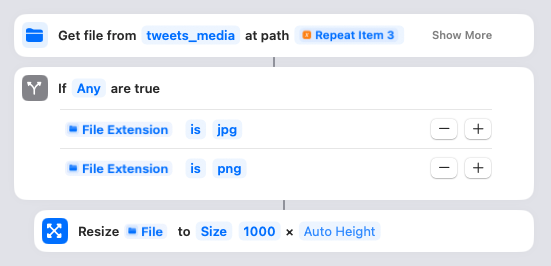
Here’s where the Shortcut actually gets the media file. The name of the file is the matched pattern from the regular expression search. You need to click on that “tweets_media” link and ensure it points to the correct folder in your Twitter archive directory. The filenames are relative to this parent, so it needs to be correct! Assuming the file is an image, it will resize it to 1000 pixels wide, maximum. (You can adjust that if you want, or take it out to leave them full-size.)
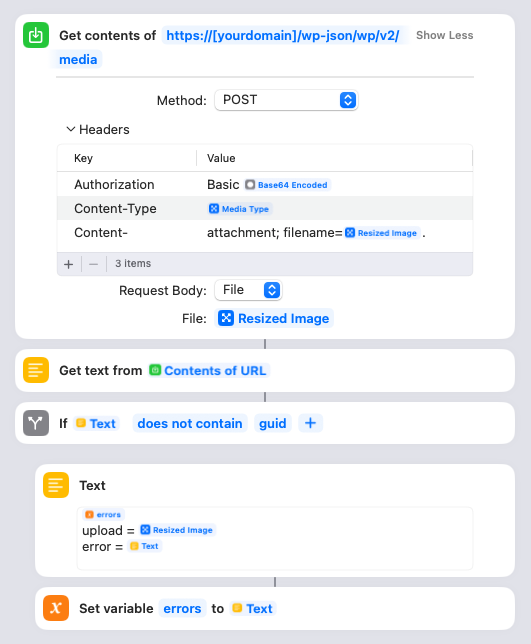
Here’s where the Shortcut actually uploads the resized media file to your site. You will need to put your own domain name into the URL there. Once the image is uploaded, the Shortcut will parse the response from your site and check if there’s an error. All successful responses should have “guid” in there, so if it’s not, it’ll save the name of the file it was trying to upload and the error message into the errors variable.
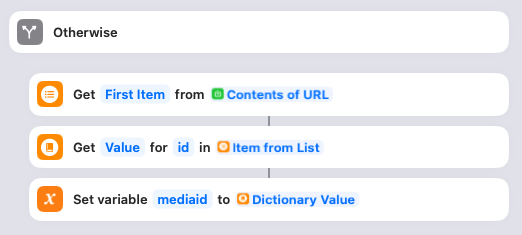
If the upload succeeded, it’ll instead save the ID of the newly uploaded image in the mediaid variable. Nothing to do here.
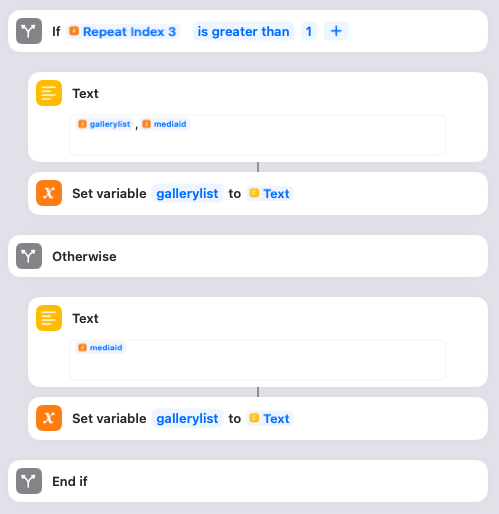
If the image is the first one attached to the tweet, the Shortcut will set the gallerylist variable to the mediaid. If there is more than one image attached to the tweet, each subsequent image will be appended with a comma separator. (You’ll see why later.) Nothing to do here.
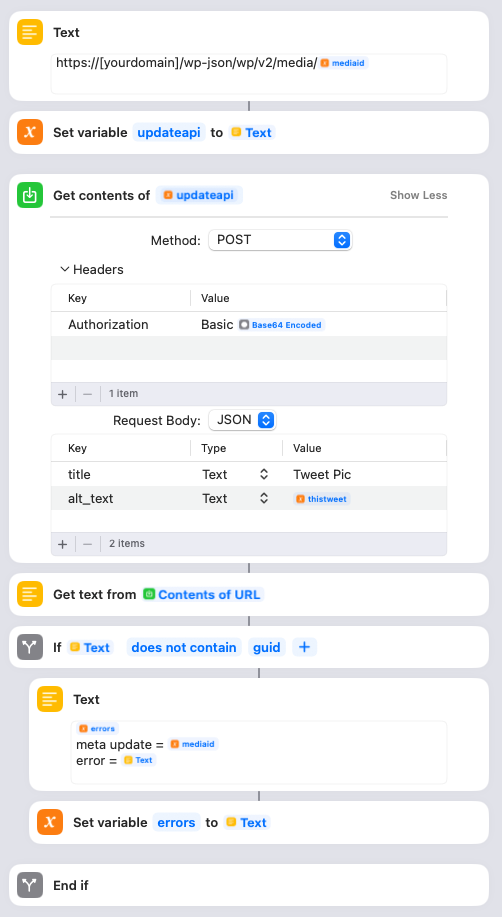
You need to update the Text box with your blog domain. This step is where the Shortcut updates the title and alt text of the image it just uploaded. The title is set to “Tweet Pic”, but you can change that to something else if you like. The alt text is set to the thistweet variable. If this update fails, the mediaid and error text are logged to the error variable.
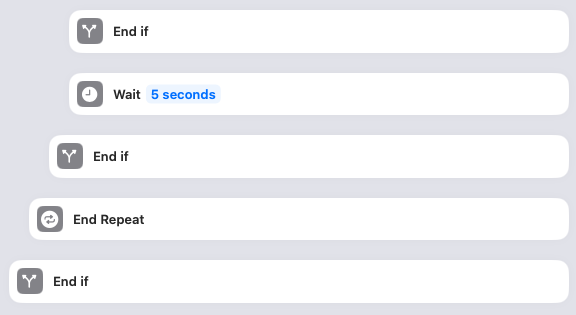
This closes the if statement checking whether the image succeeded, waits for 5 seconds, closes the if statement checking if the media item was an image, loops to the next media item in the post, and eventually closes the if statement checking whether the tweet had any media. You can remove the Wait if you want, or experiment with how long you want it to be. I added it because I didn’t want to DDoS my own site by blasting out API requests as fast as my MacPro can generate them. Otherwise nothing to do here.

Remember, we’re still looping through each tweet. The Shortcut then checks the gallerylist variable. If gallerylist is not set to “nomedia” (because there were media items attached to the tweet), then it updates the post_content variable to append a WordPress image gallery with the list of images for the tweet. I have configured the gallery to have 4 columns of thumbnail images, but you can adjust this if you prefer something else. Then the Shortcut is finished processing this particular tweet, and it appends a horizontal rule to the post_content. Again, you can change this if you want. And then it’s time to loop to the next tweet for this day in the JSON!
(Sidenote: gallerylist gave me some difficulty at first. Initially I set it to blank and then tried to check whether it was still blank at this point, but I found that Shortcuts doesn’t have a good way of testing whether something is null. Instead it’s better to set it to something, and then check whether it’s still that.)
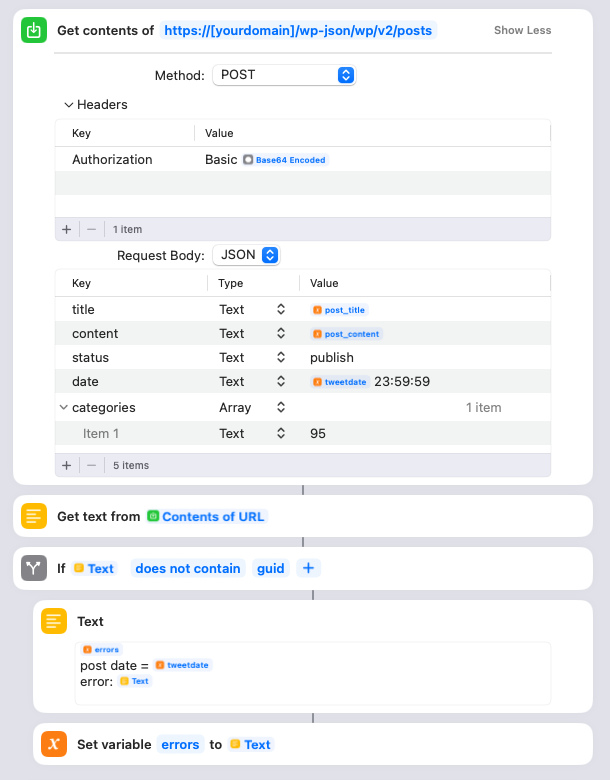
Once the Shortcut has looped through all the tweets for this particular day, it’s time to actually create the WordPress post. You need to adjust the URL to have your domain name. It uses the encoded username/password we created way up at the start. It uses the post_title variable we set at the start of the Shortcut as the title. The content is the post_content HTML that was created, and the date is the tweetdate plus the time 23:59:59. I also assign the post to a special WordPress category that I created ahead of time. You can either remove this, or change the category ID to the appropriate one from your site.
Also please note that I’ve set the status to “publish”. This means the posts will go live in WordPress right away, but since the publish date is in the past they won’t appear on your home page or in your RSS feeds.
The Shortcut will also check if there were any errors returned upon publishing the post, and if so save the post date and the error message in the errors variable.
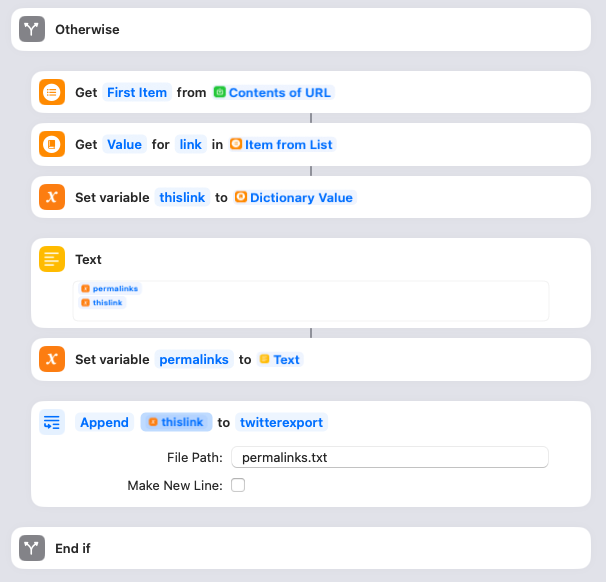
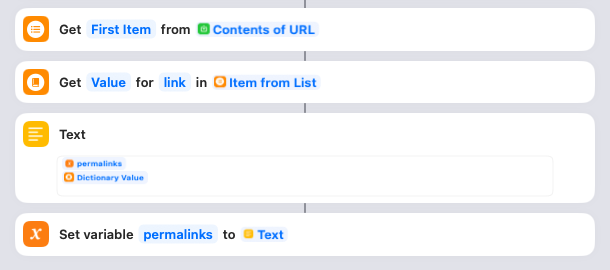
If there were no errors, the Shortcut parses the response from the WordPress API and pulls out the link to the post that’s been created. That link then gets appended to the list saved within the permalinks variable. I also append the link to the permalinks.txt file. Make sure the twitterexport directory actually points to the folder containing the permalinks.txt file!
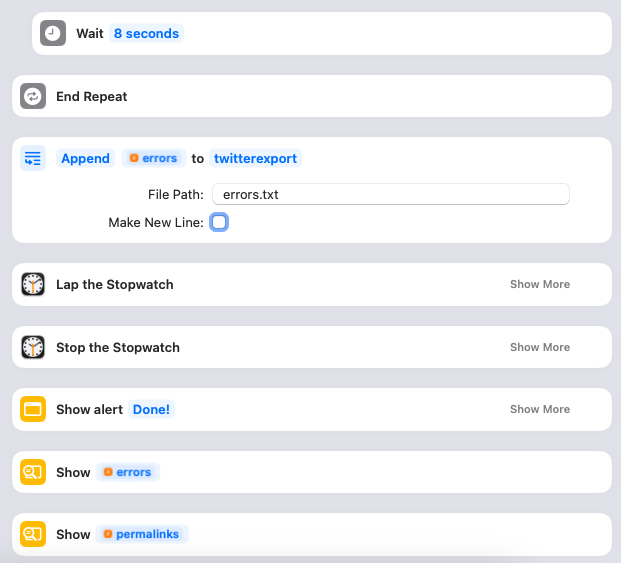
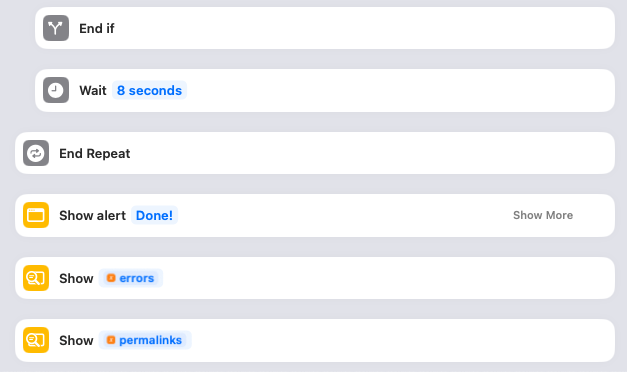
Once the post for the day is completed, I have another “wait” set for 8 seconds to space out the loops. You can remove this, or adjust as necessary. Then the whole thing loops back around to the next day in the JSON. Once all the days are processed, the Shortcut will append the errors variable to the errors.txt file. Make sure the twitterexport directory actually points to the folder containing the errors.txt file! It’ll then click the “Lap” button on the Stopwatch so you know how long this particular import took and then click “Stop” to stop it altogether. The Shortcut will then show an alert box that says “Done!”, then one with any errors that occurred, and then another with the list of permalinks.
Step 5 – Run the Shortcut
Once I had the Shortcut properly configured, I made sure it was pointing to the first import file – tweet_days_00_a.txt – and clicked the “Play” button to start the import. Shortcuts will highlight each step as it moves through the flow. Once it finishes, I checked if there were any errors and then loaded up the category on my site to see if everything looked okay. If all was well, I updated the Shortcut to point to the next import file – tweet_days_01_1.txt – and clicked Play again… over and over and over until all 50 were complete.
One last heads up – you’ll probably get a lot of Permissions requests from your Mac at first due to the large number of files you’re transferring. I just kept clicking the option to “Always Allow” and eventually it stopped asking.
After the import…
As mentioned, I still need to figure out how to handle the 200 video files that I skipped over. I’ll probably go through them individually and see if they’re worth keeping or if they were just stupid memes and gifs.
And that’s it! Suck it, Elon!
Oh, and if you’re wondering why the stopwatch image has more than 50 laps? It’s because once or twice I accidentally started processing the same import file again and had to frantically kill Shortcuts before it duplicated all of the posts and images. 🤦♀️
-
Leaving Instagram
Edited (6/2/25) to add: I figured out how to do error checking! I’ve included details below and updated the shared Shortcut.
Edited (3/2/25) to add: I had the file encoding command incorrect below! It’s now correct.Everybody’s got a line, and Meta crossed mine a while back. It’s time to extricate my data and my attention from their greedy, fascist-enabling claws. I spent the last couple days using an Apple Shortcut to migrate all of my Instagram posts over to WordPress posts on this blog, and I’m in the process of shutting down the Insta account entirely. If you’d like to do the same, I’ll show you how.
Why a Shortcut? Well, I did some research first to see if there was a plugin or service that could migrate the posts for me. Unfortunately, I didn’t find much. This plugin on Github looked like the perfect thing, but it hasn’t been updated in six years since Instagram got it shut down. I also found Intagrate – and would have been willing to pay for it – but spotted this alert at the top of the page: “Due to Instagram API changes, only Instagram Creator and Business accounts can be connected to the plugin.” Most likely that means I wouldn’t have any luck trying to use the API myself, either by fixing the old plugin or writing my own.
And then I thought about the Apple Shortcuts I wrote recently for making posts straight from my phone. I already know how to upload media to WordPress and then use it to create posts. Why not use that to do the export? I just needed my Instagram data in some format that the Shortcut could parse.
Step 1 – Request my Instagram archive
To get to my Instagram data, I had to go to the Meta Accounts Center and click on “Your information and permissions.” Then I clicked on the “Download your information” option. Then I clicked on the “Download or transfer information” option in the box that pops up. I selected my Instagram profile and “Some of your information.” Then I selected the option to just download my “Content.” (There’s a ton of other information in there like Fundraisers and Followers and Messages and whatnot, but I only cared about my content.) Then I selected the option to “Download to device.” The final step was to select my download options:
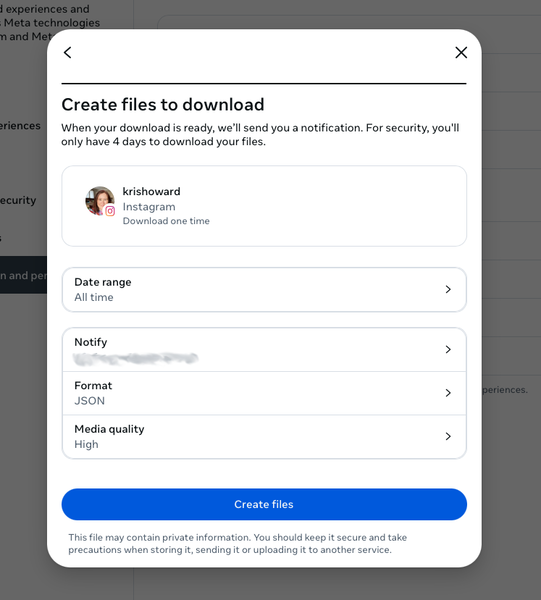
I requested “All time” for the date range, “JSON” for the format, and “High” for the media quality. Once I submitted the request, it took a little while for the file to be prepared. They sent me an email once it was ready and I downloaded it.
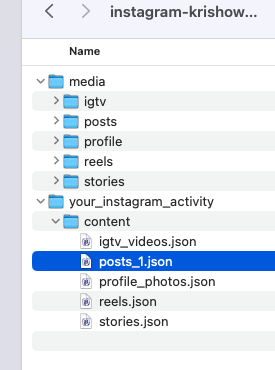
The archive itself is pretty straightforward. The details of all my posts were in your_instagram_activity/content/posts_1.json. All of the actual images were in media/posts and then organised in folders by month/year.
Step 2 – Prepare the JSON
Once thing I noticed when I looked at the JSON in a text editor was that the encoding was clearly messed up. I could see posts where I had used emojis instead looked like this:
"title": "I was excited yesterday to find at a Mittagong antique shop a set of 6 placemats depicting artworks from the famous Australian artist Tom Roberts. Mr. Snook was similarly excited to find a red metal EAT napkin holder for $2 at the Vinnies. \u00f0\u009f\u0098\u0082\u00e2\u009d\u00a4\u00ef\u00b8\u008f",
I’m not an expert at fixing encoding issues, so I asked Rodd to help. We tried changing the encoding in BBEdit, but nothing seemed to fix it. He went away and did some digging and figured out I needed to use iconv and jq. Here’s the Terminal command that worked:
cat posts_1.json | jq '.|sort_by(.media[0].creation_timestamp)|reverse' | iconv -t iso-8859-1 -f utf-8 > posts_1_fix.json
And now when I opened posts_1_fix.json I could see the emoji properly:
"title": "I was excited yesterday to find at a Mittagong antique shop a set of 6 placemats depicting artworks from the famous Australian artist Tom Roberts. Mr. Snook was similarly excited to find a red metal EAT napkin holder for $2 at the Vinnies. 😂❤️",
The other thing that command does is to reorder the items in the JSON. For some reason, the file was not organised by timestamp. (I thought at first some items were missing and thus did several more downloads before I realised that all the content was there, just jumbled about.) Most people probably don’t care about the order, but in my case, it’s because for several years I had a plugin that automatically pulled in my Instagram posts each day to my blog. That meant I needed to delete several years worth of posts in the middle of the JSON to avoid having duplication. I simply used Epoch Converter to get the timestamp of the first and last posts that I imported in this way, and then deleted the items that fell within that timeframe.
Another thing – my Shortcut only handles images. It’ll skip over any videos, which come through as mp4 files. I don’t usually post these, so my approach was to handle them separately. I simply went through the file searching for them to see if they were worth moving over to YouTube and embedding on the blog, and then deleted those items. You can choose how you want to handle them.
Lastly, I discovered that Shortcuts would only parse the JSON if it had a .txt extension. So I copied the first 1000 lines or so of it (I’ll explain why in a minute) into a separate file and called it “posts_scratch.txt”, keeping it in the same folder as “posts_1.json” and “posts_1_fix.json”.
Step 3 – Set up the Shortcut
You can download the Shortcut I created here. I’ll walk you through it bit by bit.
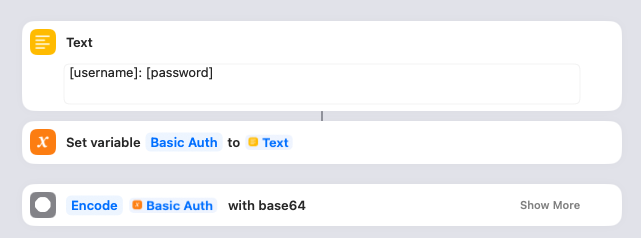
This is where you give the Shortcut the details it needs to access your WordPress blog. You’ll need to create an Application Password and then put the username and password into the Text box as shown. The Shortcut saves that in a variable and then encodes it.
In order to show a list of all the posts that have been created at the end of the import (as well as any errors that have occurred), I create blank variables to collect them. Nothing to do here.
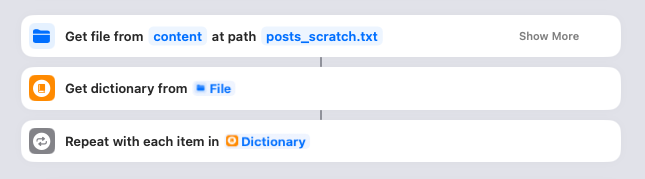
This is things really get going. You need to click on that “content” link and ensure it points to the content folder in your downloaded Instagram archive. When you run the Shortcut, it’ll look in that folder for the “posts_scratch.txt” file and parse it, with each Instagram post becoming an item in the Dictionary. The Shortcut then loops through each of these.
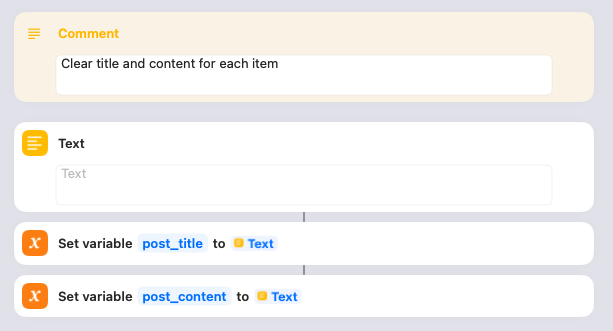
For each Instagram post, I set a blank variable for the post_title and post_content. Nothing to do here.
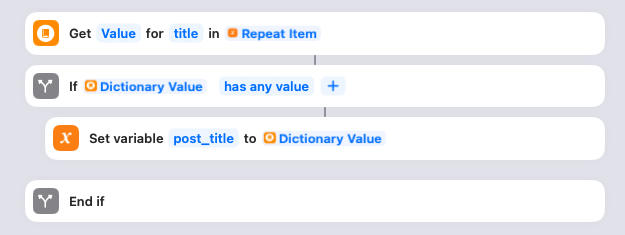
Next the script looks to see if there is a title specified for the Instagram post in the JSON. Note: the JSON file handles this differently depending on whether it’s a single image or multi image post. (No idea why; the consistency is stupid. 🙄 ) This case is for a multi image post. If the title is specified, it gets saved to the post_title variable. Nothing to do here.

Next the script grabs the media associated to the Instagram post. It then starts looping through each media item attached. Nothing to do here.
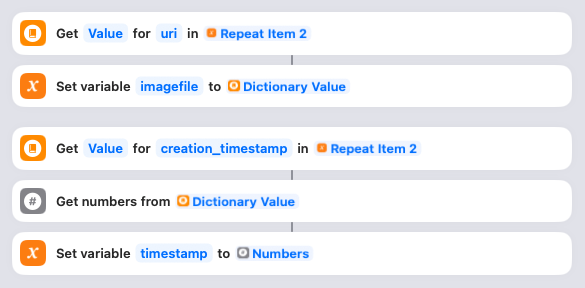
For each media item, it grabs the URI specified in the JSON and saves it in the imagefile variable. It also grabs the timestamp, converts it into a number (rather than a string), and saves it in the timestamp variable. Nothing to do here. (Yes, I know that I’m doing this over and over for each image, even though the creation_timestamp is the same for every item in a post. You can fix that if it bothers you. But if such inefficiency bothers you, you’re probably not using a Shortcut for this anyway. 😂 )
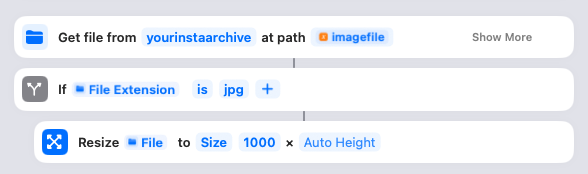
Here’s where the Shortcut actually gets the media file. You need to click on that “yourinstaarchive” link and ensure it points to your downloaded Instagram archive. The URIs are relative to this parent, so it needs to be correct! Assuming the file is an image, it will resize it to 1000 pixels wide, maximum. (You can adjust that if you want, or take it out to leave them full-size.)
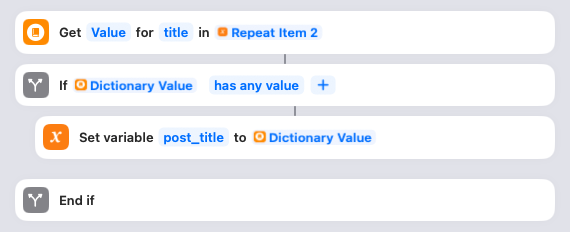
Here’s where the Shortcut handles the case where it’s a single image post. In that case, the title is included with the media item itself. So it grabs that title, and if it has value (i.e. isn’t blank), it saves it as the post_title. Nothing to do here.
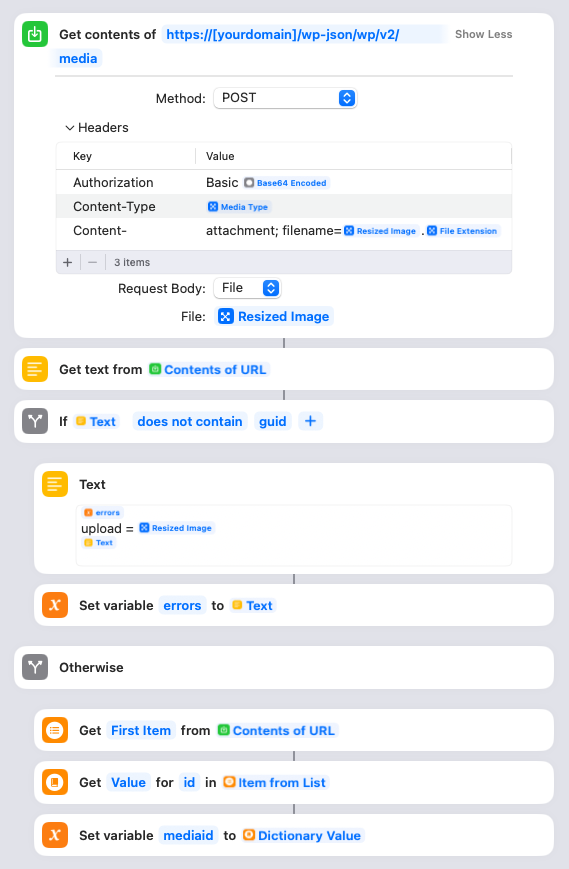
Here’s where the Shortcut actually uploads the resized media file to your site. You will need to put your own domain name into the URL there. Once the image is uploaded, the Shortcut will parse the response from your site and check if there’s an error. All successful responses should have “guid” in there, so if it’s not, it’ll save the name of the file it was trying to upload into the errors variable. If the upload succeeded, it’ll instead save the ID of the newly uploaded image in the mediaid variable and progress to updating the alt text and title.
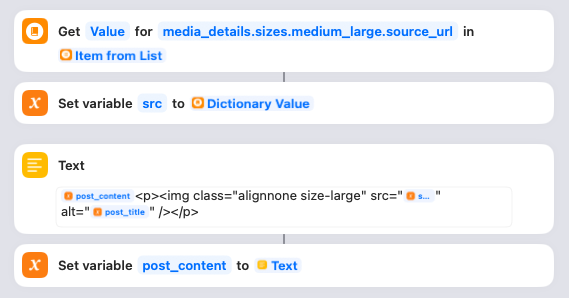
As part of the response, WordPress will send back the URLs for all the different resized versions of the image. The Shortcut will grab the “medium_large” version, which is the fixed width 768px wide version and save it as the src variable. (You can change the image size if you want, but that’s left as an exercise for the you. None of this stuff is well documented, I’m afraid.) The Shortcut will then create the HTML to display the image and save it in the post_content variable. Because of the way the Text item is set up, as you recursively loop through each image in the post it’ll be appended as a series of paragraphs. Feel free to change the HTML to suit your blog if you want, otherwise nothing to do here. (At a later step, it’ll inject the actual text from the Instagram post.)
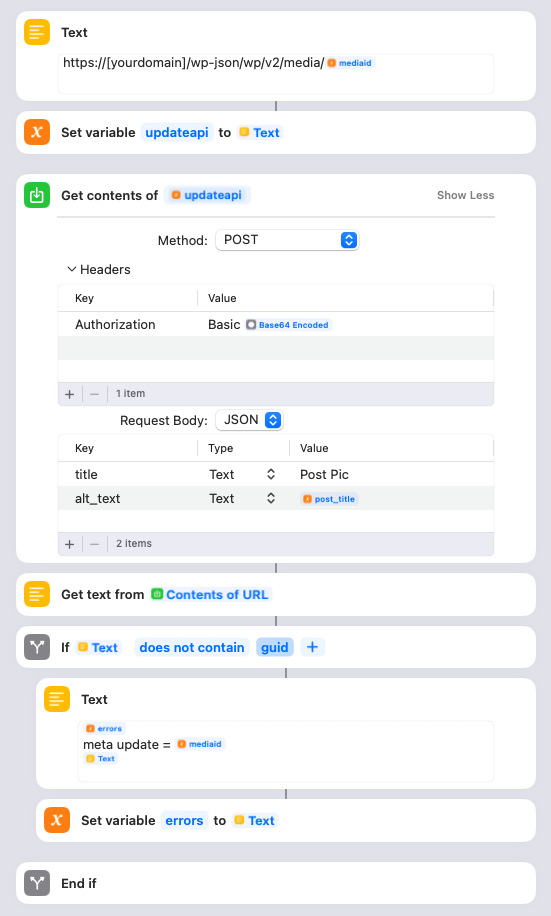
You need to update the Text box with your blog domain. This step is where the Shortcut updates the title and alt text of the image it just uploaded. The title is set to “Post Pic”, but you can change that to something else if you like. The alt text is set to the post_title variable. If this update fails, the mediaid is logged to the error variable.
This closes off the two If statements (whether it was a JPG or not, and whether the image upload succeeded), waits for 5 seconds, and then loops to the next media item in the post. You can remove the Wait if you want, or experiment with how long you want it to be. I added it because I know my site struggles under heavy load, and I wanted to spread out the API requests to be safe rather than just blasting them as fast as my MacPro can generate them. Otherwise nothing to do here.

This is where the Shortcut turns the timestamp into an actual date that WordPress can work with. (No, I don’t bother doing anything tricky to handle the timezone, as I don’t need that level of precision on my posts.) Nothing to do here.
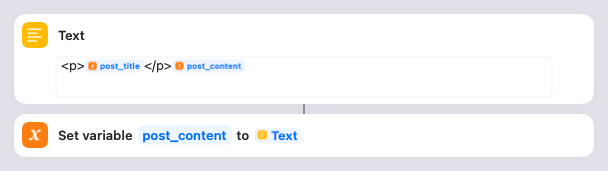
Here’s where the Shortcut injects the Instagram post caption at the start of the post_content variable, which at this point is a list of HTML images. You can adjust the HTML if you want, otherwise nothing to do here.
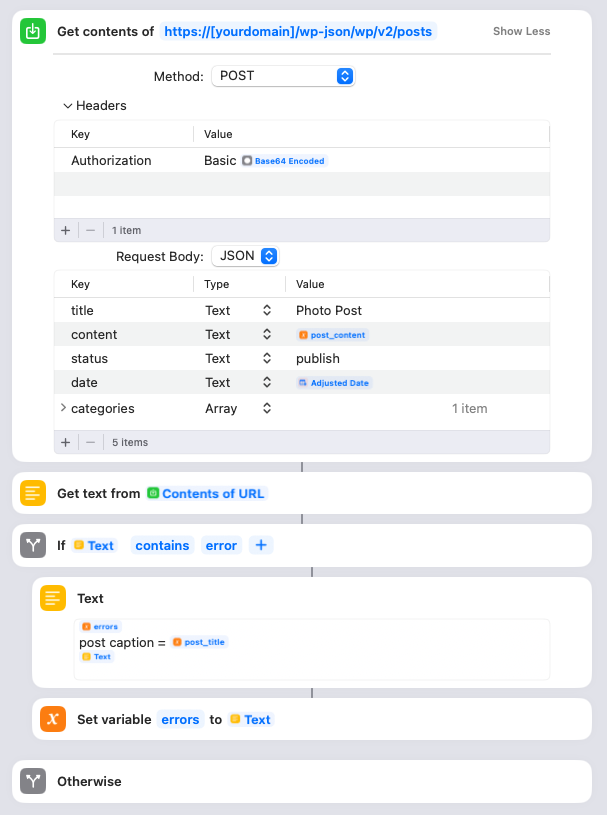
Here’s where the Shortcut actually creates the WordPress post. You need to adjust the URL to have your domain name. It uses the encoded username/password we created way up at the start. I set it to use “Photo Post” as the WordPress post title, but you can change that to whatever you want. The content is the post_content HTML that was created, and the date is the converted timestamp. I also assign the post to a special WordPress category. You can either remove this, or change the category ID to the appropriate one from your site.
Also please note that I’ve set the status to “publish”. This means the posts will go live in WordPress right away, but since the publish date is in the past they won’t appear on your home page or in your RSS feeds. You may wish to change this to “draft” the first few times you run it. I found though that when I went into WordPress to check and publish those posts, it updated the published date to the current date – meaning the post no longer appeared at the correct date in the past, and it showed up in my RSS feed as a new post. So once you’re satisfied that the script is working, I suggest changing it to “publish” directly and then they’ll be saved with the correct date.
The Shortcut will also check if there were any errors returned upon publishing the post, and if so save the caption of the post in the errors variable.
If there were no errors, the Shortcut next parses the response from the WordPress API and pulls out the link to the post that’s been created. It then gets appended to the list saved within the permalinks variable. Nothing to do here.
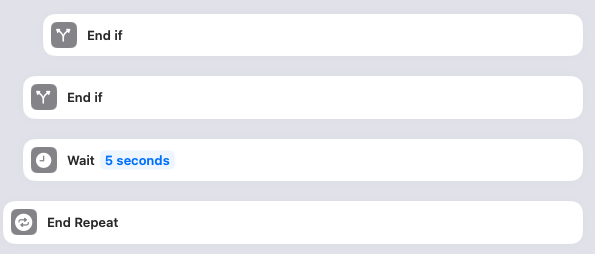
Final step! Again, I have a “wait” set after the if statement finishes just to space out the post loops. You can remove this, or adjust as necessary. Then the whole thing loops back around to the next Instagram post in the JSON. Once the loop is finished, it’ll show an alert box that says “Done!”, then one with any errors that occurred, and then another with the list of permalinks. This allows you to investigate and fix any of the errors, and to spot check some of the permalinks to make sure they look correct. Note: The error checking may include some false positives, if you actually used the word “error” in the post! So if it looks fine on your site, you can disregard that error.
Optionally, you could use the Shortcut action “Append to Text File” or “Append to Note” if you want to write those errors or permalinks to a file. I leave that as an exercise for you to work out. 🙂
Step 4 – Run the Shortcut
Once I had the Shortcut properly configured, I copied out just a small portion of the fixed JSON into my posts_scratch.txt so I could test it. To run it, I just clicked the “Play” button on the Shortcut. Shortcuts will highlight each step as it moves through the flow. Once I was satisfied it was doing what I wanted, I increased the number of items in my posts_scratch.txt file.
Why not just run the whole thing? Well, I found it crashed every now and then. I’m not sure why – whether it was a memory issue with Shortcuts, or my server being flaky, or WordPress itself just throwing an error. That’s why I started adding some “wait” pauses in there, and why I found it easier to work in smaller batches. Whenever it crashed, I could look in my WordPress dashboard to see the last Media item that had been uploaded, and then find that point in the JSON and delete everything before that item. Then I’d delete the Media item in WordPress and start the Shortcut over again at that point. 1000 lines or so seemed to be the sweet spot, but you need to make sure you aren’t cutting off one of the items in the JSON, of course.
Update: The above was written before I figured out how to add error checking to the Shortcut. Now it should run without actually crashing the Shortcut, logging errors to a variable. I would still be wary about running a really large file, as I have no idea how Shortcuts would handle that…
One last heads up – you’ll probably get a lot of Permissions requests from your Mac at first due to the large number of files you’re transferring. I just kept clicking the option to “Always Allow” and eventually it stopped asking.
After the import…
As mentioned, this Shortcut only handles JPGs, so I then went through the original JSON file looking for mp4 files to decide what to do with them. Some of them I discarded, and others I uploaded to YouTube and manually created posts for them.
I also searched through my existing WordPress posts for any places where I had previously embedded or linked to Instagram images. (Search for “instagram.com” or “instagr.am” to find these. I also had some that were done with IFTTT, so a search for “ift.tt” will find those.) I either replaced those with links to my posts, or removed them as necessary.
Finally it was time to remove my content off Instagram. I didn’t want to nuke my account yet, which meant I needed to delete the images one by one. (There are apps that claim to do bulk delete, but I didn’t like the look of any of them.) To do this, I went to “Your Activity” -> “Photos and videos” in a browser window. Then click “Select” and start clicking away. Once you hit 100 (the maximum), click “Delete” to blast them.
I’ll give it a few weeks or so before I delete the account entirely, to make sure folks know where to find my content going forward!
Next up…. Facebook. *cracks knuckles*
-
Facebook detox
In addition to demonetising my Meta data, I’ve decided to take a break from Meta platforms this week. It turns out that it’s surprisingly difficult to log out of Facebook Messenger on your phone, to the extent that I had to dig up a Wikihow article to show me how. Even after I managed to log out of Facebook, Messenger, Instagram, and Threads, they kept showing me a single-click “log back in” option due to some saved profile, which I then had to delete. The fact that they make it so damn difficult kinda reinforces my decision, to be honest.
The only one I haven’t signed out of is WhatsApp. This is solely because my main friend group uses it to communicate, and I haven’t yet figured out how to convince them all to move to an alternative.
Why just a break? Why don’t I delete my accounts? The temptation is definitely there. Sadly, FB remains my main channel to keep up with my family and friends in the US. It’s where I see what my brother and sister-in-law are doing with their cafe this week; it’s where I see whatever dodgy Jeep memes my Dad is laughing at; it’s where I see whatever quilt show in the Midwest my Mom is supporting; it’s where I find out if my college friends in LA are still safe. Instagram is literally the only way I know what’s happening with my young nieces and nephews, who would never be so crass as to text me or talk on the phone. It’s hard. I suspect the way forward will just be to cut my usage way, way back, and to move towards a read-only method of interaction there.
-

Problems with WordPress and Amazon CloudFront
Here’s a fun story. When I originally moved this blog to Amazon Lightsail five years ago, I followed the recommended best practice and installed the AWS for WordPress plugin. I used that to set up an Amazon CloudFront distribution to manage the site’s cache. For several years, everything worked great. Then in September 2022, AWS abandoned the plugin and removed it from WordPress.org. As far as I can tell, they provided no information for users to tell them what to do without it. I continued to use the plugin for sometime, even though this is generally seen as pretty bad security since it’s no longer receiving updates. A few months back, I got tired of my Security scanner blaring at me about this discontinued plugin and deactivated it. The CloudFront distribution still existed and my site continued to work as intended, so I figured it was safe to delete.
As you might guess, there have been consequences. I noticed recently that my site was sometimes caching things too aggressively. I’d write a new blog post and tell Rodd to check it out, but he’d still be seeing the old one for some time. I’m far from a CloudFront expert, but I’ve been looking at my distribution behaviour settings and comparing them to current best practices. This site, for example, recommends using “Origin” for your cache key. My plugin-created distro however uses “Cloudfront-Forwarded-Proto,” “CloudFront-is-Tablet-Viewer,” “CloudFront-is-Mobile-Viewer,” “CloudFront-is-Desktop-Viewer,” and “Host.” For object caching, my distribution had “Use origin cache headers” selected instead of a custom option. Without any documentation from AWS on how their plugin actually worked, all I can theorise is that it must’ve set some sort of header that CloudFront was using, and by deleting the plugin, I’ve mucked up that behaviour.
So what to do? For the meantime, I’ve changed the default behaviour object caching to have a default TTL of 5 minutes. I’ll see if that helps the situation at all. Otherwise I’m going to either have to look at my backups and see if I can reverse-engineer what the plugin was doing, or else figure out how to modify my distribution to work properly without it. Ugh.
-
Demonetising my Meta data
Mad at Meta? Don’t Let Them Collect and Monetize Your Personal Data | Electronic Frontier Foundation
I just went through and checked all of these settings. Not only is Facebook a privacy nightmare, Zuckerberg’s pivot to right-wing broligarch is sickening. I’d delete my accounts entirely except it’s my main way of communicating with some family members back in the US. At least I can limit how much I contribute to their coffers.
-
Carbon dioxide
Mr. Snook has been after a carbon dioxide monitor for some time now, worried that our new insulated windows are actually killing us. He ordered this one in the Boxing Day sale, and it’s just arrived today. So now he’s walking around the house going “TWELVE HUNDRED IN THE LIVING ROOM! WE NEED TO VENTILATE!” Forecast today is for 33C/91F. Fml. 🤦♀️
-
iOS Shortcuts for WordPress Bloggers
You may have noticed I’m posting a lot more lately. It’s partly because I’m not working, plus a bit of conscious effort… plus a couple effort-saving shortcuts I’ve set up.
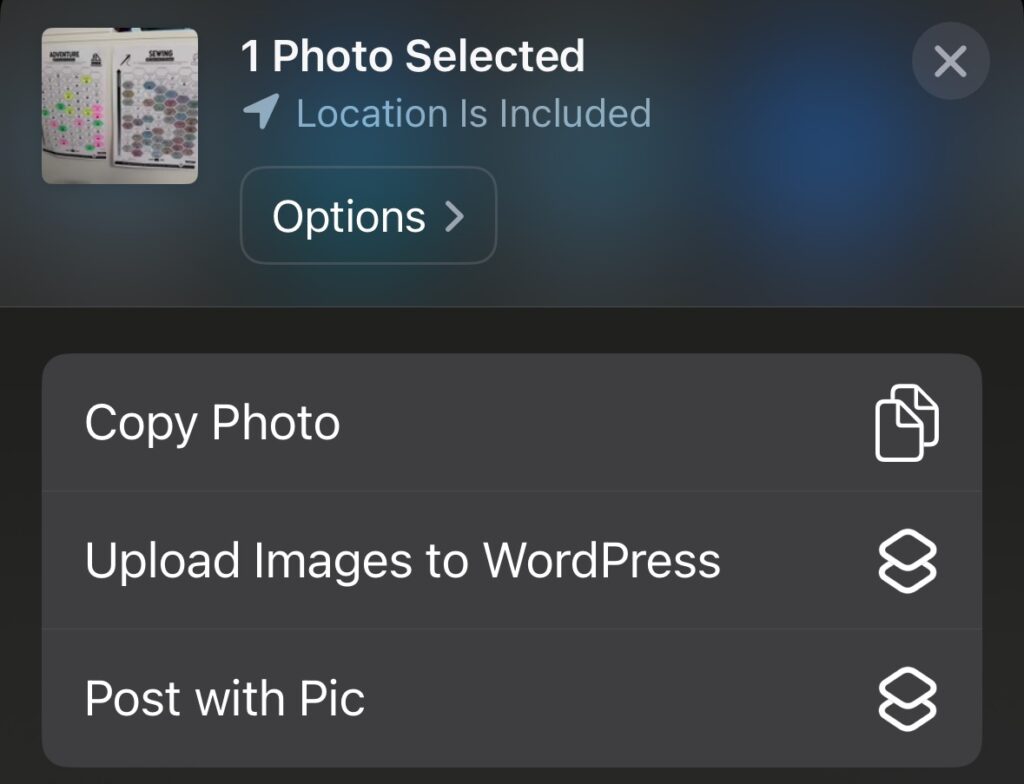
In the past, I used to share images to Instagram and then had an IFTTT applet run to post those images to WordPress as blog posts. I wanted to flip that model and instead first post to my own site, and THEN have the option of sharing to Instagram or other social networks. The solution I’ve landed on is to use an iOS Shortcut as a Share Sheet action. That means I take a photo, click the Share button, and then click the Post with Pic shortcut.
The Shortcut first prompts me for a Post Title, Post Content, and Image Alt Text. It then converts the image to a JPG and uploads it to the WordPress Media API along with the title and alt text. Next, it creates a new post with the title and content, and sets the newly uploaded image as the Featured Image for the post. It also copies the Post Content to the clipboard and reopens the Share Sheet in case I want to then post the image to Instagram or any other social networks. Lastly, it opens my site so I can see the new post.
 As you can see, it’s a pretty lengthy Shortcut. You can download a blank version for yourself from here. There are a few places you’ll need to tweak and customise for your own setup. (I recommend doing that on your laptop rather than trying to do it on the phone directly.) You’ll first need to set up an Application-Specific Password for your WordPress User. There’s a Text action where you’ll need to put in your WordPress username and that application-specific password for authentication. There are also three places where you need to replace [yourdomain] with the URL to your own site. Once you’ve got it updated, click the Info icon and make sure you’ve checked “Show in Share Sheet.” Then you should be good to go! (I built this based on Chuck Grimmett’s Shortcut and helpful blog post.)
And yes, I know that Shortcuts has a “Post to WordPress” action built in. However, I could not get the damn thing to work! I suspect it’s because it uses XML-RPC, and I have that locked down for security. This version with the Rest API works just fine.
 There’s a second Shortcut in the Share Sheet above: Upload Images to WordPress. This is for when I have a number of images I want to use in a post. You can upload through the WordPress iOS app, but I’ve found it clunky and slow. It also defaults to uploading at full resolution too. This shortcut works a lot better. I simply select several images in the Photos app, hit Share, and then the relevant Shortcut. It converts each one to JPG and resizes to 1000px wide before uploading. You can grab it here. Again, you’ll need to put in your username and application password. You’ll also need to put your domain name in for the API URL. You may also need to give it some permissions the first time you run it. Depending on how powerful your server is, you may need to limit how many photos you try to upload at once. Note: this one doesn’t do any titles or alt text. But this is for bulk uploading, and I then add in the metadata when I’m composing the post itself.
I hope you find these useful!