Sonofa. Twelve years ago I knitted a pair of “self-replicating mittens” with a QR code that pointed you to the pattern for the mittens, and I entered them in the Sydney Royal Easter Show. I was pretty proud of my cleverness. In the blog post where I talked about making the mittens, I said:
I wanted my code to be as simple as possible, so I needed to use a URL shortener to mask my intended address. I settled on using Google‘s, reasoning that it was likely to be around the longest. (Though who knows these days, right?)
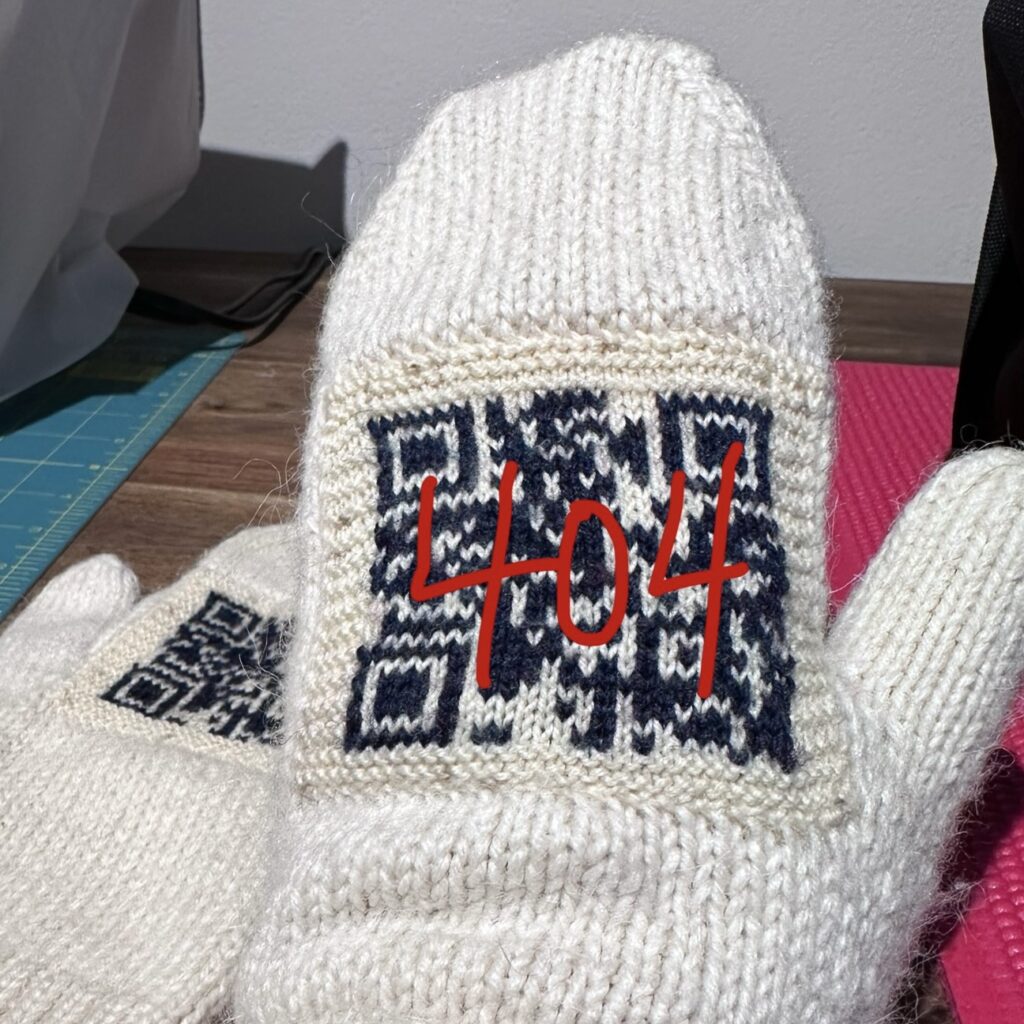
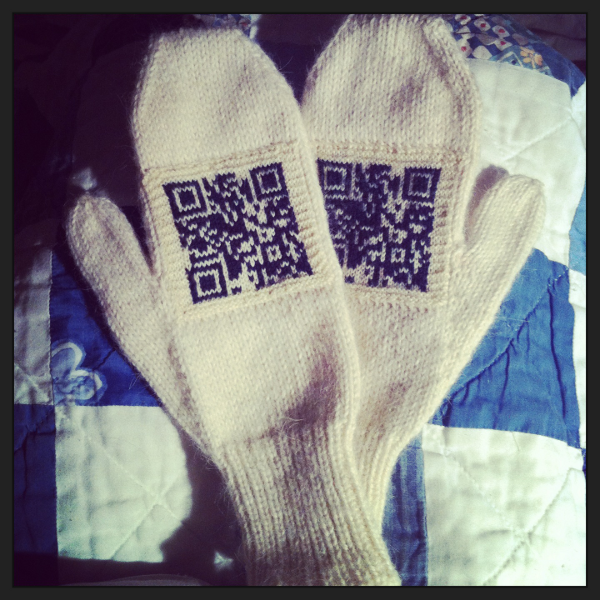
After giving a talk on geek knitting in 2012, I was inspired to try my hand at knitting a QR code. The code on these mittens actually scans and points the viewer to the pattern on this page so they can make their own. Hence, self-replicating mittens!
Edited on 16/03/2025: Google are killing the URL shortener in 2025, which means at some point the QR code – http://goo.gl/9XJgR – will stop working. Bastards.
Sizing: I made these to fit my own hands, which are normal adult women’s size. To adjust bigger or smaller, simply change the number of stitches you cast on and how many you increase for the thumb.
Tension: Come on, it’s a pair of mittens! You’ll notice that these are knitted with slightly smaller needles than you would normally knit 8ply/DK wool. That’s to make the fabric more dense and keep the air out.
Instructions
Using the 3mm needles, cast on 44 stitches in your 8ply/DK wool and join for knitting in the round.
Knit 28 rounds of K1P1 rib.
Switch to 3.75mm needles and knit 2 rounds plain (stocking stitch).
Now we’re ready for the thumb increases. Your thumbs are on opposite sides of your hands, so you need to knit each one differently!
R mitten:
Increase Round 1: K1, M1, K1, M1, knit to end
Increase Rounds 2-4: Knit plain
Increase Round 5: K1, M1, K3, M1, knit to end
Increase Rounds 6-8: Knit plain
Continue in this pattern, adding 2 more stitches between the M1s each time until you reach 58 stitches.
Knit 1 row plain.
Now we need to remove the thumb stitches and set them aside for later.
Next round: K1, slip next 15st onto scrap wool, cast on 3 stitches, continue to knit round.
Knit 25 rounds plain.
Time to start the decreases!
Decrease Round 1: *K1, SSK, knit 23st, K2tog, K1,* repeat for other side of mitten.
Decrease Round 2: Knit plain.
Repeat in this pattern until 22 stitches remain.
Use Kitchener stitch to graft closed and then weave in your ends!
L mitten:
Increase Round 1: K42, M1, K1, M1, K1
Increase Rounds 2-4: Knit plain.
Increase Round 5: K42, M1, K3, M1, K1
Increase Round 6-8: Knit plain
Continue in this pattern, adding 2 more stitches between the M1s each time until you reach 58 stitches.
Knit 1 row plain.
Again, it’s time to remove the thumb stitches and set them aside for later.
Next round: K42, slip next 15st onto scrap wool, cast on 3 stitches, K1
Knit 25 rounds plain.
Time to start the decreases!
Decrease Round 1: *K1, SSK, knit 23st, K2tog, K1,* repeat for other side of mitten.
Decrease Round 2: Knit plain.
Repeat in this pattern until 22 stitches remain.
Use Kitchener stitch to graft closed and then weave in your ends!
For each thumb:
Put 15st from scrap wool on needles.
Knit around all stitches, picking up and knitting 3st to close the gap at the top of the thumb.
Knit 16 rounds plain.
Decrease Round 1: *K1, K2tog* repeat around.
Decrease Round 2: Knit plain.
Decrease Round 3: *K2tog* repeat all the way around.
Break off wool and run end through remaining stitches, draw up tightly and fasten off.
QR Code (make 2 of these):
Note – the QR code is knitted back and forth using the fairisle/stranded knitting technique. Yeah, you have to use two colours on the purl side, but it’s a small pattern and you’ll survive. Wherever there is a float longer than 5 stitches, I recommend “catching” the floating wool with the working wool. However, since this is going to be sewn to the mitten, it’s not crucial and you don’t have to do it. Just make sure your floats are loose enough not to draw in the design too much!
Using the 2mm needles and your baby wool, cast on 33 stitches.
Knit 4 rows of garter stitch.
Keeping a 4st border on each side in garter stitch, begin working the QR Code Chart in stocking stitch.
Once the chart is finished, knit 4 rows of garter stitch to complete the border.
Cast off and weave in your ends.
I recommend BLOCKING THE HECK out of your QR codes, otherwise they may not scan. I cut two pieces of paper exactly 3 inches square, then wetted my patches and pinned them out to this size. Once they are dry, simply sew them to the back of your mittens!
It’s time again for the Sydney Royal Easter Show Competition, and this is my SEVENTH year entering. (Good grief – really?!) I’ve entered a lot of items over the years, and some of them have been awarded with ribbons. A recap:
Needless to say, Win the Easter Show has been on Hermione’s To Do list for a very long time. This year I again sent in three entries.
Catriona Vest
This is a pattern I’ve had in my Ravelry queue for a long time. I bought the wool (Pear Tree Merino) from Kylie in a destash last year and it seemed like the perfect choice for it. I made a few significant modifications: I adapted it to be knitted in the round up to the armholes, and I mirrored the cables to be symmetrical. I also dug around on Ravelry to find someone who had charted the cables, which was really helpful. (Why Debbie Bliss is incapable of including a chart, I have no idea.) I really, really like the finished vest. The wool was a great choice, and it makes the cables stand out. I entered this in the Sleeveless Garment category (no more Aran for me; I’m not that masochistic) and I think it’s probably my best shot at a ribbon. I’m also really looking forward to wearing it this winter! More photos and details on Ravelry.
Juno Regina
In the end, my first real lace project took me nearly THREE YEARS to finish. I started this in 2010 and I’ve been working on it in fits and starts ever since. That middle bit was a total slog! I’m happy with how it turned out though, and it’s destined as a (very late) wedding gift for my friend Kriti Sahni. The pattern is of course from Knitty, and the wool is Morris Empire 2ply. Special thanks to Fiona for lending me her blocking wires! (Although I had a nightmarish time blocking it. I somehow managed to catch a thread on the sink plug and pulled out a long loop! I spent like an hour hunched over it laboriously adjusting stitch tension to repair it.) Frankly, I’ll be thrilled for this just to be exhibited. The lace category is notoriously competitive, and – my fake rivalry with Reecie notwithstanding – I don’t really stand a chance. Again, more details on Ravelry.
Self-Replicating Mittens with QR Code
You may have seen these as there have already been some photos on the blog. Basically, the idea was prompted by my Girl Geek talk last year on Knitting Geekery. I got excited about the idea of making a “meta” knitted object, where the item’s pattern was encoded into the item itself. After some brainstorming and research, I settled on a QR code. I knew that other people were using them on knitted items with some success. I wanted my code to be as simple as possible, so I needed to use a URL shortener to mask my intended address. I settled on using Google‘s, reasoning that it was likely to be around the longest. (Though who knows these days, right?) Google also conveniently generate the QR code for you! Then it was just a matter of knitting it. I did several test patches, but none of them worked. I tried fairisle; I tried Swiss darning; I tried cross-stitching over the knitting. I just couldn’t get any of them to successfully read on my iPhone. I was thisclose to scrapping the whole idea. With less than a week to go, I made one last attempt using very thin baby wool and the thinnest needles I had (2mm). Still no go. At the eleventh hour, I decided to try blocking the hell out of it. I cut a piece of paper to square and aggressively pinned the wet fabric to it. Suddenly – IT WORKED! I couldn’t believe it. I shared a photo to Twitter and other people got it to work too. Hallelujah! Then it was just a matter of knitting another patch and sewing them to the mittens (which I’d already finished). I set up the target page once I dropped them off at the Show. (I included a note explaining the concept and warning the judges that the website would give away my identity.) Anyway, I’m very happy with them. I entered them in Creative Knitting, but truth be told the knitting skill required was minimal. They’re more of an Art piece than anything, and I just hope people will get the concept. If nothing else, the folks on Twitter seemed to like them! Again, details on Ravelry.
Edited on 16/03/2025: Google are killing the URL shortener in 2025, which means at some point the QR code will stop working. Bastards.
The Arts Preview Night is Tuesday, so I’ll know then whether I can finally cross that pesky To Do item off my list!
DailyMile is a community site for runners and other athletes. I’ve been posting my workouts there for the past eight months, and I’ve been blown away by the camaraderie and support I’ve received. A few months ago, a DMer from NZ named Lisa was visiting Sydney so a bunch of us had a meetup for her. Not long after she went home, the Christchurch earthquake happened. She and her family are fine, thankfully, but as you can imagine her community isn’t in great shape. She’s also had some injuries that have derailed her running. Last week one of the Sydney DMers proposed sending her a care package, and this was my contribution.
The pattern is a free one called 75-Yard Mmmalabrigo Fingerless Mitts. I used a very chunky black Japanese wool (“Nireana”) I received in a swap a few years ago. (It’s slightly thicker than what the pattern called for, so I upped the needle sizes to 5mm and 5.5mm.) The mitts were incredibly quick to knit in this thick wool. I lengthened the cuff a bit as suggested. They’re a little big for me, but then again I have tiny hands. I duplicate-stitched the DailyMile logo on the back with some doubled 8-ply in orange and white. (Ravelry details)
Lisa received the care package yesterday and she was just blown away. She posted a photo today of her wearing everything, including my mitts and a red Snuggie. (Not sure who sent her the Snuggie, but that’s BRILLIANT.) I’m so glad she liked everything! It was fun being part of the surprise.
Cranford Mitts I saw Lyn’s Cranford Mitts last week and realised they were the perfect project to use up the Noro left over from my ribbed socks. The pattern is available for free (but just watch out because there’s a missing YO on row 8). I cast on last week and had most of the first mitt knitted on Saturday, but when I tried it on I could barely get it over my hand! My tiny hands! My legendary tight tension strikes again. (And that’s with going up to a 2.75mm needle.) So I frogged it all back and started over with 60 stitches instead of 50, which meant I had a whole extra pattern repeat. That works much better for me. I lengthened the pattern a fair bit, adding in extra repeats before and after the thumb. I finished the pair of them in just five days. When I tried them on last night, I noticed that the opening around my knuckles gaped a bit so I had the bright idea to sew the sides together between my 3rd and 4th fingers. That made them fit much closer to my hand and feel a lot warmer. (Well, as warm as lacy fingerless mitts can feel!) I think they look pretty cool though, and they match my Clapotis. Yay for crafty accessories! (Ravelry details are here.)
Sweet mittens, eh? So I finally finished my own pair of Broad Street Mittens with just a few weeks of winter left to spare. As you can see, mine are knitted in navy “argyle” sock wool from Heirloom. I basically followed the pattern as written (with a few exceptions based on the error I mentioned in the previous post). And yeah, I embroidered “DUDE” and “SWEET” on the backs of the mitten flaps in a subtle red wool. Heh. Somehow I doubt many of my fellow commuters are going to get the joke.
As the Snook daily complains about how “frickin’ freezin’” it is in the mornings, I decided to knit him these Broad Street Mittens from Knitty to keep him warm. They’re basically fingerless gloves with mitten shells attached to the knuckles. There’s a loop at the top of the mitten that you slip over a button on the cuff to keep them from flapping around. Cool, huh? I used some of the Bendigo sock wool I got at the Craft Fair last month and they turned out pretty nice. It wasn’t nearly as hard to knit gloves as I thought it would be. I churned these out fairly quickly too, despite the small gauge. (I figure it was about 10 hours or so per hand.) Now to knit some for me!
As usual with Knitty patterns, I ran into a couple snags and at least one outright error. First off, the pattern tells you that you’ll need two sizes of double-pointed needles but it doesn’t tell you when to use them. I assumed at first that the smaller size was for the cuff but I wanted to be sure before I spent half the day knitting something too small. In desperation I had the Snook read over the pattern to make sure I wasn’t missing anything and he noticed a tiny line indicating that you’re supposed to use the bigger ones on the mitten shell. Fine, but there’s still nothing that says which to use on the glove. Eventually I just went with the smaller (2.75mm) ones. Whatever.
Okay, so that’s when I hit the major problem with the pattern: sizing. I cast on 48 and as I proceeded through the ribbing I realized pretty quickly that this was never going to fit over the Snook’s hand. After ripping back a couple of times, I finally accepted that I was going to be winging this and settled on 60 stitches for the wrist cuff. (I was actually doing them on two circs, so I had 30 on each one.) Then I did a row of *K5 INC 1* to get me up to 72 for the hand. Okay, so far so good.
(Actually, there’s a mistake in the pattern at this point but I didn’t catch it since I was changing the numbers. If you follow the instructions and use 48 for the cuff, you’re supposed to do a row of *K3 INC 1* to get to 60 stitches. Except that math is totally wrong. If you increase every third stitch over 48, you get 64 stitches. Should’ve been *K4 INC 1*. I only discovered this tonight when working my own smaller glove which uses the numbers from the pattern.)
Okay, so everything else stayed the same through the thumb gusset increases and subsequent decreases. I still had 72 stitches on the needles though so I needed to change the width of the fingers. That number happens to divide nicely by four so I made each finger 18 stitches around (9 from the front, 9 from the back, plus whatever extra I had to pick up or cast on). I changed the length of the fingers slightly too. The pinky ended up 13 rounds, the ring finger 14 rounds, and the other two were 18 rounds. (I had the Snook doing constant fittings, so that’s how I came up with these numbers.) The thumb was worked according to the pattern with a couple rows added for length. That was it for the glove, other than weaving in the ends.
For the mitten shell, I increased the number of stitches to 72 overall (to match the palm of the hand). So that meant I cast on 36 for the ribbing flap. Oh, and I used the larger 3.25mm needles here. Then I picked up 36 across the knuckles and started going around. I was worried at first because no matter how tightly I tugged the working yarn at the DPN joins, it always looked like there were huge ladders and gaps there. It seemed to resolve itself the further I knitted, though. I did the 17 rounds as stated and prepared to start the decreases, but it didn’t look like the shell was going to be long enough. So I modified the decrease pattern slightly. I did the “K to the last two stitches, K2tog”, then knitted a round even. Then I repeated the “K to the last two stitches, K2tog”. Then I added two lines to the pattern: “K6, K2tog. K 5 rounds even.” Followed the pattern all the way down to the last “K2tog on each needle” and realized I still had too many stitches, so I repeated that line again. That left me with the required four stitches for the I-cord. Unfortunately I still think the mitten shell’s a little small. The Snook’s fingers are rather broad and the mitten is a little too pointy, I think. I tried to block it out and was moderately successful. I think it’ll stretch and mold to his hand as he wears them.
One last pattern weirdness: At the end of the directions it says “Stitch the edges of the ribbing flap down along the sides of the hand” but the accompanying photos don’t show this. I wasn’t sure whether to do it, because as it is the flap pulls back nicely and lays flat. If you sew the edges down to the sides, you get a funky stretched bit right there when you pull the shell back. Eventually I decided to try it with some scrap wool and see how it worked. The Snook said he didn’t mind the wonkiness and it seemed to offer a little more insulation, so that’s what we went with. I still think the author could have clarified a bit better.