- in 2015 I went to a tech meetup that Dropbox were holding in a Sydney laneway, and I learned about an Aussie startup called Canva. I introduced myself to founder Cliff, did some research over the next week, and decided to talk him into hiring me. Two months later I was working there. It may well have been the most significant meetup of the hundreds I’ve been to over the years!
- in 2009 the Sydney CBD experienced a major power outage. It was a turning point in my relationship with Twitter, as the locals were having a lot of fun positing that zombies were running amok in the city. I jumped in and never looked back. (Well, until the end of 2022.)
- in 2007 Kim and Kelley Deal came into the knitting shop where I worked, and I didn’t even recognise them at first! Thank goodness my crappy mobile phone had a camera on it.
- in 2003 I knitted a bikini. No, I never wore it. Knitted bikinis look flattering on approximately 0.2% of the population.
Category: Meta
-
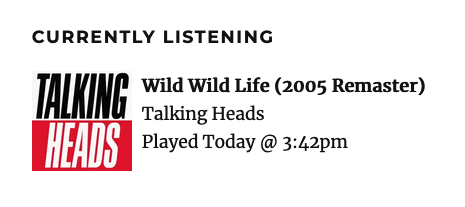
Scrobbling and it feels so good
I was cleaning up old blog posts today when I saw a mention of the widget I used to have (decades ago) that showed what I was listening to. “That would be fun to recreate,” I thought. How hard could it be?
Folks, I could find no way to easily embed my last played Apple Music song. The desktop app allows you to get iframe embed code for playlists, but there’s no playlist for your Recently Played. You can create a Smart Playlist of songs you’ve recently played, but this will only include songs in your library and not songs you’ve streamed. Also, you can’t embed a Smart Playlist anyway. There are no WordPress plugins that do this, and no third party apps that I could find. There is a Developer API for Apple Music, but to register as a developer you have to pay $99 a year. Yeah, no.
For a second I thought about switching back to Spotify. Double-plus no.
Then I remembered… scrobbling. That was a thing, right? Turns out it’s still a thing. But how to scrobble Apple Music? I mostly listen on my iPhone, and the consensus seems to be that Marvis Pro is the way to go. This app is basically a wrapper for Apple Music, but it has a massively customisable UI (the Redditors love it), it scrobbles to last.fm out of the box, and it’s only $15 AUD. I figured it was worth a shot. Installed the app, signed up for last.fm, and verified that scrobbling was happening. Now to hook it up to WordPress…
This post from RxBrad has a handy Javascript snippet that can be used in a WordPress Custom HTML widget. Too easy! I signed up for an API key and set up the script… but it wouldn’t work. In the Block Editor preview it would show the album, but when I published the widget, it would just show a broken image on the site. I noticed in the console that there were some errors about the ampersands, and I could see that WordPress was actually converting them to HTML entities. I banged my head on a wall for 10 minutes until the Snook woke up from his nap and I patiently explained the problem. Less than 2 minutes later he had solved it. Oh right! We used to always put HTML comment tags around our Javascript, back in the day. (Insert “Do not cite the Deep Magic to me, Witch” meme.) Once I added those, everything just worked!
So yeah, there it is over in the sidebar on the homepage.
Limitations:
- Marvis Pro only scrobbles while the app is open. So if my iPhone screen goes to sleep, it won’t sync again until I wake it up. It does sync the whole history then, but it does mean the sidebar isn’t really necessarily “live.” Do I care? Not at this point. If I do, I can apparently pay $10 to unlock background scrobbling via last.fm Pro.
- Marvis Pro doesn’t have a desktop app. If I want to scrobble from my Mac Mini, I’ll need to setup the last.fm desktop app. Can’t be arsed right now, but it’s an option.
-
Twitter Import via Apple Shortcut
 I have successfully imported my entire Twitter history to this blog! Each day’s tweets are grouped into a single post, published on the correct day. You can see all of the tweets here. I started with a JSON file with 3.4 million(!) lines and 52,813 tweets, and ended up with 4,941 WordPress posts (equivalent to 13.5 years) and just over 10,000 images. The full import took me over 40 hours to run. 😳
So how did I do it? I quit Twitter back in 2022 after the Nazi bought it and downloaded all my data at that time. After I did my recent Instagram import using an Apple Shortcut and the WordPress API, I wondered if the same method could be used for my tweet data. Turns out it can! I’ll describe what I did in case you want to do the same.
Caveats: This script only covers importing public tweets (not DMs or anything else), and I didn’t bother with any Likes or Retweet data for each one. I also skipped over .mp4 video files. (I’ve got around 200 and I’m still figuring out how to handle.)
Step 1 – Download your Twitter archive
I can’t actually walk you through this step, as my account is long gone. Hopefully yours is too, and you downloaded your data.
Once I unzipped the file, I found a pretty simple directory structure.
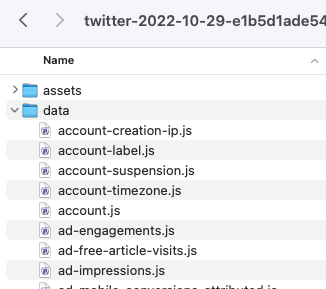
There’s a LOT of random information in there. For my import, I only needed two things: data/tweets.js for the details of the tweets, and data/tweets_media for the images.

Step 2 – Prepare the JSON
I needed to do a bit more work to prepare this JSON for import than I did with Instagram. First, I renamed tweets.js to tweets.json. When I opened it, I immediately noticed this at the very top:
window.YTD.tweets.part0 = [
  {
    "tweet" : {
      "edit_info" : {
        "initial" : {
          "editTweetIds" : [
            "1585904318913331200"
          ],
See that “window.YTD.tweets.part0 =” bit? That’s not valid JSON, so I deleted it so the file starts with just [ on the first line. Then I was good to go.
I then took a subset of the JSON and started experimenting with parsing it and importing. I noticed a couple problems right away. The first is how the tweet dates are handled:
"created_at" : "Fri Oct 28 08:00:28 +0000 2022",
WordPress isn’t going to like that. I knew I’d have to somehow turn that text into a date format that WordPress could consume.
The next problem is that each tweet was a standalone item in the JSON. To group them by days, I’d need to loop through and compare each tweet’s date with the one before, or else import each tweet as a standalone post. As a reminder, there were more than 52,000 tweets in my file. Yeah, that sucks. Definitely didn’t want to do that.
The last problem was with media. The Instagram JSON had a simple URI that pointed me exactly to the files for each post, but Twitter doesn’t have that. Eventually I worked out that you’re meant to search the tweets_media folder for images that start with the unique tweet ID. No, really, that’s what you’re meant to do. So I’d need to deal with that.
After discussing it with my husband Rodd, he reckoned that he could use jq to reformat the JSON, fixing the dates and ordering and grouping the tweets by day. (jq is a command line tool that lets you query and manipulate JSON data easily.) After a bit of hacking, he ended up with this little jq program:
jq -c '
[
  .[].tweet # Pull out a list of all the tweet objects
  | . + {"created_ts": (.created_at|strptime("%a %b %d %H:%M:%S %z %Y")|mktime)} # Parse created_at to an epoch timestamp and add it as `created_ts`.
  | . + {"created_date": (.created_ts|strftime("%Y-%m-%d"))} # Also add the date in YYYY-mm-dd form as `created_date` so we can collate by it later.
]
| reduce .[] as $x (null; .[$x|.created_date] += [$x]) # Use `reduce` to collate into a dictionary mapping created_date to a list of tweet objects.
| to_entries # Turn that dictionary into an array of objects like {key:<date>, value:[<tweet>, ...]}
| sort_by(.key) # Sort them by date
| .[] | { # Convert to a stream of objects like {date: <date>, tweets: [<tweet>, ...]}
  "date": (.key),
  "tweets": (.value|sort_by(.created_ts)) # Make sure the tweets within each day are sorted chronologically too.
}
' > tweets_line_per_day.json
That resulted in a new file called tweets_line_per_day.json that looked like this:

Each line is a single day, with an array of all the tweets from that day in order of posting. Because this was still a huge file, I asked him to break it into 50 chunks so I could process just a bit at a time. I also wanted the file extension to be .txt, as that’s what Shortcuts needs.
split --additional-suffix=.txt --suffix-length=2 --numeric-suffixes -n l/50 tweets_line_per_day.json tweet_days_
That resulted in 50 files, each named tweet_days_00.txt, etc. For the final manipulation, Shortcuts wants the stream of objects in an array, so he needed to use jq “slurp mode.” This also had the benefit of expanding the objects out from a single line per day into a pretty, human-readable format.
for FILE in tweet_days_??.txt; do jq -s . < $FILE > $(basename $FILE .txt)_a.txt; done
The end result of all that was a set of 50 files, each named tweet_days_00_a.txt, etc, suitable for parsing by an Apple Shortcut. They each looked like this:

Much better! This, I can work with. I copied these into my Twitter archive directory so I had everything in one place.
Step 3 – Create a media list
Rather than search through all the images in the media file, I created a simple text file that the Shortcut could quickly search as part of its flow. To do this, I opened a terminal window and navigated to the tweets_media folder.
ls > ../tweets_media.txt
That created a simple text file with all the named files in that folder. I also created two more blank files called permalinks.txt and errors.txt that I would use for tracking my progress through the import. I made sure all 3 files were in the top level of my Twitter archive directory.
Step 4 – Set up the Shortcut
You can download the Shortcut I created here. I’ll walk you through it bit by bit.
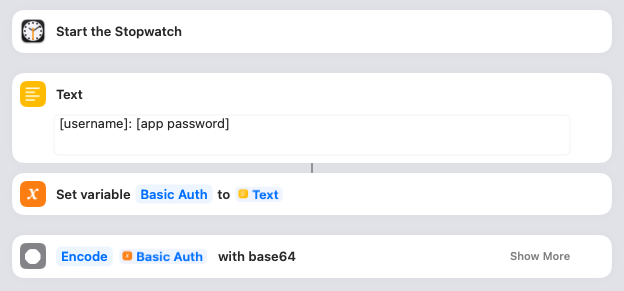
I wanted to keep track of how long the import took, so the first thing I did was Start the Stopwatch. You can omit that if you like, or keep it in. More importantly, this is where you give the Shortcut the details it needs to access your WordPress blog. You’ll need to create an Application Password and then put the username and password into the Text box as shown. The Shortcut saves that in a variable and then encodes it.
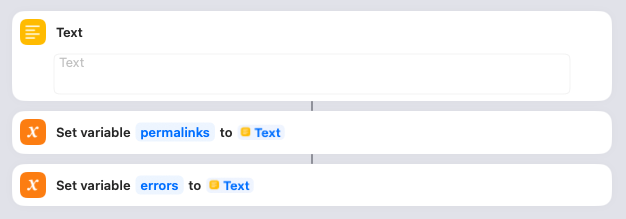
In order to show a list of all the posts that have been created at the end of the import (as well as any errors that have occurred), I create blank variables to collect them. Nothing for you to do here.

Next you need to decide what the title of each post will be. I’ve gone with “Shared today on Twitter,” but you might want to change that. The Shortcut saves that in a variable.
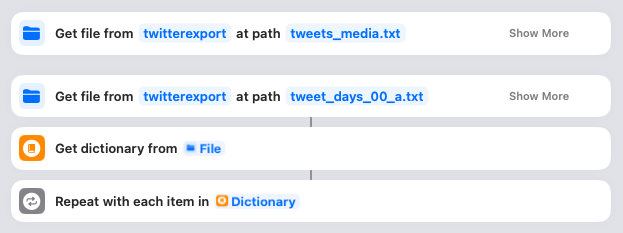
This is where it all starts to happen! You need to click on both of those “twitterexport” links and ensure they point to your downloaded Twitter archive directory. When you run the Shortcut, it’ll first look in that folder for the “tweets_media.txt” (the list of all media files) and read that into memory. Then it’ll look for the “tweet_days_00_a.txt” file and parse it, with each day becoming an item in the Dictionary. The Shortcut then loops through each of these days.
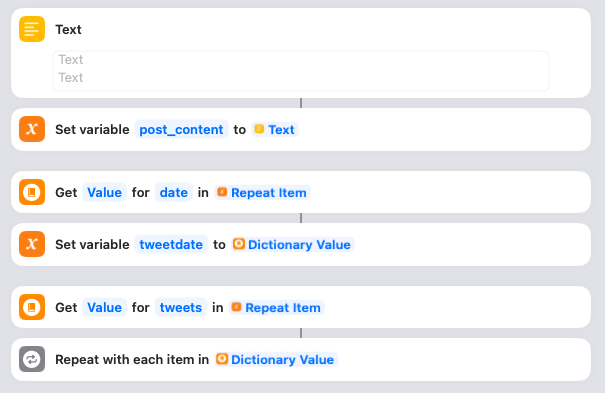
For each day, the Shortcut starts by setting a variable called post_content to blank. It also gets the date from the JSON and sets it in a variable called tweetdate. Then it grabs all the tweets for that day in preparation for looping through them. Nothing to do here.
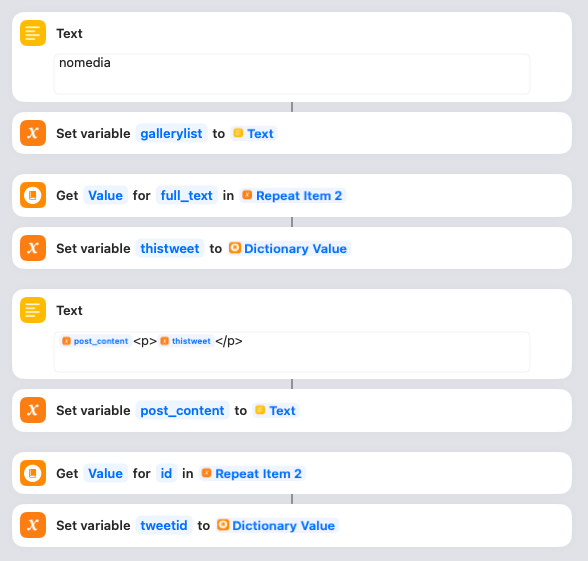
For each tweet, the Shortcut does a few things. First it sets a variable called gallerylist to “nomedia”. This variable is used to track whether there are any images for a post. Next it gets the actual text of the tweet and saves it in a variable called thistweet. Next it uses thistweet to update the post_content variable. I’ve simply wrapped each tweet in paragraph tags, but you can tweak this if you want. Lastly it gets the unique ID for the tweet and saves that in a variable called tweetid.
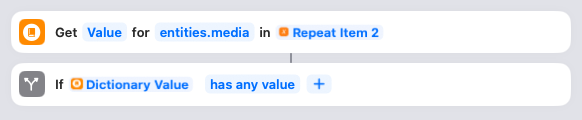
Now the Shortcut checks to see if there are any media items associated with the tweet. If not, it can skip the next section. If there are media items…
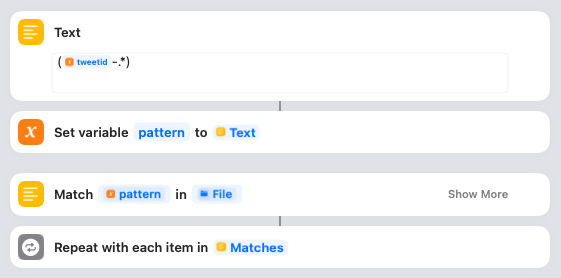
…then the Shortcut is going to search for them using regular expressions. First it defines a variable called pattern that is going to look for the tweetid followed by a hyphen and then any other characters. Then it matches that pattern to the tweets_media.txt file we read in towards to the start of the Shortcut. If it finds any matching media, it will loop through them one by one.
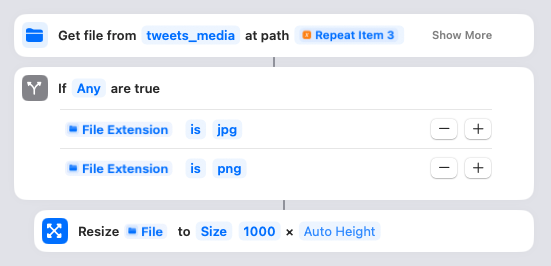
Here’s where the Shortcut actually gets the media file. The name of the file is the matched pattern from the regular expression search. You need to click on that “tweets_media” link and ensure it points to the correct folder in your Twitter archive directory. The filenames are relative to this parent, so it needs to be correct! Assuming the file is an image, it will resize it to 1000 pixels wide, maximum. (You can adjust that if you want, or take it out to leave them full-size.)
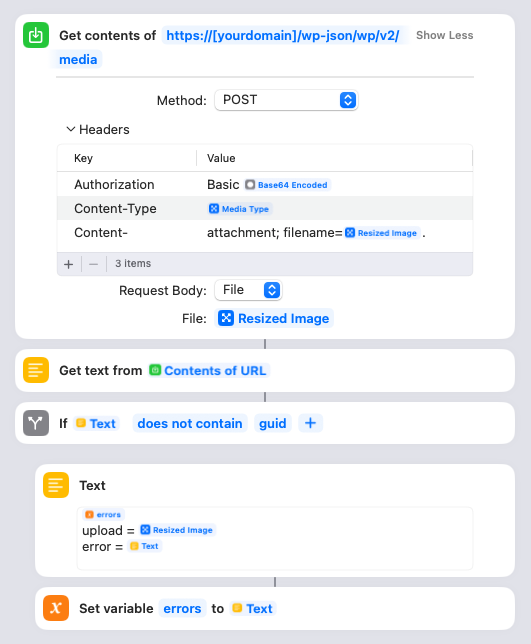
Here’s where the Shortcut actually uploads the resized media file to your site. You will need to put your own domain name into the URL there. Once the image is uploaded, the Shortcut will parse the response from your site and check if there’s an error. All successful responses should have “guid” in there, so if it’s not, it’ll save the name of the file it was trying to upload and the error message into the errors variable.
If the upload succeeded, it’ll instead save the ID of the newly uploaded image in the mediaid variable. Nothing to do here.
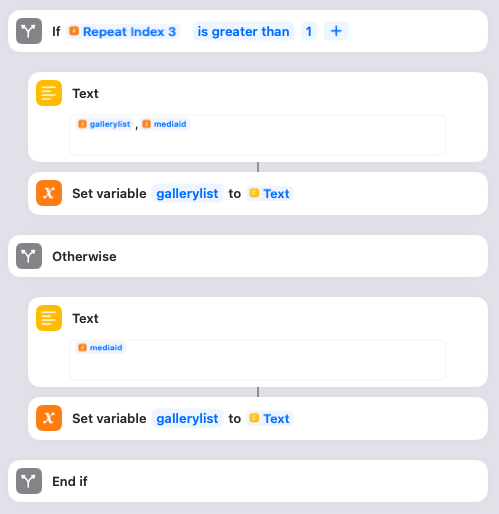
If the image is the first one attached to the tweet, the Shortcut will set the gallerylist variable to the mediaid. If there is more than one image attached to the tweet, each subsequent image will be appended with a comma separator. (You’ll see why later.) Nothing to do here.
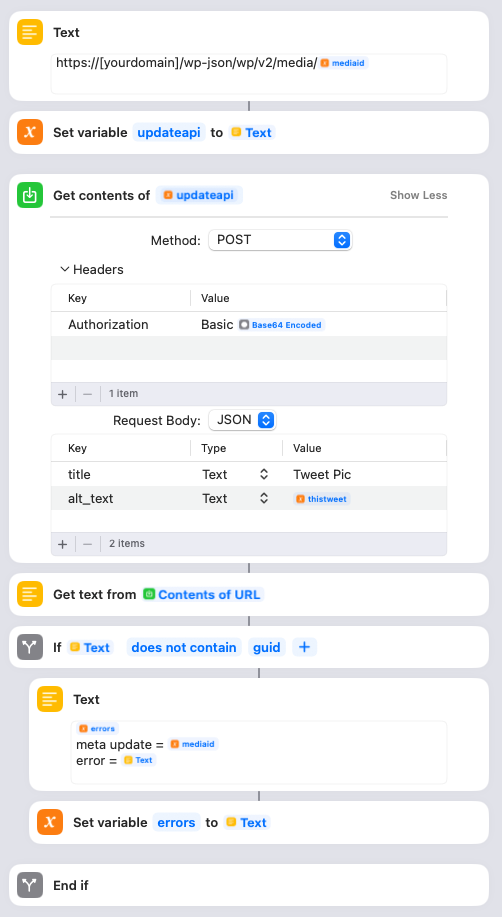
You need to update the Text box with your blog domain. This step is where the Shortcut updates the title and alt text of the image it just uploaded. The title is set to “Tweet Pic”, but you can change that to something else if you like. The alt text is set to the thistweet variable. If this update fails, the mediaid and error text are logged to the error variable.
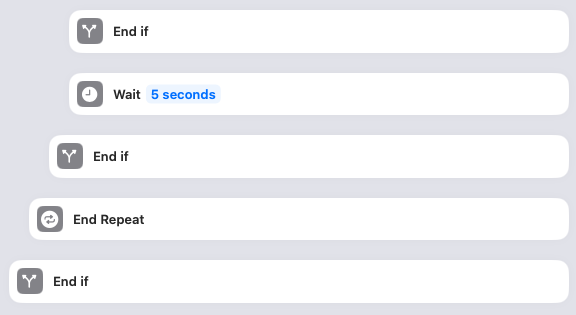
This closes the if statement checking whether the image succeeded, waits for 5 seconds, closes the if statement checking if the media item was an image, loops to the next media item in the post, and eventually closes the if statement checking whether the tweet had any media. You can remove the Wait if you want, or experiment with how long you want it to be. I added it because I didn’t want to DDoS my own site by blasting out API requests as fast as my MacPro can generate them. Otherwise nothing to do here.

Remember, we’re still looping through each tweet. The Shortcut then checks the gallerylist variable. If gallerylist is not set to “nomedia” (because there were media items attached to the tweet), then it updates the post_content variable to append a WordPress image gallery with the list of images for the tweet. I have configured the gallery to have 4 columns of thumbnail images, but you can adjust this if you prefer something else. Then the Shortcut is finished processing this particular tweet, and it appends a horizontal rule to the post_content. Again, you can change this if you want. And then it’s time to loop to the next tweet for this day in the JSON!
(Sidenote: gallerylist gave me some difficulty at first. Initially I set it to blank and then tried to check whether it was still blank at this point, but I found that Shortcuts doesn’t have a good way of testing whether something is null. Instead it’s better to set it to something, and then check whether it’s still that.)
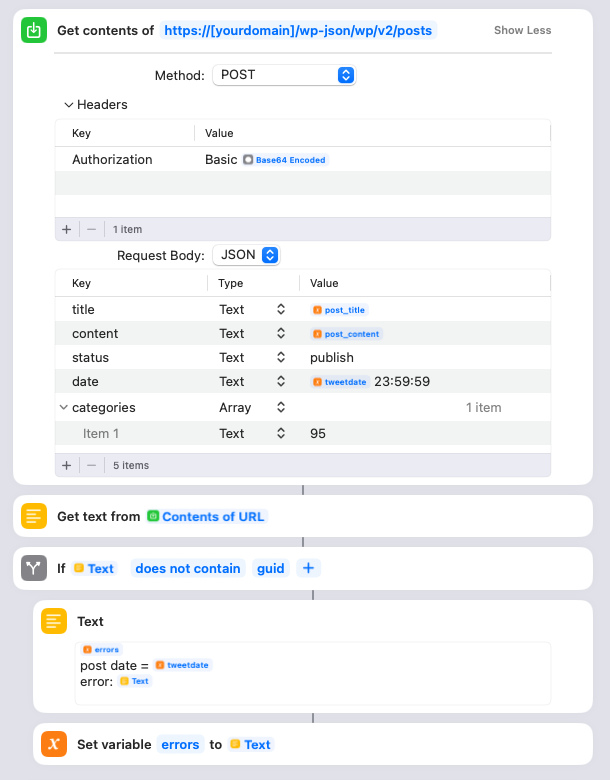
Once the Shortcut has looped through all the tweets for this particular day, it’s time to actually create the WordPress post. You need to adjust the URL to have your domain name. It uses the encoded username/password we created way up at the start. It uses the post_title variable we set at the start of the Shortcut as the title. The content is the post_content HTML that was created, and the date is the tweetdate plus the time 23:59:59. I also assign the post to a special WordPress category that I created ahead of time. You can either remove this, or change the category ID to the appropriate one from your site.
Also please note that I’ve set the status to “publish”. This means the posts will go live in WordPress right away, but since the publish date is in the past they won’t appear on your home page or in your RSS feeds.
The Shortcut will also check if there were any errors returned upon publishing the post, and if so save the post date and the error message in the errors variable.
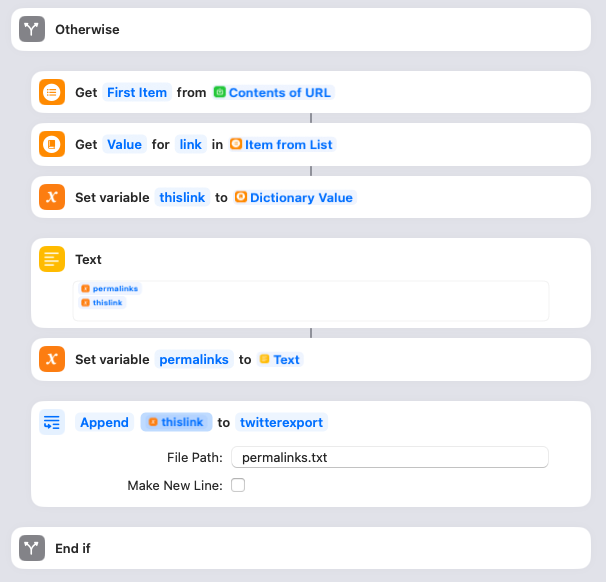
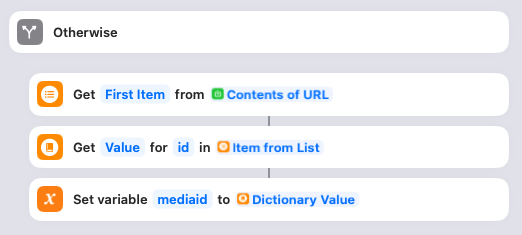
If there were no errors, the Shortcut parses the response from the WordPress API and pulls out the link to the post that’s been created. That link then gets appended to the list saved within the permalinks variable. I also append the link to the permalinks.txt file. Make sure the twitterexport directory actually points to the folder containing the permalinks.txt file!
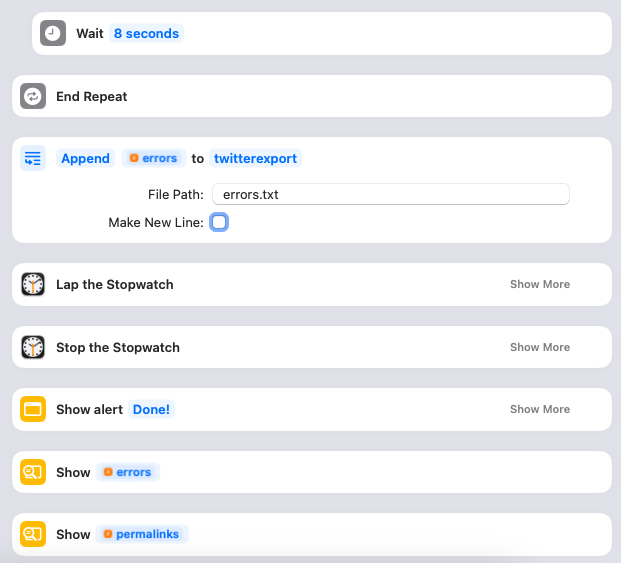
Once the post for the day is completed, I have another “wait” set for 8 seconds to space out the loops. You can remove this, or adjust as necessary. Then the whole thing loops back around to the next day in the JSON. Once all the days are processed, the Shortcut will append the errors variable to the errors.txt file. Make sure the twitterexport directory actually points to the folder containing the errors.txt file! It’ll then click the “Lap” button on the Stopwatch so you know how long this particular import took and then click “Stop” to stop it altogether. The Shortcut will then show an alert box that says “Done!”, then one with any errors that occurred, and then another with the list of permalinks.
Step 5 – Run the Shortcut
Once I had the Shortcut properly configured, I made sure it was pointing to the first import file – tweet_days_00_a.txt – and clicked the “Play” button to start the import. Shortcuts will highlight each step as it moves through the flow. Once it finishes, I checked if there were any errors and then loaded up the category on my site to see if everything looked okay. If all was well, I updated the Shortcut to point to the next import file – tweet_days_01_1.txt – and clicked Play again… over and over and over until all 50 were complete.
One last heads up – you’ll probably get a lot of Permissions requests from your Mac at first due to the large number of files you’re transferring. I just kept clicking the option to “Always Allow” and eventually it stopped asking.
After the import…
As mentioned, I still need to figure out how to handle the 200 video files that I skipped over. I’ll probably go through them individually and see if they’re worth keeping or if they were just stupid memes and gifs.
And that’s it! Suck it, Elon!
Oh, and if you’re wondering why the stopwatch image has more than 50 laps? It’s because once or twice I accidentally started processing the same import file again and had to frantically kill Shortcuts before it duplicated all of the posts and images. 🤦♀️